


CAUTION:
The
weight
of
this
part
or
unit
is
between
32
and
55
kilograms
(70.5
and
121.2
pounds).
It
takes
three
persons
to
safely
lift
this
part
or
unit.
(RSFTC205)
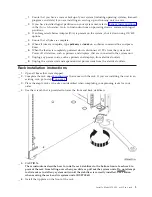
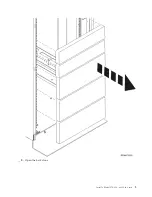
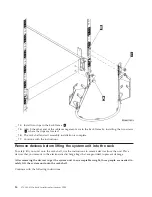
CAUTION:
When
the
unit
is
extended,
its
weight
can
turn
over
a
rack
that
is
not
steady.
Before
you
pull
the
unit
out
of
the
rack,
ensure
that
a
rack
stabilizer
is
attached
to
the
bottom
front
of
the
rack.
Do
not
pull
out
more
than
one
unit
at
a
time.
The
rack
can
turn
over
if
you
pull
out
more
than
one
unit
at
a
time.
(RSFTC224)
Before
you
begin
Before
you
begin
a
replacement
or
installation
task,
follow
these
steps:
__
1.
For
an
installation
and
if
possible,
for
a
replacement,
ensure
that
you
have
a
current
backup
of
your
system
(including
operating
system,
licensed
programs,
and
data).
If
you
have
backed
up
the
operating
system
and
licensed
programs
since
the
last
time
you
applied
PTFs,
that
backup
is
acceptable.
__
2.
Ensure
that
you
take
a
few
minutes
to
become
familiar
with
these
instructions.
__
3.
Ensure
that
you
have
access
to
a
medium
flat-bladed
screwdriver.
__
4.
If
there
are
incorrect,
missing,
or
visibly
damaged
parts,
contact
one
of
the
following:
v
Your
authorized
service
provider
v
In
the
United
States:
IBM
®
Rochester
Manufacturing
Automated
Information
Line
(R–MAIL)
at
1–800–300–8751
v
In
countries
outside
of
the
United
States:
Use
the
following
Web
site
to
locate
your
service
and
support
numbers:
http://www.ibm.com/planetwide
__
5.
If
you
are
installing
new
hardware
in
logical
partitions,
you
need
to
plan
and
understand
the
requirements
to
be
successful.
Go
to
in
the
Information
Center
.
Then
return
to
these
instructions.
__
6.
If
you
encounter
difficulties
during
the
procedure,
contact
your
authorized
service
provider
or
your
authorized
dealer.
__
7.
Determine
if
there
are
any
existing
PTF
prerequisites
before
you
install
your
new
feature.
Go
to
the
following
Web
site:
http://www-912.ibm.com/s_dir/slkbase.NSF/slkbase
a.
Select
All
Documents
.
b.
Select
General
Information
.
c.
Select
Offerings
.
d.
Select
Feature
Prerequisites
.
e.
Select
Customer
Installation
Features
Prerequisites
.
f.
Locate
your
feature
number
and
OS/400
®
release,
and
check
the
prerequisites.
Model
270,
800,
or
810
installation
in
a
rack
instructions
Some
of
the
figures
in
these
instructions
may
not
look
exactly
like
the
system
unit
that
you
have.
However,
the
steps
to
perform
the
task
are
the
same.
Are
you
installing
a
new
270,
800,
or
810
unit
in
a
rack?
__
Yes
:
Go
to
__
No
:
Continue
with
the
next
step.
2
270,
800,
810
In
Rack
Installation
Instructions
V5R3
Summary of Contents for Eserver i Series
Page 1: ...iSeries 270 800 and 810 units in a rack installation instructions Version 5 ERserver...
Page 2: ......
Page 3: ...iSeries 270 800 and 810 units in a rack installation instructions Version 5 ERserver...
Page 6: ...iv 270 800 810 In Rack Installation Instructions V5R3...
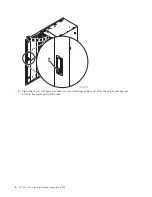
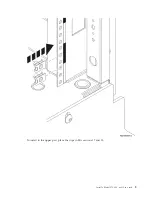
Page 11: ...__ 8 Open the back door Install a Model 270 800 or 810 in a rack 5...
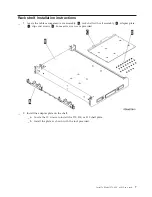
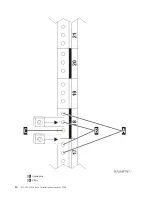
Page 16: ...A Guidepins B Clips 10 270 800 810 In Rack Installation Instructions V5R3...
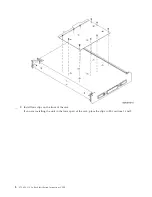
Page 35: ...__ 2 Install the access cover A Push in B Install a Model 270 800 or 810 in a rack 29...
Page 38: ...32 270 800 810 In Rack Installation Instructions V5R3...
Page 40: ...34 270 800 810 In Rack Installation Instructions V5R3...
Page 48: ...42 270 800 810 In Rack Installation Instructions V5R3...
Page 49: ......
Page 50: ...Printed in USA...