D10
Fan
Before
performing
the
following
procedure,
read
“Safety
Considerations”
on
page
41.
Hot-Swap
Fan
Assembly
Removal
To
remove
a
hot-swap
fan,
do
the
following:
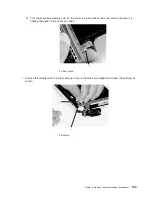
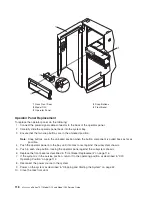
1.
Locate
the
cooling
fan
assembly
on
the
front
of
the
I/O
subsystem.
2.
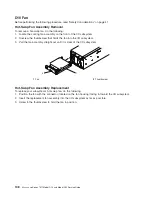
Unscrew
the
thumbscrew
that
holds
the
fan
into
the
I/O
subsystem.
3.
Pull
the
fan
assembly
straight
out
until
it
is
clear
of
the
I/O
subsystem.
1
2
1
Fan
2
Thumbscrew
Hot-Swap
Fan
Assembly
Replacement
To
replace
your
subsystem’s
hot-swap
fan,
do
the
following:
1.
Position
the
fan
with
the
connector
(located
on
the
fan
housing)
facing
in
toward
the
I/O
subsystem.
2.
Insert
the
replacement
fan
assembly
into
the
I/O
subsystem
as
far
as
possible.
3.
Screw
in
the
thumbscrew
to
hold
the
fan
in
position.
108
Eserver
pSeries
7311
Model
D10
and
Model
D20
Service
Guide
Summary of Contents for eserver pSeries 7311 D10
Page 1: ...pSeries 7311 Model D10 and Model D20 Service Guide SA38 0627 01 ERserver...
Page 2: ......
Page 3: ...pSeries 7311 Model D10 and Model D20 Service Guide SA38 0627 01 ERserver...
Page 8: ...vi Eserver pSeries 7311 Model D10 and Model D20 Service Guide...
Page 12: ...x Eserver pSeries 7311 Model D10 and Model D20 Service Guide...
Page 14: ...xii Eserver pSeries 7311 Model D10 and Model D20 Service Guide...
Page 25: ...1 Processor Subsystem 2 I O Subsystem Chapter 1 Reference Information 9...
Page 89: ...Chapter 3 Removal and Replacement Procedures 73...
Page 99: ...2 1 1 Top of Cassette 2 Handle Chapter 3 Removal and Replacement Procedures 83...
Page 179: ...D10 I O Subsystem Parts continued 1 2 3 4 5 6 7 Chapter 4 Parts Information 163...
Page 207: ......

