
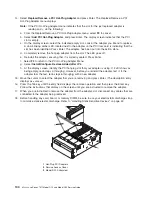


28.
If
you
have
other
options
to
install,
refer
to
“Model
D20
FRU
Replacement
Procedure
List”
on
page
112.
If
you
do
not
have
other
options
to
install,
continue
on
to
the
next
step.
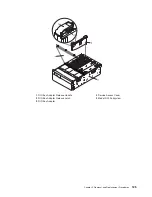
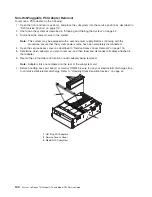
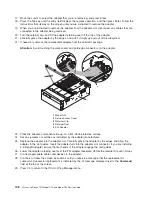
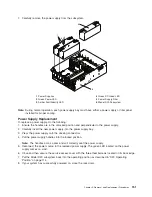
29.
Replace
the
service
access
cover
as
described
in
“Service
Access
Cover
Replacement”
on
page
115.
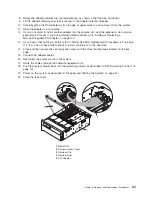
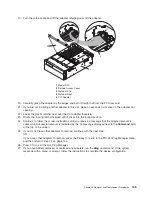
30.
Push
the
system
drawer
back
into
the
operating
position
as
described
in
“D20
Operating
Position”
on
page
114.
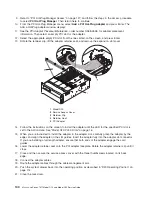
31.
Connect
the
adapter
cables.
32.
Route
the
cables
through
the
cable-management
arm.
33.
Close
the
rack
doors.
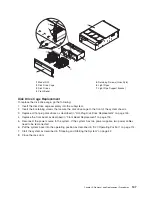
Replacing
a
Hot-Pluggable
PCI
Adapter
Attention:
The
Linux
operating
system
does
not
support
these
hot-plug
procedures.
Also,
Linux
does
not
support
hot-plugging
any
hot-pluggable
PCI
adapters.
Systems
with
Linux
installed
on
one
or
more
partitions
must
be
shut
down
and
powered
off
before
replacing
any
PCI
adapter
assigned
to
a
Linux
partition.
Follow
the
non-hot-pluggable
adapter
procedures
when
replacing
a
PCI
adapter
in
any
partition
with
Linux
installed.
Notes:
1.
Use
this
procedure
only
when
you
are
replacing
an
adapter
with
an
identical
adapter.
If
you
are
replacing
an
adapter
with
an
adapter
that
is
not
identical
to
the
adapter
removed,
go
to
“Hot-Pluggable
PCI
Adapter
Removal”
on
page
133
and
“Installing
a
Hot-Pluggable
PCI
Adapter”
on
page
139.
2.
Removing
a
hot-pluggable
PCI
adapter
requires
the
system
administrator
to
take
the
PCI
adapter
offline
before
performing
any
PCI
adapter
hot-plug
procedures.
Before
taking
an
adapter
offline,
the
devices
attached
to
the
adapter
must
be
taken
offline
as
well.
This
action
prevents
a
service
representative
or
user
from
causing
an
unexpected
outage
for
system
users.
For
additional
information
about
taking
an
adapter
offline
or
removing
it
from
the
system
configuration,
see
the
AIX
System
Management
Guide:
Operating
System
and
Devices
.
Documentation
for
the
AIX
operating
system
is
available
from
the
IBM
Eserver
pSeries
Information
Center
at
http://publib16.boulder.ibm.com/pseries/index.htm.
Select
AIX
documentation
.
The
AIX
Documentation
CD
contains
the
base
set
of
publications
for
the
operating
system,
including
system-management
and
end-user
documentation.
This
publication
is
also
contained
on
the
AIX
Documentation
CD.
The
documentation
is
made
accessible
by
loading
the
documentation
CD
onto
the
hard
disk
or
by
mounting
the
CD
in
the
CD-ROM
drive.
To
replace
a
hot-plug
PCI
adapter,
do
the
following:
1.
Open
the
front
and
rear
rack
doors,
and
place
the
system
into
the
service
position
as
described
in
“D20
Service
Position”
on
page
113.
2.
Remove
the
service
access
cover
as
described
in
“Service
Access
Cover
Removal”
on
page
115.
3.
Refer
to
the
PCI
Adapter
Placement
Reference
,
order
number
SA38-0538,
for
information
regarding
slot
restrictions
for
adapters
that
can
be
used
in
this
system.
4.
Before
handling
any
card,
board,
or
memory
DIMM,
be
sure
to
use
your
electrostatic
discharge
strap
to
minimize
static-electric
discharge.
Refer
to
“Handling
Static-Sensitive
Devices”
on
page
42.
5.
Determine
the
slot
from
which
you
are
removing
the
adapter.
6.
Ensure
that
any
processes
or
applications
that
might
use
the
adapter
are
stopped.
7.
Refer
to
“PCI
Hot-Plug
Manager
Access”
on
page
127,
and
follow
the
steps
in
the
access
procedure
to
select
PCI
Hot
Plug
Manager
.
Then
return
here
to
continue.
136
Eserver
pSeries
7311
Model
D10
and
Model
D20
Service
Guide
Summary of Contents for eserver pSeries 7311 D10
Page 1: ...pSeries 7311 Model D10 and Model D20 Service Guide SA38 0627 01 ERserver...
Page 2: ......
Page 3: ...pSeries 7311 Model D10 and Model D20 Service Guide SA38 0627 01 ERserver...
Page 8: ...vi Eserver pSeries 7311 Model D10 and Model D20 Service Guide...
Page 12: ...x Eserver pSeries 7311 Model D10 and Model D20 Service Guide...
Page 14: ...xii Eserver pSeries 7311 Model D10 and Model D20 Service Guide...
Page 25: ...1 Processor Subsystem 2 I O Subsystem Chapter 1 Reference Information 9...
Page 89: ...Chapter 3 Removal and Replacement Procedures 73...
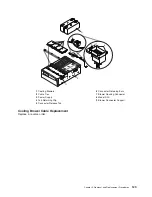
Page 99: ...2 1 1 Top of Cassette 2 Handle Chapter 3 Removal and Replacement Procedures 83...
Page 179: ...D10 I O Subsystem Parts continued 1 2 3 4 5 6 7 Chapter 4 Parts Information 163...
Page 207: ......