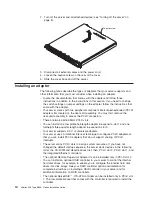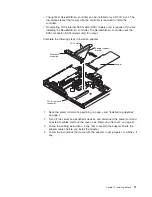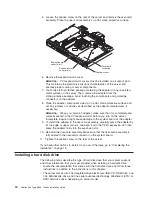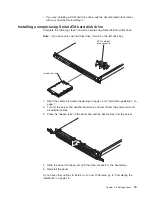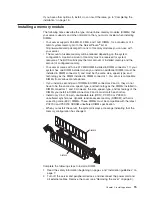
Attention:
To
avoid
breaking
the
retaining
clips
or
damaging
the
DIMM
connectors,
open
and
close
the
clips
gently.
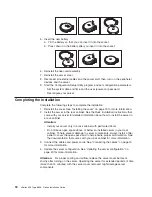
3.
Open
the
retaining
clip
on
each
end
of
the
DIMM
connector.
4.
Touch
the
static-protective
package
containing
the
DIMM
to
any
unpainted
metal
surface
on
the
server.
Then,
remove
the
DIMM
from
the
package.
5.
Turn
the
DIMM
so
that
the
DIMM
keys
align
correctly
with
the
slot.
6.
Insert
the
DIMM
into
the
connector
by
aligning
the
edges
of
the
DIMM
with
the
slots
at
the
ends
of
the
DIMM
connector.
Firmly
press
the
DIMM
straight
down
into
the
connector
by
applying
pressure
on
both
ends
of
the
DIMM
simultaneously.
The
retaining
clips
snap
into
the
locked
position
when
the
DIMM
is
firmly
seated
in
the
connector.
If
there
is
a
gap
between
the
DIMM
and
the
retaining
clips,
the
DIMM
has
not
been
correctly
inserted;
open
the
retaining
clips,
remove
the
DIMM,
and
then
reinsert
it.
If
you
have
other
options
to
install,
do
so
now.
Otherwise,
go
to
“Completing
the
installation”
on
page
18.
Replacing
a
fan
assembly
The
server
comes
with
four
replaceable
fans.
Complete
the
following
steps
to
replace
a
fan
assembly.
Use
this
procedure
to
replace
any
of
the
four
replaceable
fans.
1.
Read
the
safety
information
beginning
on
page
v
and
“Installation
guidelines”
on
page
7.
2.
Turn
off
the
server
and
peripheral
devices,
and
disconnect
the
power
cord
and
all
external
cables.
Remove
the
cover
(see
“Removing
the
cover”
on
page
9).
3.
Determine
which
fan
to
replace
by
checking
the
LED
at
each
fan;
a
lit
LED
indicates
the
fan
to
replace.
Note:
For
more
information
about
the
LEDs,
see
the
Hardware
Maintenance
Manual
and
Troubleshooting
Guide
on
the
IBM
xSeries
Documentation
CD.
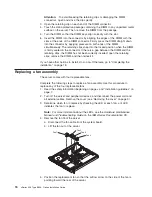
4.
Remove
the
fan
from
the
server:
a.
Disconnect
the
fan
cable
from
the
system
board.
b.
Lift
the
fan
out
of
the
server.
Fan 1
Fan 2
Fan 3
Fan 4
5.
Position
the
replacement
fan
so
that
the
airflow
arrow
on
the
side
of
the
fan
is
pointing
toward
the
rear
of
the
server.
16
xSeries
306
Type
8836:
Option
Installation
Guide
Summary of Contents for eServer xSeries 306 Type 8836
Page 1: ...xSeries 306 Type 8836 Option Installation Guide ERserver...
Page 2: ......
Page 3: ...xSeries 306 Type 8836 Option Installation Guide ERserver...
Page 42: ...30 xSeries 306 Type 8836 Option Installation Guide...
Page 44: ...32 xSeries 306 Type 8836 Option Installation Guide...
Page 45: ......
Page 46: ...Part Number 59P6591 Printed in USA 1P P N 59P6591...

