38
IBM FAStT200 and FAStT200 HA Storage Servers Installation and User’s Guide
Attention:
Never hot-swap a drive CRU when its green Activity LED is flashing. Hot-
swap a drive CRU only when its amber Fault LED is completely on and not flashing or
when the drive is inactive with the green Activity LED on and not flashing.
Before you install or remove drive CRUs, review the following information:
Filler panels
Storage servers without a full set of drives (10) contain filler panels in the
unused drive bays. Before installing new drives, you must remove the filler
panels. Save the filler panels for future use. Each of the 10 bays must always
contain either a filler panel or a drive CRU. Each filler panel contains a filler
piece for use with a slim drive.
Drive CRUs
The RAID controller supports up to 10 (half-high or slim) 40-pin Fibre Channel
hard disk drives. These drives come preinstalled in drive trays. This drive-
and-tray assembly is called a
drive CRU
(customer replaceable unit). You can
install the drive CRUs in the 10 drive bays on the front of the storage server.
Drive LEDs
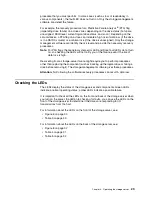
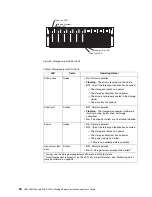
Each drive CRU has two LEDs, which indicate the status for that particular
drive. For information about the drive LED operating states and descriptions,
see Figure 6 on page 30 and Table 3 on page 30.
Fibre Channel loop IDs
When you install a drive CRU in the storage server, the drive CRU connects
into a printed circuit board called the
midplane
. The midplane automatically
sets the Fibre Channel loop ID to the default value 00.
Hot-swap hardware
The storage server contains hardware that you can use to replace a failed
hard disk drive without turning off the storage server. Therefore, you can
continue operating the system while a hard disk drive is removed or installed.
These drives are known as
hot-swap
drives.
Slim drives
You can install slim, hot-swap drive CRUs, which are slightly smaller than the
standard disk drive. These drive CRUs do not fill the entire drive bay. To
maintain proper airflow and cooling when you install a slim drive, you must
also install one of the filler pieces that are provided in the filler panels.
Installing hot-swap drives
Before you begin, do the following:
• Read the safety and handling guidelines that are provided in “Safety” on page iii
and “Handling static-sensitive devices” on page 37.
• Ensure that the current system configuration is working properly.
• Back up all important data before you make changes to storage devices, such as
hard disk drives.
Use the following procedure to install drives in the storage server. You can install
additional drives while the storage server is powered up and running.
Note:
If you are replacing a drive, see “Replacing hot-swap drives” on page 41.
1. Read the instructions that come with the drive CRU.
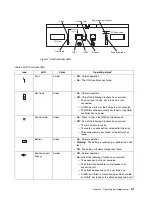
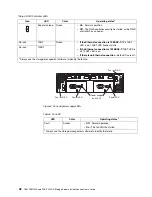
2. Check for Fault LEDs. If any amber LEDs are lit, see “Checking the LEDs” on
page 29 and “Troubleshooting” on page 65.
3. Determine the bay into which you want to install the drive.
Summary of Contents for FAStT200 HA
Page 1: ...IBM IBM FAStT200 and FAStT200 HA Storage Servers Installation and User s Guide SC21 P877 50...
Page 2: ......
Page 3: ...IBM IBM FAStT200 and FAStT200 HA Storage Servers Installation and User s Guide SC21 P877 50...
Page 10: ...viii IBM FAStT200 and FAStT200 HA Storage Servers Installation and User s Guide...
Page 26: ...8 IBM FAStT200 and FAStT200 HA Storage Servers Installation and User s Guide...
Page 34: ...16 IBM FAStT200 and FAStT200 HA Storage Servers Installation and User s Guide...
Page 42: ...24 IBM FAStT200 and FAStT200 HA Storage Servers Installation and User s Guide...
Page 54: ...36 IBM FAStT200 and FAStT200 HA Storage Servers Installation and User s Guide...
Page 88: ...70 IBM FAStT200 and FAStT200 HA Storage Servers Installation and User s Guide...
Page 94: ...76 IBM FAStT200 and FAStT200 HA Storage Servers Installation and User s Guide...
Page 112: ...94 IBM FAStT200 and FAStT200 HA Storage Servers Installation and User s Guide...
Page 113: ......


