20.
Press
firmly
on
the
captive
screws
and
tighten
them
with
a
screwdriver,
alternating
between
screws
until
they
are
tight.
If
possible,
rotate
each
two
full
rotations
at
a
time.
Repeat
until
the
screws
are
tight.
Do
not
overtighten
the
screws
by
using
excessive
force.
If
you
are
using
a
torque
wrench,
tighten
the
screws
to
8.5
to
13
Newton-meters
(Nm)
(6.3
to
9.6
inch-pounds).
If
you
have
other
options
to
install
or
remove,
do
so
now;
otherwise,
go
to
“Completing
the
installation”
on
page
34.
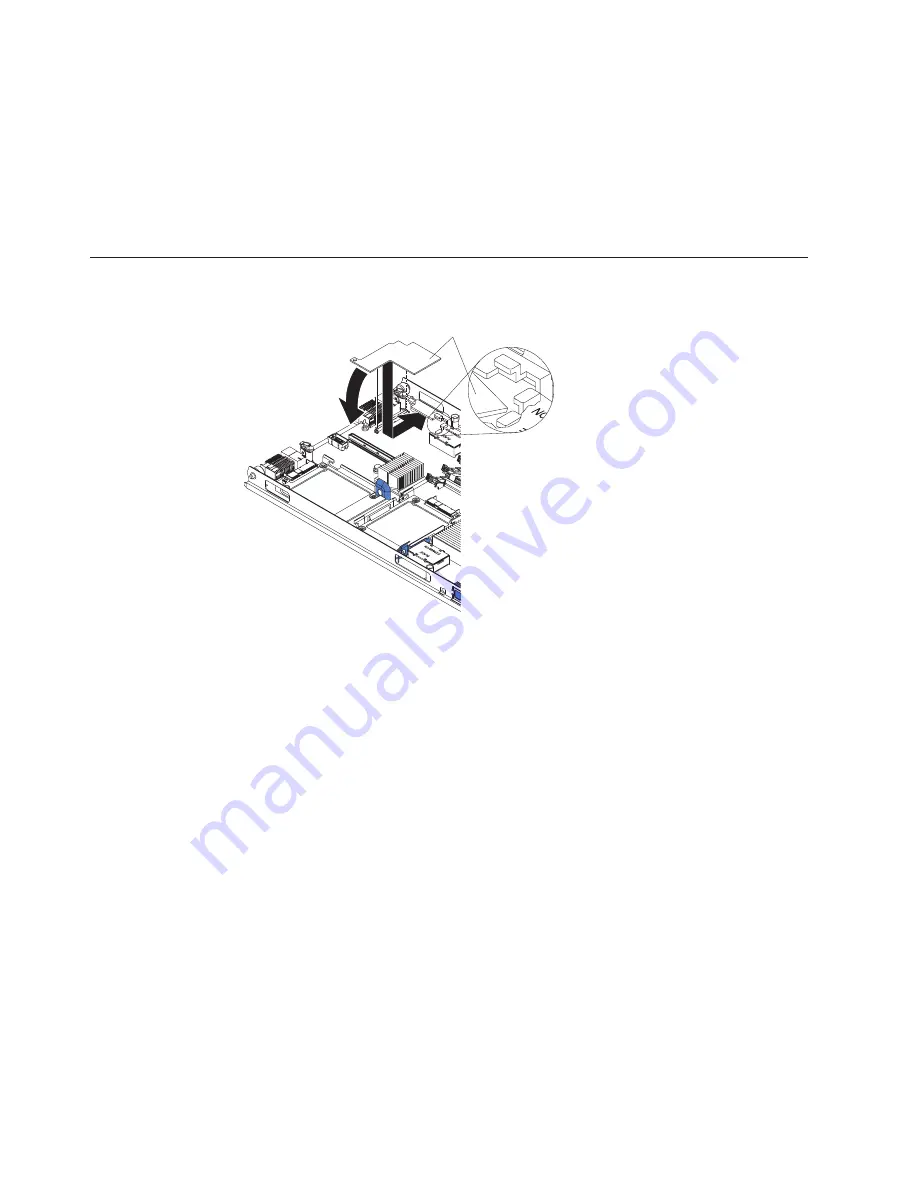
Installing
a
Concurrent
KVM
Feature
Card
The
following
illustration
shows
how
to
install
a
cKVM
Feature
Card.
cKVM feature card
To
install
a
cKVM
Feature
Card,
complete
the
following
steps:
1.
Read
the
safety
information
that
begins
on
page
v
and
“Installation
guidelines”
on
page
15.
2.
If
the
blade
server
is
installed
in
a
BladeCenter
unit,
remove
it
(see
“Removing
the
blade
server
from
the
BladeCenter
unit”
on
page
17
for
instructions).
3.
Carefully
lay
the
blade
server
on
a
flat,
static-protective
surface.
4.
Open
the
blade
server
cover
(see
“Opening
the
blade
server
cover”
on
page
18
for
instructions).
5.
If
a
Memory
and
I/O
Expansion
Blade
is
installed,
remove
it
(see
“Removing
an
expansion
unit”
on
page
19).
6.
If
a
small-form-factor
expansion
card
or
a
high-speed
expansion
card
is
installed,
remove
it.
7.
Touch
the
static-protective
package
that
contains
the
cKVM
Feature
Card
to
any
unpainted
metal
surface
on
the
BladeCenter
unit
or
any
unpainted
metal
surface
on
any
other
grounded
rack
component;
then,
remove
the
card
from
the
package.
8.
Locate
the
cKVM
connector
and
orient
the
cKVM
Feature
Card.
9.
Slide
the
right
side
of
the
card
(the
side
of
the
card
that
is
away
from
the
cKVM
connector)
between
the
two
tabs
at
the
right
side
of
the
expansion
card
bracket;
then,
gently
pivot
the
card
into
the
connector.
Note:
For
device-driver
and
configuration
information
needed
to
complete
the
installation
of
the
cKVM
Feature
Card,
see
the
documentation
that
comes
with
the
card.
28
BladeCenter
HS21
Type
8853:
Installation
and
User’s
Guide
Summary of Contents for HS21 - BladeCenter - 8853
Page 3: ...BladeCenter HS21 Type 8853 Installation and User s Guide...
Page 60: ...48 BladeCenter HS21 Type 8853 Installation and User s Guide...
Page 78: ...66 BladeCenter HS21 Type 8853 Installation and User s Guide...
Page 79: ......
Page 80: ...Part Number 44W1496 Printed in USA 1P P N 44W1496...


