background image

Print media guide

Page 1 of 2

Print media guide

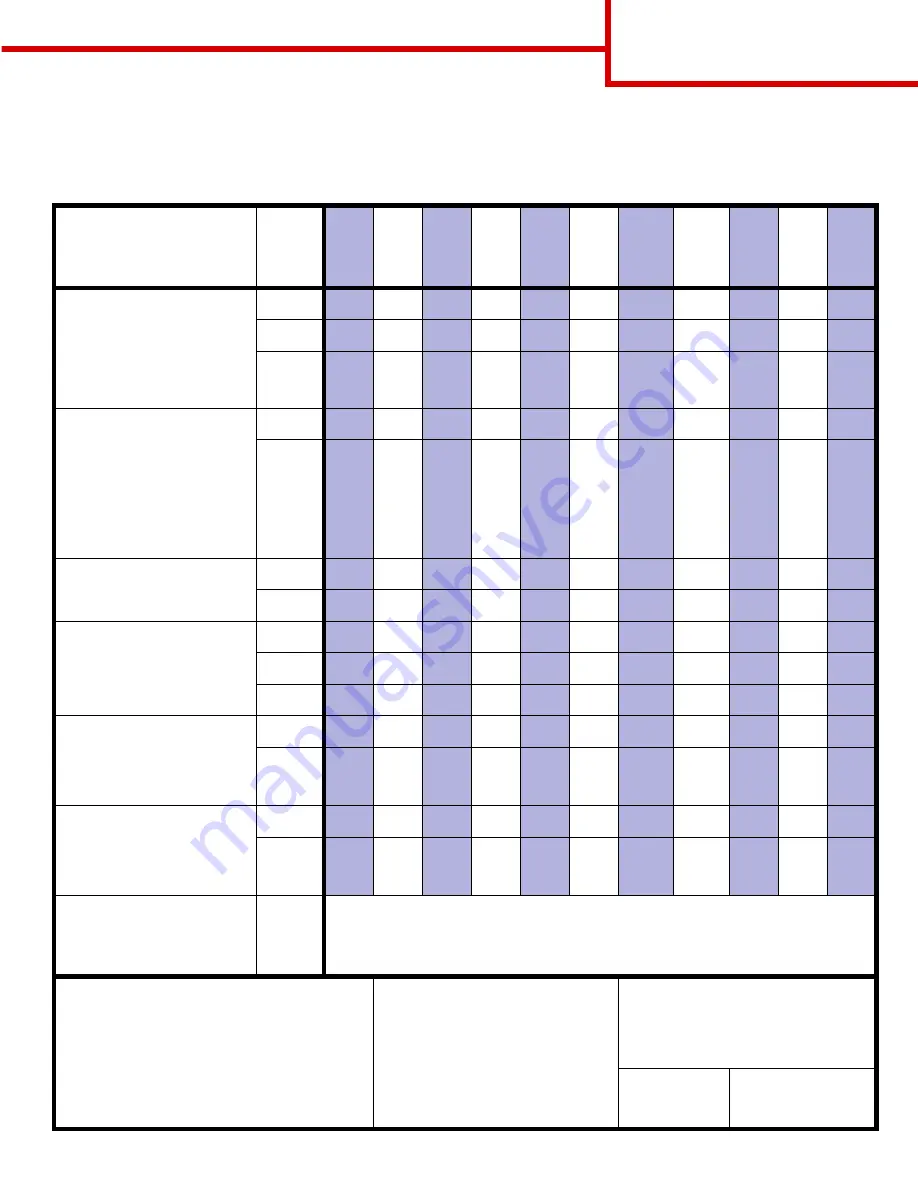
The printer supports the following standard print media sizes. The Universal setting lets you select custom sizes 
up to the maximum specified.

Print media

Source

A4

(2

10

 x

 29

7 m

m

)

A5

(1

48

 x

 21

0 m

m

)

JIS B

5

(1

82

 x

 25

7 m

m

)

Statem

ent

(5

.5

 x 8

.5 in

.)

Lette

r

(8

.5

 x 1

1

 in

.)

Folio

(8

.5

 x 1

3

 in

.)

Lega

l

(8

.5

 x 1

4

 in

.)

Ex

ecu

tive

(7

.2

5 x 

10.

5 i

n

.)

U

n

ive

rsal

(5

.5

 x 8

.27

 in.

to

 8

.5 x 

14 

in

.)

U

n

ive

rsal

(2

.7

5 x 

5 i

n

.

to

 9

.01

 x 14

 in.)

U

n

ive

rsal

(5

.8

3 x 

7.1

7

 i

n

.

to

 8

.5 x 

14 

in

.)

Plain paper 

1, 2

Grain long (Light):

60–74.9 g/m

2

 (16–19.9 lb bond)

Grain long (Normal):

75–119.9 g/m

2

 (20–31.9 lb bond)

Grain long (Heavy):

120–176 g/m

2

 (32–47 lb bond)

500 

7

2000 

8

MPF 

9

Card stock 

2

Upper limit, grain long:

Index Bristol:

163 g/m

2

 (90 lb)

Tag:

163 g/m

2

 (100 lb)

Cover:

176 g/m

2

 (65 lb)

Upper limit, grain short:

Index Bristol:

199 g/m

2

 (110 lb)

Tag:

203 g/m

2

 (125 lb)

Cover:

216 g/m

2

 (80 lb)

500

MPF

Transparency

161–169 g/m

2

 (43–45 lb bond)

500

MPF

Glossy paper

Gloss Book, grain long:

88–176 g/m

2

 (60–120 lb book)

Gloss Cover, grain long:

162–176 g/m

2

 (60–65 lb cover)

500

2000

MPF

Labels

Paper:

 3

180 g/m

2

 (48 lb bond)

Dual-Web: 

3

180 g/m

2

 (48 lb bond)

Polyester:

220 g/m

2

 (59 lb bond)

Vinyl: 

3, 4

300 g/m

2

 (92 lb bond)

500

MPF

Integrated forms (labels)

 5

Pressure sensitive area:

140–175 g/m

2

Paper base (grain long):

75–135 g/m

2

 (20–36 lb bond)

500

MPF

Envelope 

6

60–105 g/m

2

 (16–28 lb bond)

MPF

7¾ Envelope (3.875 x 7.5 in.)

DL Envelope (110 x 220 mm)

9 Envelope (3.875 x 8.9 in.)

C5 Envelope (162 x 229 mm)

10 Envelope (4.12 x 9.5 in.)

B5 Envelope (176 250 mm)

Other Envelope (98.4 x 162 mm to 176 x 250 mm)

1

Paper less than 75 g/m

2

 (20 lb) is limited to simplex only 

at less than 60% relative humidity and is not supported 
in duplex. The duplex option supports the same weights 
and types as the printer except for paper 60–74.9 g/m

2


(16–19.9 lb) grain long bond, A5 cardstock, envelopes, 
transparencies, vinyl labels, and polyester labels.

2

For 60–176 g/m

2

 (16–65 lb) paper, grain long fibers are 

recommended. For papers heavier than 176 g/m

2


(65 lb), grain short is preferred.

3

Multipurpose feeder weights differ:
• Paper:

199 g/m

2

 (53 lb)

• Dual-Web: 199 g/m

2

 (53 lb)

• Vinyl:

260 g/m

2

 (78 lb liner)

4

Vinyl labels are supported only when 
printing environments and media are 
20–32.2° C (68–90° F).

5

Pressure sensitive area must enter the 
printer first.

6

Sulfite, wood-free, or up to 100% cotton 
bond.
• 100% cotton content maximum weight is 

90 g/m

(24 lb) bond.

• 28 lb bond envelopes are limited to 25% 

cotton content.

7

500-sheet tray

8

2000-sheet tray

9

Multipurpose feeder

Summary of Contents for INFOPRINT COLOR 1454

Page 1: ...Infoprint Color 1454 1464 Help guide G510 4097 00 ...

Page 2: ......

Page 3: ...Infoprint Color 1454 1464 Help guide G510 4097 00 ...

Page 4: ......

Page 5: ...ng supplies installing maintenance kits and troubleshooting It also provides general information for administrators Drivers CD The drivers CD contains the necessary printer drivers to get your printer up and running It may also contain printer utilities screen fonts and additional documentation Other languages The Help Menu pages User s Guide and Setup Guide are also available on the publications ...

Page 6: ...ices or standard color systems Auto Applies different color conversion tables to each object on the printed page depending on the type of object and how the color for each object is specified Off No color correction is implemented Manual Lets you customize the color conversion tables applied to each object on the printed page depending on the type of object and how the color for each object is spe...

Page 7: ... or no color conversion tables Vivid Prints RGB samples using Vivid color conversion tables US CMYK Prints CMYK samples using US CMYK color conversion tables Euro CMYK Prints CMYK samples using Euro CMYK color conversion tables Off CMYK Prints CMYK samples using Off or no color conversion tables Vivid CMYK Prints CMYK samples using Vivid CMYK color conversion tables Manual Color To let users custo...

Page 8: ...k needed to reproduce a particular color How is color specified in a document to be printed Software applications typically specify document color using RGB or CMYK color combinations Additionally they commonly let users modify the color of each object in a document Since the procedures to modify colors will vary depending on the application refer to the software application Help section for instr...

Page 9: ...ghtly increase or decrease the amount of toner used for the chosen color For example if a user believes the overall printed page to be too red then decreases to both magenta and yellow could potentially improve color preference Is it possible to increase the gloss in the printed output Additional gloss can be obtained by printing using the 1200 dpi Print Resolution setting My color transparencies ...

Page 10: ...identify the box whose color is the closest to the desired color The color combination labeled on the box can then be used for modifying the color of the object in a software application The software application Help section should provide instructions for modifying the color of an object Manual Color Correction may be necessary to utilize the selected color conversion table for the particular obj...

Page 11: ...ot be exactly as expected based on the Color Samples pages CMYK Text Auto US CMYK Off Off CMYK Manual US CYMK Vivid CMYK Off Euro CMYK Graphic Auto US CMYK Off Off CMYK Manual US CYMK Vivid CMYK Off Euro CMYK Image Auto US CMYK Off Off CMYK Manual US CYMK Vivid CMYK Off Euro CMYK Color specification of object being printed Classification of object being printed Printer Color Correction setting Col...

Page 12: ... slide the guide to the correct position for the size paper you are loading 4 Flex the sheets back and forth to loosen them and then fan them 5 Place the paper against the back left corner of the tray print side down 6 Squeeze the front guide lever and slide the guide until it firmly touches the stack of paper 7 Reinstall the tray 8 If you are loading a different type of media than was previously ...

Page 13: ...aper types or sizes 5 When you see the correct paper type or size press Select to save the setting as the default 6 Press Go to return the printer to the Ready state Printing on specialty media transparencies labels and so on Follow these instructions when you want to print on media such as transparencies card stock glossy paper labels or envelopes 1 Load the print media as specified for the tray ...

Page 14: ...d appear in the Printers folder Use the drivers CD that shipped with your printer to install the custom printer driver and obtain all the enhanced printer features and functionality Using Windows Server 2003 Windows 2000 Windows XP and Windows 98 SE Windows Me and Windows NT 1 Insert the drivers CD If the CD does not auto launch click Start à Run and then type D Setup exe in the Run dialog box Not...

Page 15: ... create a desktop printer icon Macintosh 8 6 9 x or create a queue in the Print Center or Printer Setup Utility Macintosh OS X Creating a desktop printer icon Macintosh 8 6 9 x 1 Install a printer PostScript Printer Description PPD file on your computer Note A PPD file provides detailed information about the capabilities of a printer to your Macintosh computer a Insert the drivers CD b Double clic...

Page 16: ...able is properly connected and the printer is turned on After the printer appears in the Printer List you can quit Print Center or Printer Setup Utility UNIX Linux Local printing is supported on many UNIX and Linux platforms such as Sun Solaris and Red Hat Some printer driver packages are available on the drivers CD The User s Guide in each package gives detailed instructions for installing and us...

Page 17: ...e 3 and begin with step 2 Note You can find instructions for other methods of setting the IP address in the online documentation on the drivers CD that shipped with your printer Launch the CD and then click View Documentation Network Printer Install If your network is not using DHCP then you must manually assign an IP address to the printer One of the easiest ways is to use the operator panel 1 Pr...

Page 18: ... created and appear in the Printers folder For basic printer functionality you can install a system printer driver The system printer driver presents a consistent user interface for use with all the printers on your network However using a custom printer driver provides enhanced printer features and functionality such as printer status alerts Follow the steps for your printing configuration and op...

Page 19: ...t page to verify printer installation Direct printing using Windows 95 and Windows 98 first edition For information about Windows 95 and Windows 98 first edition direct printing refer to the User s Guide on the publications CD Shared printing from a server using Windows NT 4 0 Windows 2000 Windows XP and Windows Server 2003 After connecting your printer to a Windows NT 4 0 Windows 2000 Windows XP ...

Page 20: ...server computer to the client computer and for a new printer object to be added to the Printers folder The time this takes varies based on network traffic and other factors 5 Close Network Neighborhood 6 Print a test page to verify printer installation Using the peer to peer method With this method the printer driver is fully installed on each client computer Network clients retain control of driv...

Page 21: ...p page under AppleTalk for Zone 3 Select the new printer from the list 4 If you don t know which printer to select look on the Network Setup page under the AppleTalk heading to find the default name of the printer 5 Click Create 6 Make sure there is an icon next to the printer name in the Chooser 7 Close the Chooser window 8 Verify printer installation a Click the desktop printer icon you just cre...

Page 22: ...reate an AppleTalk print queue see Using AppleTalk on page 9 1 Open Finder click Applications and then click Utilities 2 Double click Print Center or Printer Setup Utility 3 Choose Add Printer from the Printers menu 4 Choose IP Printing from the pop up menu 5 Enter the IP address or the printer DNS name in the Printer s Address box 6 Choose the printer manufacturer from the Printer Model pop up me...

Page 23: ... lb bond Vinyl 3 4 300 g m2 92 lb bond 500 MPF Integrated forms labels 5 Pressure sensitive area 140 175 g m2 Paper base grain long 75 135 g m2 20 36 lb bond 500 MPF Envelope 6 60 105 g m2 16 28 lb bond MPF 7 Envelope 3 875 x 7 5 in DL Envelope 110 x 220 mm 9 Envelope 3 875 x 8 9 in C5 Envelope 162 x 229 mm 10 Envelope 4 12 x 9 5 in B5 Envelope 176 250 mm Other Envelope 98 4 x 162 mm to 176 x 250 ...

Page 24: ...n paper before you load it Do not overload the trays or the multipurpose feeder Make sure the stack height does not exceed the maximum height indicated Push all trays firmly into the printer after loading them Make sure the guides in the trays are properly positioned for the size paper you have loaded Do not send jobs to staple hole punch or offset for transparencies labels or card stock We recomm...

Page 25: ...r beside Tray 1 200 Paper Jam Area C Paper input options 500 sheet drawer or 2000 sheet drawer 24 x Paper Jam Areas 1 6 Finisher 28 x Paper Jam Area M Mailbox or output expander 27 x Paper Jam Area L Upper right access door redrive area 201 Paper Jam 202 Paper Jam Area K Lower right access door fuser area 201 Paper Jam 202 Paper Jam Area J Duplex tray 230 Paper Jam Area D Front access door 201 Pap...

Page 26: ...jam message persists paper may be caught in the image transfer unit Refer to the User s Reference located on the publications CD for information about clearing this type of jam 201 Paper Jam Fuser area D K L Follow the instructions for clearing Area D Area K and Area L If the jam message persists paper may be caught in the fuser See Clearing fuser jams on page 6 for instructions 202 Paper Jam Fuse...

Page 27: ...a C 1 If you have one or more optional 500 sheet drawers a Open the 500 sheet drawer access door Hold the door down while removing jams Note Make sure the entire paper stack is loaded correctly and pushed all the way down into the tray b Close the door 2 If you have an optional 2000 sheet drawer a Open the 2000 sheet drawer access door Pull the jam down and out of the rollers b Close the door Area...

Page 28: ...ollers 2 Reinstall the duplex mechanism in the printer Area T x 1 If you cannot clear all the 500 sheet drawer jams from Area C a Carefully open trays 2 through 4 all 500 sheet trays and remove jams Note Make sure the paper is pushed all the way down into the tray b Close trays 2 through 4 2 If you cannot clear the 2000 sheet drawer jam from Area C a Open the 2000 sheet drawer Note Any image print...

Page 29: ... jams and then close the door Area L 1 Open the upper right access door 2 Remove jams from the rollers and then close the door Clearing mailbox or output expander jams Area M 1 Open the rear door of the 5 bin mailbox or output expander 2 Pull the jam straight out and then close the door ...

Page 30: ... it aside 6 Lift up the fuser roller cover and remove the jam 7 Close the fuser roller cover 8 Snap the housing back onto the fuser 9 Insert the fuser back into the printer 10 Slide the latches out and then pull up to refasten them 11 Close the doors Clearing image transfer unit jams Refer to the User s Reference located on the publications CD for information about clearing this type of jam Cleari...

Page 31: ...s occur every 148 mm 5 8 in Marks occur on every third or sixth page in any color Replace the image transfer unit Color misregistration Color has shifted outside of the appropriate area or has been superimposed over another color area Top to Bottom or Left to Right 1 Re seat the cartridges by removing them from the printer and then reinserting them 2 Adjust the Color Alignment under the Utilities ...

Page 32: ... in more than one printer Select a different Toner Darkness setting from the printer driver before sending the job to print Perform a Color Adjust in the Utilities Menu Load paper from a new package Avoid textured paper with rough finishes Make sure the paper you load in the trays is not damp Make sure the printer s paper type paper texture and paper weight settings match the type of paper you are...

Page 33: ... from Plain to CardStock or other appropriate weight Replace the fuser Gray background The Toner Darkness setting is too dark The print cartridges are defective Select a different Toner Darkness setting from the printer driver before sending the job to print Replace the print cartridges Uneven print density The print cartridges are defective The transfer roller is worn or defective The image trans...

Page 34: ...e Card Stock Label Guide available on our Lexmark Web site at www lexmark com for detailed specifications Refer to Paper and specialty media specifications in the User s Guide on the publications CD Blank pages One or more print cartridges are defective or empty Replace the defective print cartridges Solid color pages The print cartridges are defective Your printer requires servicing Replace the p...

Page 35: ...y moved from one location within an office to another following these precautions The printer must remain in an upright position Any cart used to move the printer should have a surface able to support the full footprint of the printer Severe jarring movements may cause damage to the printer and must be avoided Preparing the printer for shipment To transport the printer by vehicle or by commercial ...

Page 36: ......

Page 37: ... Satisfied Satisfied Neutral Dissatisfied Very Dissatisfied Accurate h h h h h Complete h h h h h Easy to find h h h h h Easy to understand h h h h h Well organized h h h h h Applicable to your tasks h h h h h Please tell us how we can improve this book Thank you for your responses May we contact you h Yes h No When you send comments to IBM you grant IBM a nonexclusive right to use or distribute y...

Page 38: ...stems Depatment H7FE Building 004N PO Box 1900 Boulder CO 80301 9817 _ _ _ _ _ _ _ _ _ _ _ _ _ _ _ _ _ _ _ _ _ _ _ _ _ _ _ _ _ _ _ _ _ _ _ _ _ _ _ _ _ _ _ _ _ _ _ _ _ _ _ _ _ _ _ _ _ _ _ _ _ _ _ _ _ _ _ _ _ _ _ _ _ _ _ _ _ _ _ _ _ _ _ _ _ _ _ _ _ _ _ _ _ _ _ _ _ _ _ _ _ _ _ _ _ _ _ _ _ _ _ _ _ _ _ _ _ _ _ _ _ _ _ _ _ _ _ _ _ _ _ _ _ _ _ _ _ _ _ _ _ _ _ _ _ _ _ _ _ _ _ _ _ _ _ _ _ _ _ _ _ _ _ _ _ _...

Page 39: ......

Page 40: ... Part Number 75P6580 Printed in USA G510 4097 00 1P P N 75P6580 ...

Reviews: