


Note:
You can rapidly find
your e-mail recipient by
pressing
#
and entering the
shortcut number on the MFP
control panel.
Creating
permanent FTP
destinations
Note:
Before you create a
destination, check the list at
the bottom of the Web page.
Make sure your recipient is
not already listed.
Note:
You can rapidly find
your FTP recipient by
pressing
#
and entering the
shortcut number on the MFP
control panel.
9
Assign a shortcut number (1–245) to the destination (optional).
10
Click
Add/Modify
. This new destination is now available for
selection from the MFP control panel menu.
Create a separate recipient entry for each destination and give them
unique names easily identified in the destinations list.
1
Type the IP address of the MFP in the URL field of your
browser, and then press
Enter
.
2
Click
Configuration
.
3
Under the MFP heading, click
Manage Destinations
.
4
Click
FTP Destinations Setup
.
5
Enter a unique name for the destination.
6
Enter Server name, Log-in, Password, and Filename.
7
Select scan type and resolution.
8
Assign a shortcut number (1–245) to the destination (optional).
9
Click
Add/Modify
. This new destination is now available for
selection from the MFP control panel menu.
Set up network scanning
39
Summary of Contents for Infoprint M22 MFP
Page 1: ...IBM Infoprint M22 MFP Option Setup Guide S510 2633 00 IBM ...
Page 2: ......
Page 3: ...IBM Infoprint M22 MFP Option Setup Guide S510 2633 00 IBM ...
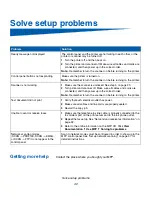
Page 6: ...Solve setup problems 42 Maintain your scanner 43 Notices 48 Contents iv ...
Page 58: ......
Page 61: ......
Page 62: ...IBMR Part Number 75P5112 Printed in U S A S510 2633 00 1P P N 75P5112 ...


