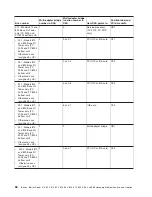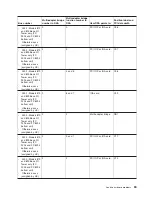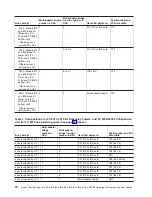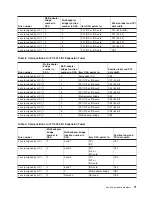
5.
Switch
the
two
bus
cables
on
the
second
I/O
tower’s
failed
port
so
that
the
cable
that
was
connected
to
port
1
will
now
be
in
port
0,
and
the
cable
that
was
connected
to
port
0
will
now
be
in
port
1.
Attention:
You
must
fully
connect
the
cable
and
tighten
the
connector’s
screws
within
30
seconds
of
when
the
cable
makes
contact
with
the
port.
Otherwise,
the
link
will
fail
and
you
must
disconnect
and
reconnect
again.
Also,
if
the
connector
screws
are
not
tightened,
errors
will
occur
on
the
link
and
it
will
fail.
6.
Refresh
the
port
status
for
the
first
failing
resource
by
doing
the
subtask
in
this
document,
then
continue
with
the
next
step.
7.
If
the
port
on
the
I/O
tower
on
which
you
did
NOT
switch
cables
is
now
working,
use
the
symbolic
FRU
to
exchange
the
HSL
I/O
bridge
card
in
the
I/O
tower
on
which
you
DID
switch
the
cables.
Go
to
8.
Switch
the
cables
back
to
their
original
positions.
Attention:
You
must
fully
connect
the
cable
and
tighten
the
connector’s
screws
within
30
seconds
of
when
the
cable
makes
contact
with
the
port.
Otherwise,
the
link
will
fail
and
you
must
disconnect
and
reconnect
again.
Also,
if
the
connector
screws
are
not
tightened,
errors
will
occur
on
the
link
and
it
will
fail.
9.
Exchange
the
cable
between
the
two
ports
on
the
failed
link.
Go
to
10.
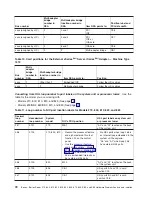
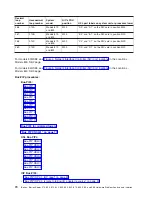
If
you
are
working
on
a
system
Model
800,
810,
825,
870,
or
890,
then
use
symbolic
FRU
For
all
other
systems,
use
the
symbolic
FRU
to
replace
other
cable
related
items
that
may
be
on
either
frame,
such
as
interposer
cards
and
cable
wraps.
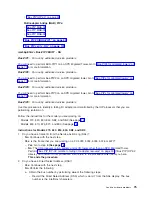
If
the
error
was
cleared
up
by
exchanging
these
items,
go
to
If
the
error
still
has
not
been
cleared
up,
call
your
next
level
of
support
for
further
instructions.
Cannot
power
on
frame:
v
If
one
or
more
of
the
frames
in
the
loop
cannot
become
powered
on,
work
the
errors
related
to
powering
on
the
frames
before
continuing
with
this
bus
error.
v
If
a
frame
still
cannot
become
powered
on,
re-configure
the
HSL
loop
without
the
I/O
towers
and
system
units
that
cannot
be
powered
on,
allowing
the
loop
to
complete.
v
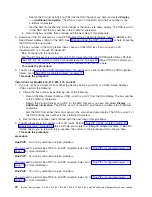
If
the
error
was
cleared
up
when
the
frames
were
powered
back
on
or
removed
from
the
loop,
go
to
v
If
the
error
persists
when
the
frames
were
powered
back
on,
or
removed
from
the
loop,
continue
from
where
you
left
off
in
the
Manually
detecting
the
failed
link:
1.
Get
the
loop
number
from
the
SRC
if
you
do
not
already
have
it.
The
loop
number
is
a
hexadecimal
number
in
word
7
of
the
SRC.
If
you
are
working
with
the
SRC
in
the
PAL,
then
the
loop
number
is
the
4
leftmost
characters
of
the
DSA
in
word
7
(BBBB).
Use
the
(in
the
overview
section)
to
convert
the
hexadecimal
loop
number
to
decimal
format
before
continuing
with
this
procedure.
If
you
are
working
from
the
Service
Action
Log
(SAL),
the
loop
number
should
be
displayed
in
the
FRU
description
area
in
decimal
format.
2.
Sign
on
to
SST
or
DST
(if
you
have
not
already
done
so).
Select
Start
a
service
tool
—>
Hardware
service
manager
—>
Logical
hardware
resources
—>
High-speed
link
(HSL)
resources
.
3.
Select
Resources
associated
with
loop
for
the
HSL
loop
with
the
failed
link.
The
HSL
bridges
will
be
displayed
under
the
loop.
4.
Select
Display
detail
for
the
loop
with
the
failed
link.
5.
Select
Follow
leading
port
until
a
port
with
a
″
failed
″
status
is
found.
Note
the
resource
name
at
the
leading
port
with
a
failed
status,
and
the
type-model
and
serial
number
for
the
resource
with
the
failed
status.
6.
Select
Follow
leading
port
one
more
time
and
note
all
the
information
for
the
resource
name
with
a
failed
trailing
port.
Analyze
hardware
problems
81


