background image

32

IBM Netfinity FAStT500 RAID Controller Enclosure Unit Installation Guide

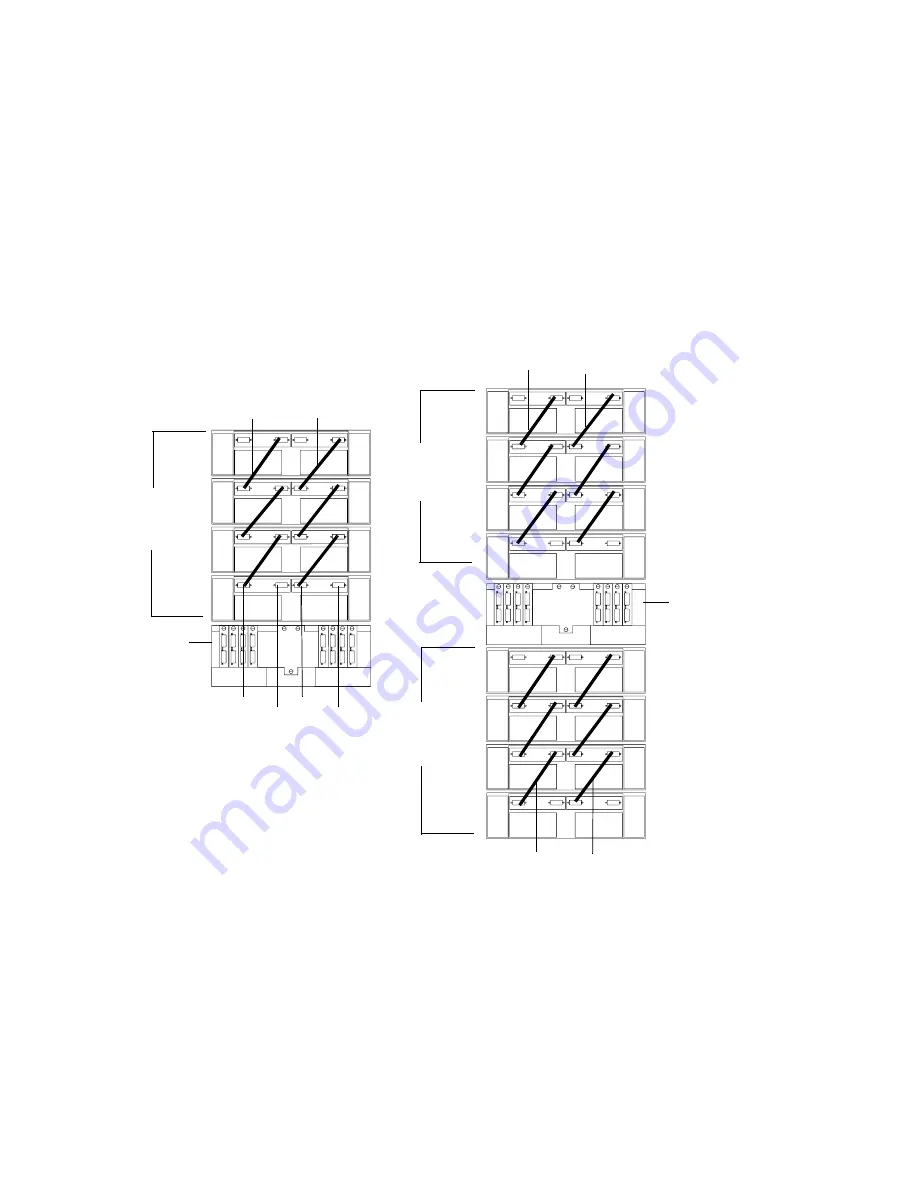
Connect additional drive enclosures to drive Loops A and B, as shown in 

Figure 20

.

Starting with the second drive enclosure, cable each additional drive enclosure into 
Loops A and B in the same manner. Leave unoccupied the In ports on the last drive 
enclosure in the loop and the Out ports on the first drive enclosure. If you want to cable 
a second drive group, go to 

Step 4

; otherwise, go to 

"Connecting drive cables to the 

controller unit" on page 33

.

Repeat 

Step 1

 through 

Step 3

 to cable a second drive group (Loop C and Loop D on 

Drive Group 2) in the same manner, as shown in 

Figure 20

. When you finish, go to 

"Connecting drive cables to the controller unit" on page 33

.

Figure 20.  Connecting a second redundant drive loop

Out

In

In

Out

Step 3: Cable additional drive 
enclosures to Loop A and Loop B.

Step 4: Cable a 
second drive 
group as a 
redundant drive 
loop.

Controller

Controller

Loop C

Loop D

Loop A

Loop B

Drive 
enclosure 
Group 1

Loop A

Loop B

Drive 
enclosure 
Group 1

Drive 
enclosure 
Group 2

Summary of Contents for Netfinity FAStT500

Page 1: ......

Page 2: ......

Page 3: ...Netfinity FAStT500 RAID Controller Enclosure Unit Installation Guide ...

Page 4: ...gdom It is possible that this publication may contain references to or information about IBM products machines and programs program ming or services that are not announced in your country Such references or information must not be construed to mean that IBM intends to announce such IBM products programming or services in your country Requests for technical information about IBM products should be ...

Page 5: ...i Chapter 1 Getting started 1 Controller unit components 3 Operating specifications 5 Preparing for installation 6 Handling static sensitive devices 10 Preparing the site 10 Floor space 10 Weight 10 Preparing the rack 10 Preparing the drive enclosures 11 Preparing the controller unit 12 Installing the support rails 14 Installing the controller unit in the rack 17 Installing additional cache memory...

Page 6: ...onnecting secondary interface cables 39 Chapter 3 Starting the controller unit 41 Turning on the power 41 Turning off the power 42 Turning on the controller unit alarm 43 Controller unit indicator lights 44 Completing the installation 48 Chapter 4 Getting help service and information 49 Appendix Product warranties and notices 51 Warranty statements 51 Notices 59 Trademarks 59 Electronic emissions ...

Page 7: ...v Index 63 ...

Page 8: ...vi IBM Netfinity FAStT500 RAID Controller Enclosure Unit Installation Guide ...

Page 9: ...e 11 Removing and replacing the mini hub 14 Figure 12 Replacing the controller unit bezel 18 Figure 13 Mini hub interface connections 23 Figure 14 Controller unit interface ports 24 Figure 15 Controller unit host mini hubs 25 Figure 16 Controller unit drive mini hubs 26 Figure 17 Controller unit Ethernet and RS 232 ports 26 Figure 18 Redundant drive loop cabling overview 30 Figure 19 Example of co...

Page 10: ...ning on and off the power 41 Figure 28 Controller unit alarm switch 43 Figure 29 Controller indicator lights front view 44 Figure 30 Controller fan indicator lights front view 45 Figure 31 Battery indicator lights front view 46 Figure 32 Controller unit indicator lights back view 46 Figure 33 Mini hub indicator lights 47 ...

Page 11: ...ation Vor Beginn der Installation die Broschüre mit Sicherheitshinweisen lesen Prima di installare questo prodotto leggere l opuscolo contenente le informazioni sulla sicurezza Lees voordat u dit product installeert eerst het boekje met veiligheidsvoorschriften Les heftet om sikkerhetsinformasjon Safety Information før du installerer dette produktet Antes de instalar este produto leia o folheto In...

Page 12: ...etsinformationen innan du installerar den här produkten Перед установкой продукта прочтите брошюру по технике безопасности Safety Information Pred inštaláciou tohto produktu si pre ítajte Informa nú brožúrku o bezpe nosti Preden namestite ta izdelek preberite knjižico Varnostne informacije Installálás el tt olvassa el a Biztonsági el írások kézikönyvét ...

Page 13: ...nance or reconfiguration of this product during an electrical storm Connect all power cords to a properly wired and grounded electrical outlet Connect to properly wired outlets any equipment that will be attached to this product When possible use one hand only to connect or disconnect signal cables Never turn on any equipment when there is evidence of fire water or structural damage Disconnect the...

Page 14: ...inside the device Use of controls or adjustments or performance of procedures other than those specified herein might result in hazardous radiation exposure Class 1 laser statement DANGER Some laser products contain an embedded Class 3A or Class 3B laser diode Note the following Laser radiation when open Do not stare into the beam do not view directly with optical instruments and avoid direct expo...

Page 15: ...ler enclosure unit to the network instructions for installing the interface cable and instructions for completing the installation Chapter 3 Starting the controller unit provides information about connecting the power cords turning on and off the power checking the indicator lights and completing the installation Chapter 4 Getting help service and information describes how to obtain help service a...

Page 16: ...b at http www ibm com pc support Note The items denoted by an asterisk in the list indicate publications that are printed and come with the IBM Netfinity FAStT500 RAID Controller Enclosure Unit IBM Netfinity FAStT500 RAID Controller Enclosure Unit Installation Guide this book IBM Netfinity FAStT500 RAID Controller Enclosure Unit User s Reference IBM Netfinity FAStT Storage Manager for Windows NT I...

Page 17: ...naged hubs and switches in conjunction with the RAID controller unit you can build even larger configurations Throughout this book the use of hub or external hub refers to a managed hub Fibre Channel is a new technology similar to a high speed network that you can use to connect large amounts of disk storage to a server or cluster of servers Fibre Channel technology supports increased performance ...

Page 18: ...etfinity FAStT500 RAID Controller Enclosure Unit The controller unit comes with the following items Hardware Two RAID controllers Two power supplies Battery Two host mini hubs and two drive mini hubs Two power cords or two high voltage rack jumpers One rack mounting hardware kit Two rails right and left Eight black M6 hex head screws Eight clip nuts Eight cage nuts ...

Page 19: ...ly including Rack Mounting Installation Instructions Rack Mounting Template White tape dots Fibre Channel Cabling Instructions Controller unit components The controller unit has the following removable components called customer replaceable units CRUs All CRUs are accessible from either the front or back of the controller unit Bezel front cover Controller fan Battery Controller two each Power supp...

Page 20: ... Figure 2 Netfinity FAStT500 RAID Controller Enclosure Unit front view The following figure shows the controller unit back view Figure 3 Netfinity FAStT500 RAID Controller Enclosure Unit back view Removable bezel Controller fan Controllers Battery Host mini hubs Fan and communications module Power supply Drive mini hubs Power supply ...

Page 21: ...VA Environment Air temperature Controller unit on 10º to 35º C 50º to 95º F Altitude 0 to 914 m 3000 ft Controller unit on 10º to 32º C 50º to 90º F Altitude 914 m 3000 ft to 2133 m 7000 ft Humidity 10 to 80 Accoustical noise emissions values For typical system configurations Sound power idling 6 5 bels Sound power operating 6 5 bels Sound pressure idling 49 dBA Sound pressure operating 49 dBA The...

Page 22: ...and Ethernet interface cables and cable straps Rack mounting hardware comes with the controller unit Storage management software to configure the storage subsystems comes on an Installation CD with the controller unit 5 Install additional hardware based on the method of storage subsystem management You can manage the storage subsystems using the host agent method as shown in Figure 4 on page 7 or ...

Page 23: ...igure 5 Directly managed storage subsystems Controller Controller I O path Management station one or more Client software Controller Controller Host agent software I O path Management station one or more Client software Host Controller Controller Controller Controller Ethernet ...

Page 24: ...umentation provided with your host adapters for installation requirements and procedures Use the correct host adapter driver Refer to the software installation guide and README file on the storage management software installation CD for information on supported host adapters and drivers Note Make sure each host adapter and controller has a unique ID Fibre Channel network environment Go to Cluster ...

Page 25: ...Managed hub or switch Note Other managed hub configurations are possible Host adapters Host adapters Managed hub or switch Managed hub or switch Storage subsystem controllers Fibre Channel connection dual path Storage subsystem controllers Interlink Interlink Fibre Channel connection single path Node A Node B Node A Node B ...

Page 26: ...nit interface ports on page 24 Floor space The floor area at the installation site must provide Enough stability to support the weight of the controller unit and associated equipment Sufficient space to install the controller unit Weight The controller unit total weight depends on the number of components installed in the chassis The maximum weight equals a controller unit containing two RAID cont...

Page 27: ... rack stability load the rack starting at the bottom If you install multiple components in the rack do not overload the power outlets Always connect the controller unit to a properly grounded outlet Preparing the drive enclosures Prepare the drive enclosures that you are attaching to the controller unit This could involve any or all of the following tasks Moving the drive enclosures to the install...

Page 28: ...ll weight To gain access to the CRUs cables indicator lights and switches inside the controller unit you must remove the bezel Figure 7 shows how to remove the bezel Attention Pulling the bezel out too far can damage the hooks at the top To avoid damaging the plastic hooks place the controller unit on a flat surface Be sure the front of the controller unit extends approximately two inches beyond t...

Page 29: ...ing the controller fan and controllers Figure 9 Removing and replacing the battery Controller Fan front view Pull up on the fan lever to unlock then grasp the lip handle and pull out firmly Controllers front view Unlock and open the levers then using the levers pull out the controller a couple inches Grasp both sides of the controller and remove it Important To prevent data loss replace Controller...

Page 30: ...are supplied with your controller unit Where you place the support rails in or on the cabinet depends on where you intend to position the controller unit Fan and Communications module back view Loosen the captive screws then grasp the pull handle and pull firmly to remove the module Power Supply back view Using the pull handle lift up and pull to release each power supply then slide out the power ...

Page 31: ...e electrical current supplied to the device The device also might have more than one power cord To remove all electrical current from the device ensure that all power cords are disconnected from the power source 1 Stop all I O activity to the devices in the rack in which you are installing the controller unit If your rack has ac distribution boxes turn off the power switches 2 Use the following il...

Page 32: ...h of the rail to the depth of your rack 4 Hold the rail against the outside of the right mounting flange on the rack and loosely insert the two front black hex screws 5 Extend the rail outside of the rear mounting flange on the rack then install and tighten the two rear black hex screws 6 Tighten the two front black hex screws then tighten the adjustment screws on each rail 7 Repeat Step 3 through...

Page 33: ... from the rails and save them for securing the controller unit as described in Installing the controller unit in the rack Installing the controller unit in the rack CAUTION Use safe practices when lifting Front controller unit screws Rear controller unit screws 4 18 kg 37 lbs 32 kg 70 5 lbs 55 kg 121 2 lbs ...

Page 34: ...re installing additional cache memory in a controller you can install it now before you install the controller back in the controller unit See Installing additional cache memory in a controller 4 To install the power supplies and fan and communications module in the back of the controller unit reverse the instructions in Figure 10 on page 14 5 To install the mini hubs in the back of the controller...

Page 35: ...roller unit in a rack and have already removed the RAID controller skip Step 1 Attention When you handle electrostatic discharge ESD sensitive devices take precautions to avoid damage from static electricity For details about handling ESD sensitive devices refer to the following Web site and use a search term of ESD http www ibm com 1 Unlock and open the levers on the controller then use the lever...

Page 36: ...rd 256 MB cache memory module Make sure that both DIMM latches are open to their outermost position before inserting the new memory module 4 Carefully insert the DIMM into the empty socket making sure that the left and right edges of the module slide inside the grooves in the DIMM latches As you push the DIMM into place the DIMM latches slowly close around the new module Controller Top cover Top c...

Page 37: ...ly inward on the left and right DIMM latches until they lock and secure the DIMM into place 6 Install the top cover that you removed in Step 2 on page 20 7 Install the controller back in the controller unit by reversing the procedure in Step 1 on page 19 DIMM latches in closed position ...

Page 38: ...22 IBM Netfinity FAStT500 RAID Controller Enclosure Unit Installation Guide ...

Page 39: ... mini hubs When fully configured the back of the controller unit can accommodate four host mini hubs and four drive mini hubs Each mini hub is a removable unit A mini hub provides the Fibre Channel interface between a controller and hosts and drives Each mini hub has two ports One Gigabit Interface Converter GBIC connects into each mini hub port then a host or drive fiber optic cable connects into...

Page 40: ...ces The controller unit interface ports are shown in the following figure Figure 14 Controller unit interface ports Host interface ports Host mini hubs connect to the controller in pairs Mini hubs 1 and 3 connect to the top controller Controller A and mini hubs 2 and 4 connect to the bottom controller Controller B as shown in Figure 15 on page 25 To ensure redundancy you must connect each host to ...

Page 41: ... each or a maximum of 110 drives A fully configured controller unit supports a maximum of 22 drive enclosures 11 drive enclosures per channel pair or 220 drives Important These large configurations are for capacity purposes and might not provide the best performance The drive channel cables connect to GBICs which connect to either the upper or lower port on each mini hub Leave the remaining port o...

Page 42: ...f you want to directly manage storage subsystems and use the RS 232 ports for diagnostic services The following figure shows the location of these ports Figure 17 Controller unit Ethernet and RS 232 ports 4 3 2 1 Drive mini hubs Drive Channel 1 Drive Channel 2 Use one port on each mini hub to connect a drive interface cable Drive mini hub ports Leave one port unoccupied for future upgrades Control...

Page 43: ...insert or remove the GBIC while the port is powered on The operational loop performance is not affected when you install or remove a GBIC You must connect the fiber optic interface cable to the GBIC module after you insert the GBIC into the port CAUTION When laser products such as CD ROMs DVD drives fiber optic devices or transmitters are installed note the following Do not remove the covers Remov...

Page 44: ...nagement arm When attaching to a device on slides leave enough slack in the cable so that it does not bend to a radius smaller than 76 mm 3 inches when extended or become pinched when retracted Route the cable away from places where it can be snagged by other devices in the rack Do not overtighten the cable straps or bend the cables to a radius smaller than 76 mm 3 inches Do not put excess weight ...

Page 45: ...rbitrated Loop is operational To remove the fiber optic cables and GBIC do the following 1 Remove the fiber optic cables from the GBIC then replace the protective caps Note If you are using IBM GBICs you must remove the fiber optic cables from the GBIC before you can remove the GBIC from the mini hub port 2 Move the metal latch on the GBIC to the unlocked center position 3 Pull the GBIC out of the...

Page 46: ... Figure 18 shows a storage subsystem containing one controller enclosure unit and two drive groups with four drive enclosures each Each drive group uses redundant drive loops to connect to the controller unit Loop A and Loop B make up one redundant pair of drive loops Loop C and Loop D make up a second redundant pair Attention To prevent loss of drive enclosure redundancy cable the drive enclosure...

Page 47: ...drive Loop A as shown in Figure 19 Starting with the first drive enclosure connect an interface cable from the In port on the left environmental services monitor ESM board to the Out port on the left ESM board in the second next drive enclosure 2 Connect the same first two drive enclosures to drive Loop B as shown in Figure 19 Starting with the first drive enclosure connect an interface cable from...

Page 48: ...roup go to Step 4 otherwise go to Connecting drive cables to the controller unit on page 33 4 Repeat Step 1 through Step 3 to cable a second drive group Loop C and Loop D on Drive Group 2 in the same manner as shown in Figure 20 When you finish go to Connecting drive cables to the controller unit on page 33 Figure 20 Connecting a second redundant drive loop Out In In Out Step 3 Cable additional dr...

Page 49: ... enclosure and the In lower connector on drive mini hub 4 unoccupied 2 Connect drive Loop B to the controller unit as shown in Figure 21 Starting with the first drive enclosure in the loop cable the Out port on the right ESM board to the In lower port on drive mini hub 3 Leave the Out port on the left ESM board and the Out upper port on drive mini hub 3 unoccupied To connect a second redundant dri...

Page 50: ...as shown in Figure 22 Starting with the last drive enclosure cable the Out port on the right ESM board to the In lower port on mini hub 1 Leave the Out port on the left ESM board on the last drive enclosure and the Out upper port on drive mini hub 1 unoccupied Figure 22 Two redundant drive enclosure groups 5 Go to Connecting hosts directly to the controller unit on page 35 Drive Loop D Drive Loop ...

Page 51: ...he controller unit as shown in Figure 23 on page 36 Connect Host Adapter 1 HA1 from Host 1 to a port on host mini hub 1 Connect HA2 from Host 1 to mini hub 2 To connect a second host continue with Step 2 otherwise go to Connecting secondary interface cables on page 39 2 Connect a second host Host 2 to the controller unit as shown in Figure 23 on page 36 Attach HA1 from Host 2 to the unoccupied por...

Page 52: ...rs Before starting make sure to connect each host to its respective mini hub Important Host mini hub 1 and host mini hub 3 correspond to Controller A top Mini hub 2 and mini hub 4 correspond to Controller B bottom To ensure redundancy connect each host to both controllers You can use either the upper or lower connectors on either mini hub Note Throughout this book the use of hub or external hub re...

Page 53: ...ub 1 Connect HA2 from Host 1 through Hub 2 to mini hub 2 Figure 24 Using managed hubs to connect a host 2 Connect additional hosts to the controller unit using and method shown in Figure 25 on page 38 3 Go to Connecting secondary interface cables on page 39 HA1 HA2 Hub 1 Host 1 Hub 2 Host mini hubs Controller B Controller A Controller B Controller A 1 2 3 4 Controller B Front View Controller A Hub...

Page 54: ...onnect a new managed hub to an available port on each hub that you connected in Step 1 Method 2 Connect a new managed hub to either port on each remaining host mini hub Method 3 Connect a new managed hub to the unoccupied port on the mini hubs that you connected in Step 1 Hub 4 HA1 HA2 Host 1 HA1 HA2 Host 2 Hub 4 HA1 HA2 Host 2 Hub 4 Hub 1 Hub 2 Hub 3 Hub 3 Hub 3 ...

Page 55: ...ables from the management station to the Ethernet ports for Controller A or Controller B on the back of the controller unit as shown in Figure 26 For more information see Figure 5 on page 7 Figure 26 Connecting Ethernet and RS 232 interface cables 2 To perform diagnostic procedures connect an RS 232 interface cable to an RS 232 port see Figure 26 for the location of these ports Controller B Ethern...

Page 56: ...40 IBM Netfinity FAStT500 RAID Controller Enclosure Unit Installation Guide ...

Page 57: ...o the controller unit and to the ac power source 1 Make sure both power switches on the controller unit are off 2 Plug both controller unit power cords into the controller unit as shown in Figure 27 3 Plug both controller unit power cords into the ac outlets To maintain power redundancy plug each power cord into an independent power source such as the ac distribution box inside a cabinet or an ext...

Page 58: ... and the time you turn on the power again Turn on both power switches on the back of the controller unit see Figure 27 on page 41 for the location of the switches You must turn on both switches to take advantage of the redundant power supplies Turning off the power CAUTION The Power Control button on the device and the power switch on the power supply do not turn off the electrical current supplie...

Page 59: ...ck is in progress it might take a long time for the drive indicator lights to stop blinking b Make sure that all amber fault indicator lights on the controller unit are off If any fault indicator lights are on correct the problem before turning off the power 2 Turn off the power switches on the back of the controller unit see Figure 27 on page 41 for the location of the switches 3 Turn off any dri...

Page 60: ...n The pattern shown depends on whether the controller is active or passive offline For more information refer to IBM Netfinity FAStT500 RAID Controller Enclosure Unit User s Reference and IBM Netfinity FAStT Storage Manager for Windows NT Installation and Support Guide Power Green light indicates that power is on Normal status On Problem status Off Heartbeat first status light Green light indicate...

Page 61: ...is on Normal status On Problem status Off Power Supply Amber light indicates a power supply fault Normal status Off Problem status On Fan Amber light indicates a fan fault Normal status Off Problem status On Controller Amber light indicates a controller fault Normal status Off Problem status On Fast Write Cache Green light indicates data in cache Controller fan ...

Page 62: ...s a fault in the left battery bank Normal status Off Problem status On Full Charge B Green light indicates the left battery bank is fully charged Normal status On Problem status Off Fault A Amber light indicates a fault in the right battery bank Normal status Off Problem status On Battery Fault Amber light indicates a fault in the fan and communications module Normal status Off Problem status On P...

Page 63: ...con Indicator light Color Normal operation Problem indicator Condition indicated Fault Amber Off On There is a fault in the mini hub Bypass upper port Amber Off On The upper mini hub port is bypassed Note If the port is unoccupied the light is on Loop good Green On Off The drive loop is operational Bypass lower port Amber Off On The lower mini hub port is bypassed Note If the port is unoccupied th...

Page 64: ...roblems 1 Check the indicator lights on the front of the controller for faults For the locations of the indicator lights see Controller unit indicator lights on page 44 2 When all status indicators show normal status replace the controller unit front cover For operating instructions refer to the IBM Netfinity FAStT500 RAID Controller Enclosure Unit User s Reference ...

Page 65: ... with determining if you have a hardware problem and deciding what action is necessary to fix the problem IBM Hardware Repair If the problem is determined to be caused by IBM hardware under warranty trained service personnel are available to provide the applicable level of service Engineering Change Management Occasionally there might be changes that are required after a product has been sold IBM ...

Page 66: ...ns Parts Information Technical Hints and Tips and Downloadable Files You will have the information you need all in one place In addition you can choose to receive e mail notifications whenever new information becomes available about your registered products You also can access online support forums which are community sites monitored by IBM support staff http www ibm com Main IBM home page http ww...

Page 67: ...anty for United States Puerto Rico and Canada Part 1 General Terms This Statement of Limited Warranty includes Part 1 General Terms and Part 2 Country unique Terms The terms of Part 2 may replace or modify those of Part 1 The warranties provided by IBM in this Statement of Limited Warranty apply only to Machines you purchase for your use and not for resale from IBM or your reseller The term Machin...

Page 68: ... TO JURISDICTION SOME JURISDICTIONS DO NOT ALLOW THE EXCLUSION OR LIMITATION OF EXPRESS OR IMPLIED WARRANTIES SO THE ABOVE EXCLUSION OR LIMITATION MAY NOT APPLY TO YOU IN THAT EVENT SUCH WARRANTIES ARE LIMITED IN DURATION TO THE WARRRANTY PERIOD NO WARRANTIES APPLY AFTER THAT PERIOD Items Not Covered by Warranty IBM does not warrant uninterrupted or error free operation of a Machine Unless specifi...

Page 69: ...a Machine which you return to IBM or your reseller for any reason You should remove all such information from the Machine prior to its return Production Status Each IBM Machine is manufactured from new parts or new and used parts In some cases the Machine may not be new and may have been previously installed Regardless of the Machine s production status IBM s appropriate warranty terms apply Limit...

Page 70: ...ge and install engineering changes that apply to the Machine If a Machine does not function as warranted during the warranty period and IBM or your reseller are unable to either 1 make it do so or 2 replace it with one that is at least functionally equivalent you may return it to your place of purchase and your money will be refunded The replacement may not be new but will be in good working order...

Page 71: ... to 1 ensure that the Machine is free of any legal obligations or restrictions that prevent its exchange 2 obtain authorisation from the owner to have IBM or your reseller service a Machine that you do not own and 3 where applicable before service is provided a follow the problem determination problem analysis and service request procedures that IBM or your reseller provides b secure all programs ...

Page 72: ...ion or warranty implied by the Trade Practices Act 1974 IBM s liability is limited to the repair or replacement of the goods or the supply of equivalent goods Where that condition or warranty relates to right to sell quiet possession or clear title or the goods are of a kind ordinarily acquired for personal domestic or household use or consumption then none of the limitations in this paragraph app...

Page 73: ...try specified EGYPT Limitation of Liability The following replaces item 2 in this Section 2 as to any other actual direct damages IBM s liability will be limited to the total amount you paid for the Machine that is the subject of the claim Applicability of suppliers and resellers unchanged FRANCE Limitation of Liability The following replaces the second sentence of the first paragraph of this Sect...

Page 74: ...o or in any way related to the subject matter of this Statement of Warranty IBM s liability will be limited to the total amount you paid for the Machine that is the subject of the claim Applicability of suppliers and resellers unchanged The following replaces the second paragraph of this Section Unless otherwise provided by mandatory law IBM and your reseller are not liable for any of the followin...

Page 75: ...he IBM product program or service The evaluation and verification of operation in conjunction with other products except those expressly designated by IBM are the responsibility of the user IBM may have patents or pending patent applications covering subject matter in this document The furnishing of this document does not give you any license to these patents You can send license inquiries in writ...

Page 76: ...ications to this equipment Unauthorized changes or modifications could void the user s authority to operate the equipment This device complies with Part 15 of the FCC Rules Operation is subject to the following two conditions 1 this device may not cause harmful interference and 2 this device must accept any interference received including interference that may cause undesired operation Industry Ca...

Page 77: ...rtified by the Canadian Standards Association CSA For units intended to be operated at 115 volts Use a UL listed and CSA certified cord set consisting of a minimum 18 AWG Type SVT or SJT three conductor cord a maximum of 15 feet in length and a parallel blade grounding type attachment plug rated 15 amperes 125 volts For units intended to be operated at 230 volts U S use Use a UL listed and CSA cer...

Page 78: ...nia Niger Norway Poland Portugal Romania Senegal Slovakia Spain Sudan Sweden Syria Togo Tunisia Turkey former USSR Vietnam former Yugoslavia Zaire Zimbabwe 13F9997 Denmark 14F0015 Bangladesh Burma Pakistan South Africa Sri Lanka 14F0033 Antigua Bahrain Brunei Channel Islands Cyprus Dubai Fiji Ghana Hong Kong India Iraq Ireland Kenya Kuwait Malawi Malaysia Malta Nepal Nigeria Polynesia Qatar Sierra...

Page 79: ...er server Fibre Channel connection 9 Fibre Channel network 8 configuration single and dual path 8 9 configuring drive loops 31 connecting hosts to controller unit directly 35 using managed hubs to connect to multiple hosts 39 single host 36 controller CRU accessing 12 installing and removing 13 controller fan accessing 12 installing and removing 13 controller unit accessing 12 adding cache memory ...

Page 80: ...rements 10 front view of controller unit 4 full charge indicator light battery 46 G GBICs installing 27 removing 29 removing protective cap 28 H hardware included with controller unit 2 installing 2 heartbeat indicator light on controller CRU 44 help service and support 49 World Wide Web 50 host adapter in Fibre Channel connection 8 9 using to connect to hosts 35 using with external devices 36 hos...

Page 81: ...nstalling 256 MB cache upgrade 19 mini hubs drive 25 host 24 indicator lights 43 47 installing and replacing 14 installing GBICs and fiber optic cables 27 interface connections 23 N noise emissions values 5 notices electronic emissions 60 electrostatic devices 10 product warranty 51 safety information vii trademarks 59 used in this book xi O operating specifications 5 P power controller unit 5 tur...

Page 82: ... site preparation overview 10 service area 10 software and documentation included with controller unit 3 space requirements 10 specifications controller unit 5 service area requirements 10 site requirements 10 static sensitive devices handling 10 status indicator lights on controller CRU 44 storage subsystem management direct method 6 26 39 Ethernet ports 26 39 host agent method 6 35 36 illustrati...

Page 83: ... Part Number 19K0788 Printed in U S A April 2000 19K0788 ...

Reviews: