


4.
Remove the support bracket assembly and disconnect the fan cable from the
connector (SYSFA3) on the system board. See “Removing the support bracket
assembly” on page 46 for removal instructions.
5.
Access the drive cage.
a.
If your computer has hard disk drives installed in the drive cage,
disconnect the power and signal cables from the rear of the drives.
b.
Rotate the drive cage out of the computer until it locks into place over the
drive cage retention tab.
Note:
Before you install a hard disk drive, ensure that the drive cage locks
into place over the drive cage retention tab by pressing on the side
of the drive cage.
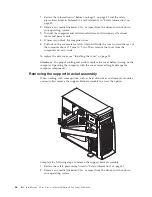
6.
Attach the blue, plastic guide rails to the sides of the drive using the screws
and guide rails provided in the drive cage.
7.
Slide the drive into the drive cage until the plastic tabs on the guide rails lock
into place in the drive cage.
8.
Lift the drive cage up and press in on the drive cage release tab; then, rotate
the cage back into the computer.
Note:
Clear any cables that might impede the replacement of the drive cage.
9.
Connect the power and signal cables to the rear of each drive.
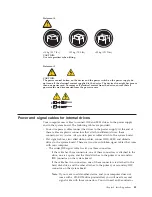
Note:
Make sure to route the signal cable so that it does not block the air flow
to the rear of the drives or over the microprocessor.
10.
If you have other options to install or remove, do so now.
11.
Reinstall the support bracket assembly and reconnect the fan cable to the
connector (SYSFA3) on the system board. See “Removing the support bracket
assembly” on page 46 for removal instructions.
12.
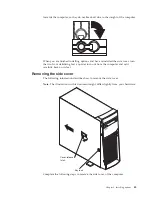
Reinstall the side cover. See “Installing the cover” on page 58 for details.
13.
Reconnect the external cables and power cords; then, turn on the attached
devices and the computer.
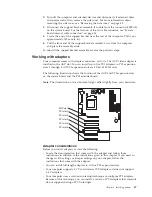
Installing memory modules
Adding memory to your computer is an easy way to make programs run faster.
You can increase the amount of memory in your computer by installing options
called memory modules. Your computer uses a noninterleaved memory
configuration.
Your computer comes with a DIMM installed on the system board in DIMM
connector 1.
Notes:
1.
When installing additional memory modules, install the second memory
module in DIMM connector 2, and the third in DIMM connector 3. (See the
illustration in this section for memory connector locations.)
2.
Your IntelliStation E Pro computer supports 64 MB, 128 MB, 256 MB, and 512
MB DIMMs. Your computer supports a minimum of 64 MB and a maximum
of 1.5 GB of system memory. Refer to http://www.ibm.com/pc/support for a
list of memory modules for use with your computer.
3.
Installing or removing DIMMs changes the configuration information in the
computer. Therefore, after installing or removing a DIMM, you must change
and save the new configuration information by using the Configuration/Setup
Chapter 5. Installing options
55
Summary of Contents for NetVista X40
Page 1: ...IBM IntelliStation E Pro User s Guide IntelliStation E Pro Types 6836 6846 SC06 P456 60...
Page 2: ......
Page 3: ...IBM IntelliStation E Pro User s Guide IntelliStation E Pro Types 6836 6846 SC06 P456 60...
Page 16: ...xiv IBM IntelliStation E Pro User s Guide IntelliStation E Pro Types 6836 6846...
Page 34: ...18 IBM IntelliStation E Pro User s Guide IntelliStation E Pro Types 6836 6846...
Page 42: ...26 IBM IntelliStation E Pro User s Guide IntelliStation E Pro Types 6836 6846...
Page 48: ...32 IBM IntelliStation E Pro User s Guide IntelliStation E Pro Types 6836 6846...
Page 130: ...114 IBM IntelliStation E Pro User s Guide IntelliStation E Pro Types 6836 6846...
Page 132: ...116 IBM IntelliStation E Pro User s Guide IntelliStation E Pro Types 6836 6846...
Page 134: ...118 IBM IntelliStation E Pro User s Guide IntelliStation E Pro Types 6836 6846...
Page 150: ...134 IBM IntelliStation E Pro User s Guide IntelliStation E Pro Types 6836 6846...
Page 154: ...138 IBM IntelliStation E Pro User s Guide IntelliStation E Pro Types 6836 6846...
Page 155: ......


