background image

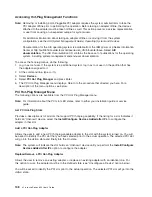
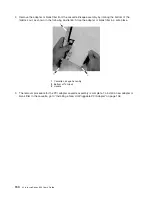
6.


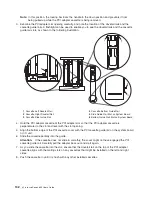
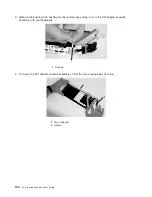
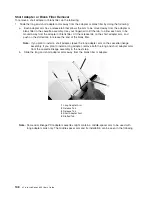
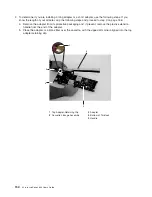
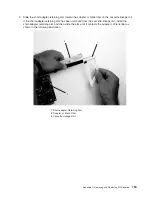
Turn


over


the


cassette


so


that


the


cover


is


facing


up,


as


shown


in


the


following


illustration.


Remove


the


cover


from


the


cassette


as


follows:


a.


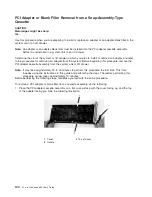
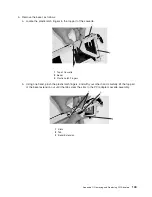
Slide


the


cover


until


it


releases


from


the


cassette


assembly.


Attention:


The


cover


might


be


tight


and


difficult


to


slide.


If


you


grasp


the


left


end


(handle


end)


of


the


cassette


and


the


right


end


of


the


cover,


you


can


use


enough


force


to


pull


the


cover


off


the


PCI


adapter


cassette


assembly.


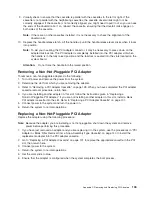
1


Left


End


of


the


Cassette


2


Cassette


Cover


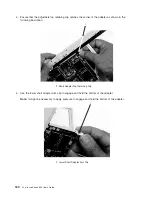
b.


Lift


the


cover


off


the


assembly,


and


set


it


aside.


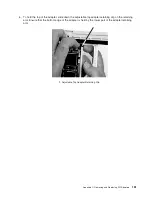
c.


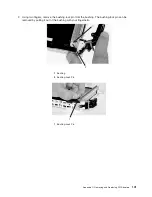
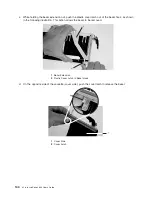
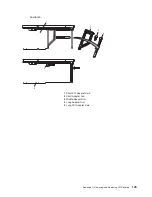
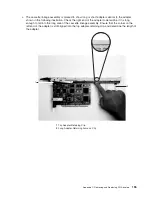
Depress


the


handle


release


lever


to


unlock


the


locking


bar.


The


locking


bar


is


located


on


the


handle,


ensure


that


the


handle


is


pulled


into


the


unlocked


position.


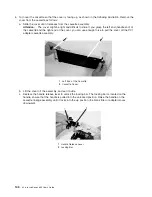
Raise


the


handle


on


the


cassette


linkage


assembly


until


it


locks


into


the


up


position


(the


blank


filler


or


adapter


moves


downward).


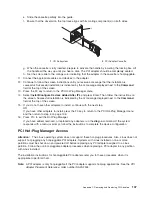
1


Handle


Release


Lever


2


Locking


Bar


146


Eserver


pSeries


655


User’s


Guide

Summary of Contents for p 655 series

Page 1: ...pSeries 655 User s Guide SA38 0617 03 ERserver...

Page 2: ......

Page 3: ...pSeries 655 User s Guide SA38 0617 03 ERserver...

Page 4: ...Information Development Department H6DS 905 6C006 11501 Burnet Road Austin Texas 78758 3493 To send comments electronically use this commercial internet address aix6kpub austin ibm com Any information...

Page 5: ...sing System Log Error Information 12 PCI Adapters 12 Resetting the System Attention LED 13 Chapter 3 Using the Hardware Management Console for pSeries 15 Hardware Management Console HMC Overview and S...

Page 6: ...Memory 46 Run Time CPU Deconfiguration CPU Gard 47 Service Processor System Monitoring Surveillance 47 System Firmware Surveillance 47 Operating System Surveillance 47 Service Processor Error Logs 48...

Page 7: ...1 Configure Surveillance Policy 81 Create Customized Configuration Diskette 82 Delete Resource from Resource List 82 Disk Maintenance 82 Disk to Disk Copy 82 Display Alter Sector 83 Display Configurat...

Page 8: ...ction 101 PCI RAID Physical Disk Identify 101 PCI SCSI Disk Array Manager 101 Process Supplemental Media 101 RAID Array Manager 101 PCI SCSI Disk Array Manager 102 PCI X SCSI Disk Array Manager 102 Ru...

Page 9: ...120 Appendix A Environmental Notices 123 Product Recycling and Disposal 123 Environmental Design 123 Acoustical Noise Emissions 1 2 124 Appendix B Notices 125 Appendix C Removing and Replacing PCI Ada...

Page 10: ...viii Eserver pSeries 655 User s Guide...

Page 11: ...to the supply circuit so that overloading of circuits does not compromise the supply wiring or overcurrent protection To provide the correct power connection to the rack refer to the rating labels lo...

Page 12: ...fety Use this power cable with a properly grounded electrical outlet to avoid electrical shock C27 DANGER To prevent electrical shock hazard disconnect all power cables from the electrical outlet befo...

Page 13: ...for laser certification numbers and approval information CAUTION All IBM laser modules are designed so that there is never any human access to laser radiation above a class 1 level during normal oper...

Page 14: ...xii Eserver pSeries 655 User s Guide...

Page 15: ...es or component failures must verify the accuracy of operations performed and data saved or transmitted by the system at or near the time of the outage or failure In addition users must establish proc...

Page 16: ...xiv Eserver pSeries 655 User s Guide...

Page 17: ...pseries en_US infocenter base v To access the pSeries publications click Hardware documentation v To view information about the accessibility features of Eserver pSeries hardware and the AIX operatin...

Page 18: ...order number SA38 0516 contains information about adapters devices and cables for your server This manual is intended to supplement the service information found in the RS 6000 and Eserver Diagnostic...

Page 19: ...e using another operating system consult the appropriate documentation for that operating system regarding support for those features and functions This chapter helps you get started with installing a...

Page 20: ...nfiguring Full System Partition Is System Using Partitions Configuring Partitions Customer Tasks Installer Tasks Marketing and Customer Tasks Using the System Planning Managed by HMC Begin Site and Ha...

Page 21: ...tasks such as floor planning electrical needs air conditioning and other site planning considerations Marketing system administrators softcopy Planning for Partitioned System Operations Describes plan...

Page 22: ...ating system in an LPAR environment System administrators printed and softcopy AIX Operating System Installation Getting Started Provides information on how to install and configure the AIX operating...

Page 23: ...pecific PCI adapter slot placement and adapter support configurations System administrators service personnel softcopy Hardware Management Console for pSeries Maintenance Guide Contains MAPs removal a...

Page 24: ...6 Eserver pSeries 655 User s Guide...

Page 25: ...2 ports One pair of internal RIO or RIO 2 ports servicing three PCI X slots two 10 100 Ethernet adapters a dual SCSI adapter and a service processor card Fan assembly Two 3 5 inch SCSI DASD bays Four...

Page 26: ...Second pSeries 655 Processor Subsystem The Hardware Management Console for pSeries HMC is used to manage the resources in the system The system can be configured as a full system partition which means...

Page 27: ...rces If you attempt to activate both of these partitions at the same time the second partition in the activation list fails System Profiles Using the HMC you can create and activate often used collect...

Page 28: ...ual setup of the operating system in a partition may require some careful planning to ensure no conflicts exist between the two environments For more detail about partitions see the IBM Hardware Manag...

Page 29: ...ndicator Bank 1 Bank 2 FRU Indicator Cable Identify Port 1 Port 0 1 Ethernet Port 1 11 Memory Controller 1 21 DASD Ribbon Cable Connector 2 Ethernet Port 0 12 Memory Controller 3 22 Service Processor...

Page 30: ...HMC 2 Check the open service events using the procedure described in Working with Serviceable Events in the IBM Hardware Management Console for pSeries Installation and Operations Guide Note For infor...

Page 31: ...dware Management Console for pSeries Installation and Operations Guide Alternate Method of Resetting the System Attention LED Using the AIX Command Line As a user with root authority enter diag on the...

Page 32: ...14 Eserver pSeries 655 User s Guide...

Page 33: ...to the IBM Hardware Management Console for pSeries Installation and Operations Guide System Power On Methods The HMC is used to power on the managed system The managed system will reboot in the same m...

Page 34: ...ng For any installation or service processor functions you must use the HMC Understanding the Power On Self Test POST After power is turned on and before the operating system is loaded the partition d...

Page 35: ...when pressed during POST initiates a system boot in service mode using the default service mode boot list 6 Key The numeric 6 key works like the numeric 5 key except that the firmware uses the customi...

Page 36: ...18 Eserver pSeries 655 User s Guide...

Page 37: ...ator panel on the HMC press any key on the keyboard to signal the service processor When you gain access the service processor prompts you for a password if one is set and when verified displays the s...

Page 38: ...off System This option is not available on this system v Read VPD Image from Last System Boot Displays manufacturer vital product data such as serial numbers and part numbers that were stored from the...

Page 39: ...error log information this option is only for service personnel v Exit from Menus Selecting this option will exit the service processor menus You can re enter the menus by pressing any key on the con...

Page 40: ...r Set the system name from the main menu using option 6 Note The information under the Service Processor Firmware heading in the following Main Menu illustration is example information only Service Pr...

Page 41: ...vileged Access Password 2 Change General Access Password 3 Enable Disable Console Mirroring Not Supported 4 Start Talk Mode Not Supported 5 OS Surveillance Setup Menu 6 Reset Service Processor 7 Repro...

Page 42: ...rvice processor commands the server to power off to prevent potential security attacks on the server by unauthorized remote users The following table lists what you can access with the privileged acce...

Page 43: ...g Dump Setup Menu A scan dump is the collection of chip data that the service processor gathers after a system malfunction such as a checkstop or hang The scan dump data may contain chip scan rings ch...

Page 44: ...IX service aids Option 2 displays the following screens Scan Log Dump Setup Menu 1 Scan Log Dump Policy Currently As Needed 2 Scan Log Dump Content Currently As Requested 3 Immediate Dump 98 Return to...

Page 45: ...ng System Power Control Menu This menu is used to set power control options Other menus that control boot options are available from this menu SYSTEM POWER CONTROL MENU 1 Enable Disable Unattended Sta...

Page 46: ...cumentation for details on setting up operating system automatic restarts The default value is No On a partitioned system this setting is ignored Enable supplemental restart policy The default setting...

Page 47: ...auses the system to perform a service mode boot using the service mode boot list saved in NVRAM If the system boots AIX from the disk drive and AIX diagnostics are loaded on the disk drive AIX boots t...

Page 48: ...em is displayed v Read Progress Indicators from Last System Boot Displays a number of the boot progress indicators which may include Service Processor checkpoints IPL checkpoints or AIX configuration...

Page 49: ...by system 4 3 3 3 00 Configured by system 98 Return to Previous Menu 0 Note This table is built from vital product data collected during the last boot sequence The first time the system is powered on...

Page 50: ...reached a threshold of recoverable errors The memory will remain deconfigured until repeat gard is disabled or the memory card is replaced For more information see Configuring and Deconfiguring Proce...

Page 51: ...d after the error status will be one of the following dash indicates that the memory card is fully configured 0 or 1 indicates that memory repeat gard has deconfigured half of the memory card If this...

Page 52: ...If this option is chosen you will be asked to make the following entries 1 For the I O drawer address type 1 2 For the I O type type A5 If either value is not valid a failure message displays on the c...

Page 53: ...s system Start Power Subystem Code Update This option is not available on this system v LED Control Menu This menu displays the state of the I O subsystem disturbance system attention LED Use this men...

Page 54: ...ser Plug Count menu If the plug count information is not included with the new or replacement module enter the default value of 8 7 for the manufacturing process and 1 for the installation of the modu...

Page 55: ...d If option 12 is selected when Not Applicable is on the screen the system responds with Not Applicable and redisplays the system information menu The setup menu can be displayed after the performance...

Page 56: ...boot and remain set during subsequent boots The maximum RIO speed setting will remain not initialized until set by the user The user can set the speed lower than or equal to the hardware capability bu...

Page 57: ...ting the operating system after the system hardware is reinitialized Restart must follow a successful reboot Boot IPL Speed When the server enters reboot recovery slow IPL is automatically started whi...

Page 58: ...rvice processor to refer to the OS Automatic Restart Policy setting and take action the same action the operating system would take if it could have responded to the problem causing the restart When t...

Page 59: ...default 2 AIX default In a partitioned system the service processor s supplemental restart policy is the only setting that is used If the service processor supplemental restart policy is enabled the s...

Page 60: ...Always check the Web site for the latest images and instructions for checking the firmware level The Web address is http techsupport services ibm com server mdownload2 The firmware level is indicated...

Page 61: ...image ls tmp fwupdate RJ img OR ls tmp fwupdate 3RJ img The update file has either the RJyymmdd img or the 3Jyymmdd img format In both cases the J in the second position indicates that this is an upd...

Page 62: ...provided on the website with the latest image Note The update process can take up to 60 minutes and the system reboots itself during the update process Frame Power Subsystem Firmware Update The frame...

Page 63: ...or a service representative For information about system administrator or service representative roles refer to the IBM Hardware Management Console for pSeries Installation and Operations Guide 2 Do n...

Page 64: ...to prevent their being configured on subsequent boots A processor or memory card is marked bad under the following circumstances v A processor or memory card fails built in self test BIST or power on...

Page 65: ...is set from the service processor menus If the fail condition persists the service processor leaves the machine powered on logs an error and displays menus to the user If Call out is enabled the servi...

Page 66: ...ror Logs The service processor error logs an example of which follows contain error conditions detected by the service processor Error Log 1 11 30 99 19 41 56 Service Processor Firmware Failure B10049...

Page 67: ...ogress Indicator Log B0FF 0539 17 0538 17 0539 17 0538 17 0539 17 0581 0538 17 0539 12 0538 12 0539 0821 01 K1 00 0539 0728 01 R1 00 00 0539 0664 40 60 00 1 0 0539 0777 U0 1 P2 I1 E1 0539 0742 U0 1 P2...

Page 68: ...ssor SP Power Applied Pre Standby Phase Standby Phase SP Menus Available Bring Up Phase SMS Menus Available Run time Phase Operating System Login Prompt Available Pre Standby Phase This phase is enter...

Page 69: ...tion is active v Environmental Monitoring The service processor provides expanded error recording and reporting v System Firmware Surveillance Heartbeat Monitoring The service processor monitors and t...

Page 70: ...u have not been authorized to use this menu please discontinue use immediately Please press x and return for main menu or press any other key s and return to continue 0 2 Press Enter The following tex...

Page 71: ...for the POST indicators memory keyboard network SCSI speaker which appear across the bottom of the screen Press the numeric 1 key after the word keyboard appears and before the word speaker appears A...

Page 72: ...no 5 Espanol Navigation keys M return to main menu ESC key return to previous screen X eXit System Management Services Type the number of the menu item and press Enter or Select a Navigation key _ Cha...

Page 73: ...m error logs have more information available and can time stamp with your local time Setup Remote IPL Initial Program Load This option allows you to enable and set up the remote startup capability of...

Page 74: ...IP parameters type the number of the parameters for which you want to change the value Entering IP parameters on this screen will automatically update the parameters on the ping test screen Attention...

Page 75: ...turn to previous screen X eXit System Management Services Type the number of the menu item and press Enter or Select a Navigation key _ The Protocol option allows you to set the appropriate protocol f...

Page 76: ...y used by the operating system Follow the instructions that display on the screen The firmware will automatically return to the SMS main menu Select Boot Options Use this menu to view and set various...

Page 77: ..._ If a device is selected that does not reside in the system a menu with the following message displays THE SELECTED DEVICES WERE NOT DETECTED IN THE SYSTEM Press any key to continue If hard drive is...

Page 78: ...hen a device is selected for installing the operating system or to boot from the Select Task menu allows you to get more information about the device or to boot from that device in normal mode or serv...

Page 79: ...to view and change the customized boot list which is the sequence of devices read at startup Configure Boot Device Order 1 Select 1st Boot Device 2 Select 2nd Boot Device 3 Select 3rd Boot Device 4 Se...

Page 80: ...ch adapter must then be selected individually to see the devices that are attached to it An example of this menu for the first adapter in the previous example is as follows Select Device Device Curren...

Page 81: ...plays a menu similar to the following for a hard disk Device Information pci 3fffdf0a000 pci 2 4 scsi 1 sd 8 0 Integrated Bootable DEVICE SCSI 18200 MB Harddisk loc U1 9 P1 Z1 A8 0 NAME sd DEVICE TYPE...

Page 82: ...ill vary depending on the devices that are installed in the system The default boot list is 1 Primary diskette drive if installed 2 CD ROM drive if installed 3 Tape drive in installed 4 Hard disk driv...

Page 83: ...run from the disk drive Consider the following items before using the diagnostics v Standalone diagnostics can run on systems configured for either a full or single system partition or a multiple part...

Page 84: ...event possible damage to disk data Do this in either of the following ways If the diagnostics were loaded in standalone mode press the F3 key until DIAGNOSTIC OPERATING INSTRUCTIONS displays Then pres...

Page 85: ...e Problem Determination option on the DIAGNOSTIC MODE SELECTION menu To run the online diagnostics in concurrent mode you must be logged in to the AIX operating system and have proper authority to iss...

Page 86: ...g the Online Diagnostics in Concurrent Mode To run online diagnostics in concurrent mode do the following 1 Log in to the AIX operating system as root user or use CE Login 2 Enter the diag command 3 W...

Page 87: ...system are moved on an I O slot basis Running Standalone Diagnostics from a Network Installation Management NIM Server A client system connected to a network with a NIM server can boot standalone dia...

Page 88: ...partition will be rebooted Stop all programs on that partition including the operating system 3 If you are in a full system partition power on the system unit to run standalone diagnostics In a partit...

Page 89: ...lone diagnostics did not load Check the following items The network parameters on the client may be incorrect Cstate on the NIM server may be incorrect Network problems might be preventing you from co...

Page 90: ...72 Eserver pSeries 655 User s Guide...

Page 91: ...l resources supported by the task A fast path method is also available to perform a task by using the diag command and the T flag By using the fast path the user can bypass most of the introductory me...

Page 92: ...NET FDDI Firmware v Format Media v Gather System Information v Generic Microcode Download v Hot Plug Task v Identify Indicators v Identify and Remove Resource Task See Hot Plug Task for AIX 4 3 3 10 o...

Page 93: ...u is presented to enter the start time the end time and the file name The start time and end time have the following format mmddHHMMyy where mm is the month 1 12 dd is the date 1 31 HH is the hour 00...

Page 94: ...ata fields It checks for bad data and counts all errors encountered If an unrecovered error occurs or recovered errors exceed the threshold value the data on the media should be transferred to other m...

Page 95: ...k and checks for recovered errors unrecovered errors and reassigned errors If these errors exceed the threshold values the user is prompted to replace the physical disk This task can be run directly f...

Page 96: ...system tries to recover from a system crash Use this service aid to display and change the following settings for the Reboot Policy Note Because of system capability some of the following settings mi...

Page 97: ...S1 Configuration File for Modem on serial port 2 S2 Enter the name of a modem configuration file to load on either S1 or S2 The modem configuration files are located in the directory usr share modems...

Page 98: ...Service Center 2 Customer Administration Center 3 Pager v Customer RETAIN Login ID Customer RETAIN Login Password These settings apply to the RETAIN service function v Remote Timeout in seconds Remot...

Page 99: ...v Optimum Dump content collected provides a moderate amount of debug information v Complete Dump data provides the most complete error coverage at the expense of reboot speed You can access this servi...

Page 100: ...ratepv command when copying the contents to other disk drive types This command also works when copying SCSI disk drives or when copying to a different size SCSI disk drive Refer to System Management...

Page 101: ...no need to see the vital product data VPD No VPD is displayed Display Firmware Device Node Information This task displays the firmware device node information This service aid is intended to gather mo...

Page 102: ...e media When booting from Standalone Diagnostics this service aid converts the logged information into a readable format that can be used to isolate the problem When booting from the hard disk or LAN...

Page 103: ...SELECTION MENU the default is on v Run Tests Multiple Times This option allows the user to turn on or off or specify a loop count for diagnostic loop mode the default is off Note This option is only d...

Page 104: ...he default p Displays or changes the value of the Display Progress Indicators option s Displays all of the diagnostic run time options Display Previous Diagnostic Results Note This service aid is not...

Page 105: ...m with the device Run diagnostics on sysplanar0 to determine what repair action is needed v Critical Low The sensor reading indicates a serious problem with the device Run diagnostics on sysplanar0 to...

Page 106: ...uesensor a 3 0 11 87 P1 9001 0 11 2345 F1 9004 0 11 2 V1 9004 1 9 2 V2 3 Return the status of sensor 9004 index 1 usr lpp diagnostics bin uesensor t 9004 i 1 9 4 Return the value of sensor 9004 index...

Page 107: ...on time period Notes 1 If the source is etc microcode the image must be stored in the etc microcode directory on the system If the system is booted from a NIM server the image must be stored in the us...

Page 108: ...PCI SCSI Adapter See the following command syntax for a DVD RAM attached to a PCI SCSI Adapter diag c d cdX T download s etc microcode diskette l latest previous f Flag Description c No console mode...

Page 109: ...ommand syntax usr lpp diagnostics bin usysfault s normal l location code Flag Description s normal Sets the Fault Indicator to the normal state l location code Identifies the resource by physical loca...

Page 110: ...escribed below Format and or Erase Hard File Attached to a Non RAID and PCI X SCSI Adapter Attention This service aid only applies to hdisks For pdisks attached to the PCI X SCSI Adapter a format is p...

Page 111: ...in step 3 of this procedure with those that now appear in the grown defect MAP Note If there are differences between the saved data and the newly obtained data then all sectors on this drive cannot be...

Page 112: ...be put on removable media and transferred to remote locations for more extensive analysis To use the SNAP task select Gather System Information from the task list You can select which components you...

Page 113: ...e Devices v Install Configure Devices Added After IPL The List PCI Hot Plug Slots function lists all PCI hot plug slots Empty slots and populated slots are listed Populated slot information includes t...

Page 114: ...ing the following command diag d device T identifyRemove However note that some devices support both the PCI Hot Plug task and the RAID Hot Plug Devices task If this is the case for the device specifi...

Page 115: ...e type of device as the device being replaced v New devices may not be added unless a device of the same FRU part number already exists in the system because the configuration information for the new...

Page 116: ...selected slot is set to the normal state and power is restored Note Before you remove the device be sure that no other host is using it The Configure Added Replaced Devices function runs the configura...

Page 117: ...sk directly from the command line See the following command syntax diag c d device name T identifyRemove l ChId s identify remove normal Flags Description c Run the task without displaying menus Only...

Page 118: ...Task Note It is important to run the Log Repair Action function This action keeps the Fault Indicator from going back to the Fault state due to a previous error in the error log that has already been...

Page 119: ...hich you replaced the RAID adapter cache card or changed the RAID configuration Other RAID functions are available using this service aid they should only be used by the system administrator who is fa...

Page 120: ...ty pxdam fastpath and is used to manage a RAID array connected to a PCI X SCSI RAID adapter It may also be run from standalone diagnostics which is available on systems or partitions with operating sy...

Page 121: ...he following options v Option 1 Short Exercise Exercises the resources within a relatively short time and exits v Option 2 Extended Exercise Allows greater flexibility and control over resources and t...

Page 122: ...cessors thus reducing the time required to exercise all of the memory Running this service aid requires 128 KB of free space in etc lpp diagnostics data Tape Exerciser The tape exerciser is labeled rm...

Page 123: ...reelance mode To use this service aid the user should understand how a SCSI bus works Use this service aid when the diagnostics cannot communicate with anything on the SCSI bus and cannot isolate the...

Page 124: ...example scraid0 T Task to run SCSD Tape Drive Service Aid This service aid allows you to obtain the status or maintenance information from a SCSD tape drive Not all models of SCSD tape drive are suppo...

Page 125: ...lability This selection checks the number of spare sectors available on the optical disk The spare sectors are used to reassign when defective sectors are encountered during normal usage or during a f...

Page 126: ...the system If there is not enough space in the var file system for the new flash update image file an error is reported If this error occurs exit the service aid increase the size of the var file syst...

Page 127: ...ied v Certify Spare Physical Disk Allows the user to certify check the integrity of the data on drives designated as spares v Format Physical Disk Formats a selected disk drive v Array Controller Micr...

Page 128: ...sk use this command syntax diag c d deviceName T certify l ChId Flag Description l Physical disk channel ID for example 23 To identify a physical disk use this command syntax diag c d deviceName T ide...

Page 129: ...nostics in Service Mode To run the online diagnostics in service mode from the boot hard disk do the following 1 From the HMC select Partition Management For more information about full system partiti...

Page 130: ...he AIX Installation Guide and Reference for information about the following tasks v Register a client on the NIM server v Enable a client to run diagnostics from the NIM server To verify that the clie...

Page 131: ...ollowing procedure to temporarily change the system bootlist so that the network adapter attached to the NIM server network is first in the bootlist 1 Exit to the SMS main screen 2 Select Select Boot...

Page 132: ...everal entries Note The 6 key works like the 5 key with the following exceptions v The system searches for a boot record according to the service mode boot list v If the service mode boot list is disc...

Page 133: ...n uses the SRN to determine which field replaceable units FRUs are needed to restore the system to correct operation Step 1 Considerations before Running This Procedure Note To find the key sequences...

Page 134: ...his step loads online diagnostics in service mode 1 Reboot the system 2 At the SMS menu press the numeric 6 key on the keyboard to indicate that diagnostics are to be loaded 3 Type the requested passw...

Page 135: ...orm the action listed in the Action column System Response Action The Diagnostic Mode Selection menu is displayed Select Problem Determination and go to Step 12 on page 118 The Missing Resource menu i...

Page 136: ...sting Complete menu and the No trouble was found message is displayed and you have not tested all of the resources Press Enter and continue with the testing The Testing Complete menu and the No troubl...

Page 137: ...hout any obvious display problem NO Go to Step 7 on page 116 YES Go to Step 9 on page 116 Step 16 The diagnostics did not detect a hardware problem If you still have a problem contact your service org...

Page 138: ...d or the system appears to stop Did the diagnostics load NO Go to Step 4 on page 121 YES Go to Step 5 on page 122 Step 3 This step attempts to load the standalone diagnostics 1 Reboot the partition No...

Page 139: ...displayed on the console Record the error code s and report the problem to the service organization The system login prompt is displayed You may not have pressed the correct key or you may not have p...

Page 140: ...ization The system appears to be stopped the disk activity light is on continuously and a beep was heard from the system unit Record error code M0MEM001 and report the problem to the service organizat...

Page 141: ...ycling facilities may not be available in your area In the United States IBM has established a collection process for reuse recycling or proper disposal of used sealed lead acid nickel cadmium and nic...

Page 142: ...3 7 7 3 59 3 59 3 Notes 1 LWAd is the upper limit A weighted sound level LpAm is the mean A weighted sound pressure level measured at the 1 meter bystander positions 1 B 10 dB 2 All measurements made...

Page 143: ...untry where such provisions are inconsistent with local law THIS MANUAL IS PROVIDED AS IS WITHOUT WARRANTY OF ANY KIND EITHER EXPRESSED OR IMPLIED INCLUDING BUT NOT LIMITED TO THE IMPLIED WARRANTIES O...

Page 144: ...126 Eserver pSeries 655 User s Guide...

Page 145: ...an adapter determine if the PCI adapter you are working with is hot pluggable See the PCI Adapter Placement Reference order number SA23 2504 When assembling inserting or removing a blindswap cassette...

Page 146: ...apter on page 134 Note An adapter or a blank filler must be installed into the PCI adapter cassette before it is reinstalled in a processor subsystem or an I O subsystem The following illustration sho...

Page 147: ...the down position See the following illustration 1 Locking Bar 2 Handle Release Lever 3 Handle in the Down Position 4 Push in the locking bar until it clicks into the locked position See the following...

Page 148: ...r slot by pulling on the adapter cassette pull tab Do not pull on the handle when removing the adapter cassette Notes a Pulling on the handle may reengage the adapter connector preventing the cassette...

Page 149: ...that the adapter is held firmly on all four corners by the retaining arms and ratchet clips v Review the procedures beginning with PCI Adapter or Blank Filler Removal from a Snap Assembly Type Cassett...

Page 150: ...tem Board 4 Hold the PCI adapter cassette at the PCI adapter slot so that the PCI adapter cassette is perpendicular to the slot and level with the slot opening 5 Align the bottom edge of the PCI casse...

Page 151: ...slot from which you are removing the adapter 3 Refer to Removing a PCI Adapter Cassette on page 128 When you have completed the PCI adapter cassette removal procedure return here 4 If you are install...

Page 152: ...mine the slot from which you are removing the adapter 2 Ensure that any processes or applications that might use the adapter are stopped Note Removing a hot pluggable PCI adapter requires the system a...

Page 153: ...r into the PCI adapter cassette See PCI Adapter or Blank Filler Removal from a Snap Assembly Type Cassette on page 140 19 With the replaced adapter installed into the PCI adapter cassette refer to Rep...

Page 154: ...lug Adapter window displays 7 For adapter placement information see the PCI Adapter Placement Reference order number SA23 2504 Select an empty PCI slot for the adapter 8 Select the appropriate empty P...

Page 155: ...op of the screen 15 If you do not have other adapters to install continue with the next step OR If you have other adapters to install press the F3 key to return to the PCI Hot Plug Manager menu and th...

Page 156: ...s Return to the procedure that directed you here For a description of the menu options see below PCI Hot Plug Manager Menu The following options are available from the PCI Hot Plug Manager menu Note F...

Page 157: ...cted source The add remove and replace functions return information to the user indicating whether the operation was successful If additional instructions are provided on the screen complete the recom...

Page 158: ...the system Before beginning this procedure remove the PCI adapter cassette assembly from the system unit or I O drawer Note It may take approximately 30 to 40 minutes to perform this procedure the fi...

Page 159: ...the bushing lock pin from the bushing The bushing lock pin can be removed by pulling it out of the bushing with your fingernails 1 Bushing 2 Bushing Lock Pin 1 Bushing Lock Pin Appendix C Removing and...

Page 160: ...moved by pulling it out of the PCI adapter cassette assembly with your fingernails 1 Bushing 4 Turn over the PCI adapter cassette assembly so that the top is facing away from you 1 Top of Adapter 2 Ha...

Page 161: ...e 2 Bezel 3 Plastic Latch Fingers b Using one hand pinch the plastic latch fingers and with your other hand carefully lift the top part of the bezel extension out until the tabs clear the slots in the...

Page 162: ...as shown in the following illustration This action allows the bezel to be removed 1 Bezel Extension 2 Plastic Cover Latch in Bezel Hook d On the opposite side of the cassette cover side push the cover...

Page 163: ...f You might have to work from both sides to loosen the bezel assembly from the cassette assembly When the bezel is free slide it completely off the cassette assembly and set it aside 1 Bezel Extension...

Page 164: ...er you can use enough force to pull the cover off the PCI adapter cassette assembly 1 Left End of the Cassette 2 Cassette Cover b Lift the cover off the assembly and set it aside c Depress the handle...

Page 165: ...embly as shipped from the manufacturer there are two adapter arms One adapter arm is used with short adapters short adapter arm and the other adapter arm is used with long adapters long adapter arm If...

Page 166: ...sh on the slotted tab to release the end of the blank filler Note If you plan to install a short adapter leave the long adapter arm on the cassette linkage assembly If you plan to install a long adapt...

Page 167: ...illustration 2 1 3 4 5 2 1 Short PCI Adapter Card 2 Short Adapter Arm 3 Middle Spacer Arm 4 Long Adapter Arm 5 Long PCI Adapter Card Appendix C Removing and Replacing PCI Adapters 149...

Page 168: ...stration Store the adapter or blank filler in a safe place 1 Cassette Linkage Assembly 2 Bottom of Tailstock 3 Handle 3 The removal procedure for the PCI adapter cassette assembly is complete To insta...

Page 169: ...ce 1 Cassette Linkage Assembly 3 Bottom of Tailstock 2 Adapter 4 Handle 3 The removal procedure for the PCI adapter cassette assembly is complete To install a new adapter or blank filler in the casset...

Page 170: ...Assembly linkage on a flat work surface in front of you Position the cassette so that the handle is in the raised up position and on the left with the top of the linkage facing away from you Note Your...

Page 171: ...5 10 100 1000 Base T Ethernet PCI Adapter 44P2676 4962 10 100 Mbps Ethernet PCI Adapter II 44P0321 5700 IBM Gigabit Ethernet SX PCI X Adapter 53P5450 5701 IBM 10 100 1000 Base TX Ethernet PCI X Adapte...

Page 172: ...move the adapter from its protective packaging and if present remove the plastic extension handle from the end of the adapter b Place the adapter or a blank filler over the cassette with the upper lef...

Page 173: ...rmine if it is long enough to fall into the long area of the cassette linkage assembly Ensure that the corner on the left end of the adapter is still aligned into the top adapter retaining clip and de...

Page 174: ...e up position the cassette linkage assembly will extend down beyond the cassette top If you are installing a short adapter or blank filler go to Short Adapter or Blank Filler Installation If you are i...

Page 175: ...the upper left corner of the adapter engages the adjustable top adapter retaining clip as shown in the following illustration 4 3 1 2 1 Cassette Linkage Assembly 2 Bottom of Tailstock 3 Retaining Cli...

Page 176: ...to the adjustable top adapter retaining clip Note If the adapter is not a full height adapter you must slide the adjustable top adapter retaining clip downward until the lower edge of the adapter is s...

Page 177: ...rm has been removed from the cassette linkage rail install the short adapter retaining arm and then slide the arm until it contacts the adapter or blank filler as shown in the following illustration 1...

Page 178: ...lowing illustration 1 1 Short Adapter Top Retaining Clip 5 Use the lower short adapter arm clip to engage and hold the bottom of the adapter Note It might be necessary to apply pressure to engage and...

Page 179: ...adjustable top adapter retaining clip on the retaining arm Ensure that the bottom edge of the adapter is held by the lower part of the adapter retaining arm 1 Adjustable Top Adapter Retaining Clip App...

Page 180: ...ter or blank filler moves up into the cassette assembly 2 1 1 Handle Release Lever 2 Lock Ensure that the right end of the cassette linkage rail moves up into the cassette linkage assembly as shown in...

Page 181: ...sition the adapter and cassette assembly with the handle on the left in the down position and the top facing away from you 2 1 1 Top of Cassette 2 Handle Appendix C Removing and Replacing PCI Adapters...

Page 182: ...ace the cassette cover on the cassette assembly as shown in the following illustration Slide the cover toward the handle until the hole in the cover aligns with the hole in the cassette assembly 2 1 1...

Page 183: ...arefully slide the bezel onto the cassette assembly 1 1 Bezel b Align and insert the cover arm latch in the hooked notch in the bezel 1 2 1 PCI Adapter Pull Tab 2 Hooked Notch in the Bezel for the Cov...

Page 184: ...the cassette linkage assembly until the tab on the top of the bezel is seated in the recess of the cassette assembly 1 2 3 4 1 Recess 3 Tab 2 Groove 4 Bezel Assembly d Insert the two tabs on the beze...

Page 185: ...three pins in the holes in the arm The bezel tab should be seated as shown in the following illustration 1 1 1 1 Pin b Ensure that the cover arm latch is completely pressed into the hooked notch on th...

Page 186: ...up Check the cover latch to ensure that it is holding the bezel to the cover as shown 1 1 Cover Latch 12 Ensure the holes are aligned and insert the bushing lock pin into the bushing as shown 1 Bushin...

Page 187: ...cassette 1 1 Location of the Installed Bushing and Bushing Lock Pin 13 Insert the bushing lock pin into the hole in the bushing and push it in until it seats as shown in the following illustration 1 1...

Page 188: ...until it locks into the up position the blank filler or adapter moves downward 1 Handle Release Lever 2 Locking Bar 15 To install the metal EMC shield on the adapter bracket grasp the EMC shield as sh...

Page 189: ...op of the cassette 1 Metal EMC Shield b The metal EMC shield has clips that slide over the top of the tailstock Ensure that these clips are holding the metal EMC shield to the tailstock 1 1 Top of Tai...

Page 190: ...ation determine if the adapter you are installing is hot swappable If the adapter is hot swappable move the slider on the color indicator to allow the orange color to be visible If the adapter is not...

Page 191: ...e cassette linkage as shown in the following illustration If there is an embossed line on the face of the top rail align the middle spacer arm as shown in the following illustration If there is no lin...

Page 192: ...ft corner of the adapter engages the top adjustable adapter retaining clip as shown in the following illustration 5 4 2 3 1 1 Top Adapter Retaining Clip 3 Adapter 2 Cassette Linkage Assembly 4 Bottom...

Page 193: ...the top adjustable adapter retaining clip Note If the adapter is not a full height adapter slide the top adjustable adapter retaining clip downward until the lower edge of the adapter is seated into...

Page 194: ...arm onto the cassette linkage rail as shown in the following illustration and slide the arm toward the adapter 1 2 3 1 Cassette Linkage Assembly 3 Top Adapter Retaining Clip 2 Adapter Retaining Arm 1...

Page 195: ...in the following illustration 1 Top Adjustable Retaining Clip 7 Ensure that the bottom edge of the adapter is held by the groove in the lower part of the adapter retaining arm 1 2 1 Top Adjustable Re...

Page 196: ...alled a middle spacer arm ensure that the adapter retaining clip is seated around the top edge of the adapter 10 Depress the handle release lever on the handle Rotate the adapter handle until it is in...

Page 197: ...tte linkage assembly as shown 1 1 Right End of Cassette Linkage 11 Position the adapter and cassette assembly with the handle on the left in the down position and the top facing away from you 1 2 1 Ha...

Page 198: ...placing the cassette cover on the cassette assembly as shown Slide the cover toward the handle until the hole in the cover aligns with the hole in the cassette assembly 2 1 1 Handle 2 Hole Aligned in...

Page 199: ...rocedure a Carefully slide the bezel onto the cassette assembly 1 1 Bezel b Align and insert the cover arm latch in the hooked notch in the bezel 1 2 1 PCI Adapter Pull Tab 2 Hooked Notch in the Bezel...

Page 200: ...bezel onto the cassette linkage assembly until the tab on the top of the bezel is seated in the recess of the cassette assembly 1 2 3 4 1 Recess 3 Tab 2 Grooves 4 Bezel d Insert the two tabs on the be...

Page 201: ...e pins in the holes in the arm The bezel tab is seated as shown in the following illustration 1 1 1 1 Pins b Ensure that the cover arm latch is completely pressed into the hooked notch on the bezel as...

Page 202: ...cover latch to ensure that it is holding the bezel to the cover as shown 1 1 Cover Latch 15 Position the adapter with the cover side facing up Ensure that the holes are aligned and insert the bushing...

Page 203: ...shing Lock Pin 16 Insert the bushing lock pin into the hole in the bushing Push on the pin until it seats 1 1 Location of the Installed Bushing and Bushing Lock Pin Appendix C Removing and Replacing P...

Page 204: ...ssette linkage until it locks into the up position the blank filler or adapter moves downward 1 Handle 2 Locking Bar 18 To install the metal EMC shield on the adapter bracket grasp the metal EMC shiel...

Page 205: ...a Ensure that the shield slides up inside the top of the cassette 1 Metal EMC Shield 2 Adapter Bracket Appendix C Removing and Replacing PCI Adapters 187...

Page 206: ...e handle and rotate the adapter handle until the handle is in the down position adapter or blank filler moves up into the cassette assembly 1 1 Handle 20 Using your system documentation determine if t...

Page 207: ...s visible 1 2 1 Orange indicates Hot Swappable 2 Blue indicates Not Hot Swappable 21 The adapter is ready to be installed into a system or an I O drawer For more information refer to your system docum...

Page 208: ...190 Eserver pSeries 655 User s Guide...

Page 209: ...t 114 considerations 65 diagnostics continued online 66 concurrent mode 67 68 loading 111 maintenance mode 67 68 problem determination loading 120 running service mode 68 running online 66 service mod...

Page 210: ...s 111 local area network service aid 100 log repair action service aid 101 logical partitions 9 M MCM L3 interposer plug count menu 36 memory configuration 46 configuration deconfiguration menu 32 dec...

Page 211: ...ors 16 keys numeric 1 key 17 numeric 5 key 17 numeric 6 key 17 numeric 8 key 17 power control network utilities menu 33 power off processor subsystem using the HMC 15 power on methods 15 processor sub...

Page 212: ...e power on policy 80 run diagnostics 102 run error log analysis 102 run exercisers 103 save or restore hardware management policies 105 SCSD tape drive 106 SCSI bus analyzer 105 spare sector availabil...

Page 213: ...See service aids terminal type identifying 65 trademarks xvi U updating frame firmware 44 integrated Ethernet microcode 45 integrated SCSI controller microcode 45 system firmware from AIX command line...

Page 214: ...196 Eserver pSeries 655 User s Guide...

Page 215: ...ied Satisfied Neutral Dissatisfied Very Dissatisfied Accurate h h h h h Complete h h h h h Easy to find h h h h h Easy to understand h h h h h Well organized h h h h h Applicable to your tasks h h h h...

Page 216: ...S 905 6C006 11501 Burnet Road Austin TX 78758 3493 _ _ _ _ _ _ _ _ _ _ _ _ _ _ _ _ _ _ _ _ _ _ _ _ _ _ _ _ _ _ _ _ _ _ _ _ _ _ _ _ _ _ _ _ _ _ _ _ _ _ _ _ _ _ _ _ _ _ _ _ _ _ _ _ _ _ _ _ _ _ _ _ _ _ _...

Page 217: ......
Page 218: ...Printed in USA February 2004 SA38 0617 03...

Reviews: