Working with Microprocessor Upgrades
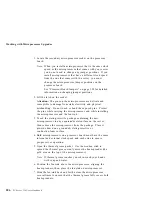
To avoid damaging the microprocessor or socket during
installation, make sure that the socket latch is fully opened to
the vertical position before you insert the microprocessor.
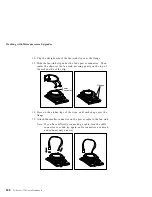
The fan sink retention clip is under tension. Be careful when
installing or removing the microprocessor assembly. Do not let
the clip scrape against the processor board, sockets, or other
components.
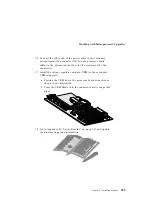
If you select a setting for the frequency jumper (J17/J18) that is
greater than the actual frequency of the microprocessor, you
might damage the microprocessor.
Notes:
1. The illustrations in this section might differ slightly from your
hardware.
2. To avoid damage and ensure proper server operation when you
install a new or additional microprocessor, use the same speed
and voltage requirements as those of the currently installed
microprocessor. Microprocessor internal and external clock
frequencies must be identical.
3. To order additional microprocessors, contact your IBM
marketing representative or your IBM reseller.
4. When you install a second microprocessor, it becomes the
startup (boot) microprocessor.
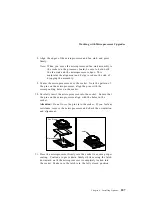
5. The pins on the microprocessor are delicate and susceptible to
damage from static electricity and physical mishandling. Do not
touch or bend the exposed pins on a microprocessor. Protect
the pins while carrying the microprocessor and during
installation.
Chapter 4. Installing Options
203
Summary of Contents for PC Server 330
Page 1: ...PC Server 330 User s Handbook IBM...
Page 6: ...vi PC Server 330 User s Handbook...
Page 10: ...x PC Server 330 User s Handbook...
Page 32: ...18 PC Server 330 User s Handbook...
Page 100: ...86 PC Server 330 User s Handbook...
Page 134: ...120 PC Server 330 User s Handbook...
Page 240: ...Updating the Server Configuration 226 PC Server 330 User s Handbook...
Page 326: ...Resolving Configuration Conflicts 312 PC Server 330 User s Handbook...
Page 382: ...IBM Part Number 76H8834 Printed in U S A September 1996 76H8834...


