Working with Microprocessor Upgrades
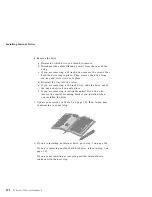
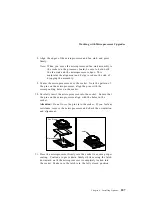
1. Locate the secondary microprocessor socket on the processor
board.
Note: When you install a microprocessor that is the same clock
speed as the microprocessor that comes with your server,
you do not need to change any jumper positions. If you
install microprocessors that have a different clock speed
from the one that comes with the server, you must
change the microprocessor jumper positions on the
processor board.
See “Processor Board Jumpers” on page 328 for detailed
information on changing jumper positions.
2. Lift the latch on the socket.
Attention:
The pins on the microprocessor are delicate and
susceptible to damage from static electricity and physical
mishandling. Do not touch or bend the exposed pins. Protect
the pins while carrying the microprocessor and while installing
the microprocessor and the fan sink.
3. Touch the static-protective package containing the new
microprocessor to any unpainted metal surface on the server;
then remove the microprocessor from the package. Place it
pin-side down on a grounded, static-protective or
conductive-foam surface.
4. Both microprocessors on a processor board must have the same
internal and external clock speed and cache size to ensure
proper server operation.
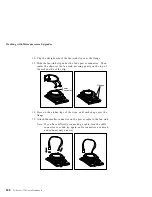
5. Open the thermal grease packet. Use the wooden stick to
spread the thermal grease evenly across the heat-spreader (the
gold area on the top of the microprocessor).
Note: If thermal grease touches your skin, wash your hands
with soap and water.
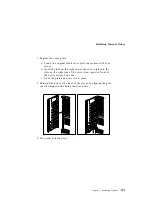
6. Position the fan sink above the microprocessor, aligning the
heat-spreaders; then, place the fan sink on microprocessor.
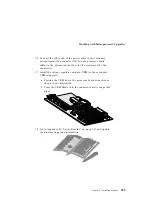
7. Slide the fan-sink back and forth across the microprocessor
several times to ensure that the thermal grease fully covers both
heat-spreaders.
206
PC Server 330 User's Handbook
Summary of Contents for PC Server 330
Page 1: ...PC Server 330 User s Handbook IBM...
Page 6: ...vi PC Server 330 User s Handbook...
Page 10: ...x PC Server 330 User s Handbook...
Page 32: ...18 PC Server 330 User s Handbook...
Page 100: ...86 PC Server 330 User s Handbook...
Page 134: ...120 PC Server 330 User s Handbook...
Page 240: ...Updating the Server Configuration 226 PC Server 330 User s Handbook...
Page 326: ...Resolving Configuration Conflicts 312 PC Server 330 User s Handbook...
Page 382: ...IBM Part Number 76H8834 Printed in U S A September 1996 76H8834...

