Working with Microprocessor Upgrades
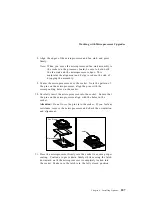
8. Align the edges of the microprocessor and fan sink, and press
firmly.
Note: When you move the microprocessor/fan sink assembly to
the socket on the processor board, be sure to hold both
the fan sink and the microprocessor edges. This
maintains the alignment and helps to reduce the risk of
dropping the assembly.
9. Center the microprocessor over the socket. Note the pattern of
the pins on the microprocessor; align the pins with the
corresponding holes on the socket.
10. Carefully insert the microprocessor into the socket. Ensure that
the pins on the microprocessor align with the holes in the
socket.
Attention:
Do not force the pins into the socket. If you feel any
resistance, remove the microprocessor and check the orientation
and alignment.
Latch
Microprocessor
Fan Sink
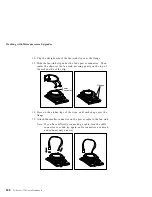
11. Press the microprocessor firmly into the socket to ensure proper
seating. Continue to press down firmly while moving the latch
downward until the microprocessor is completely locked into
the socket. Make sure the latch is in the fully closed position.
Chapter 4. Installing Options
207
Summary of Contents for PC Server 330
Page 1: ...PC Server 330 User s Handbook IBM...
Page 6: ...vi PC Server 330 User s Handbook...
Page 10: ...x PC Server 330 User s Handbook...
Page 32: ...18 PC Server 330 User s Handbook...
Page 100: ...86 PC Server 330 User s Handbook...
Page 134: ...120 PC Server 330 User s Handbook...
Page 240: ...Updating the Server Configuration 226 PC Server 330 User s Handbook...
Page 326: ...Resolving Configuration Conflicts 312 PC Server 330 User s Handbook...
Page 382: ...IBM Part Number 76H8834 Printed in U S A September 1996 76H8834...

