background image

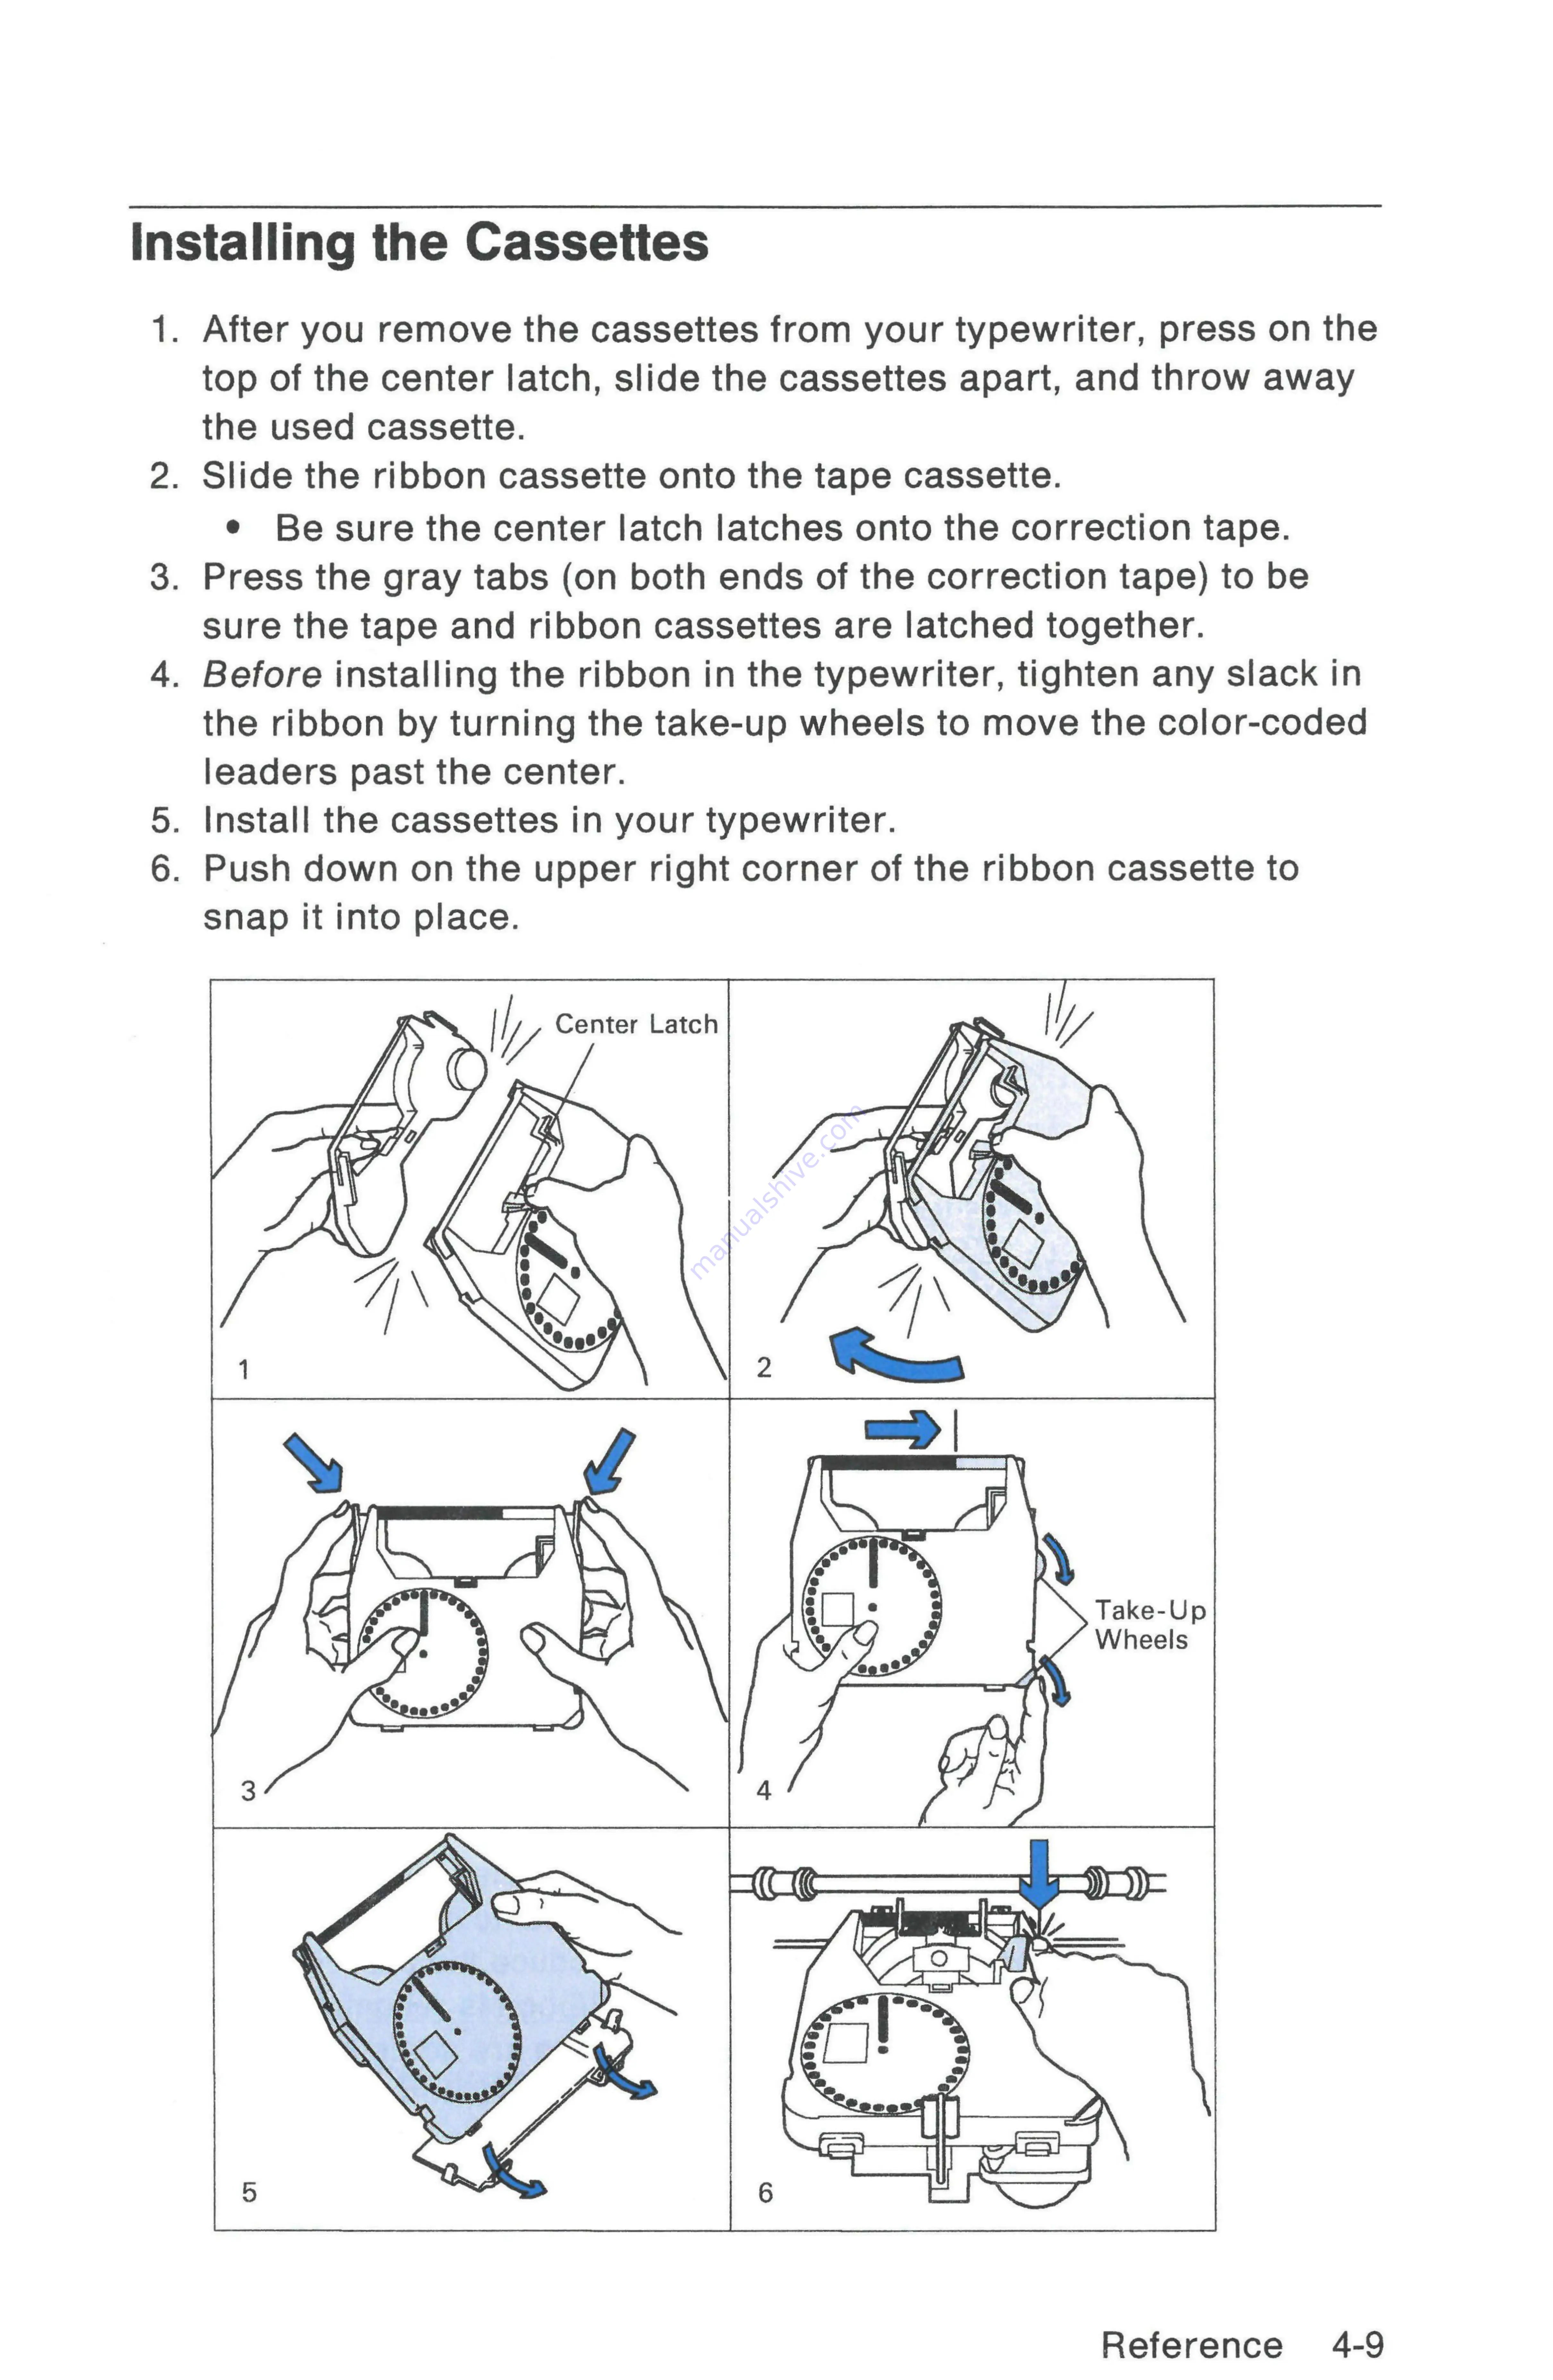
Installing

the

Cassettes

1.

oO

After you

remove the

cassettes

from

your typewriter,

press

on

the

top

of

the

center

latch,

slide

the

cassettes

apart,

and

throw

away

the used

cassette.

.

Slide

the

ribbon

cassette

onto

the

tape

cassette.

e

Be

sure

the

center

latch

latches

onto

the

correction tape.

.

Press

the gray

tabs

(on

both

ends

of

the

correction tape)

to

be

sure

the

tape

and

ribbon

cassettes

are

latched

together.

.

Before

installing

the

ribbon

in

the

typewriter, tighten

any

slack

in

the

ribbon

by

turning

the take-up

wheels

to

move

the color-coded

leaders

past

the center.

.

Install

the

cassettes

in

your

typewriter.

.

Push

down

on

the upper

right

corner

of

the

ribbon

cassette

to

snap

it

into

place.

Reference

4-9

Summary of Contents for Personal Wheelwriter 6781

Page 1: ......

Page 2: ...e changes will be incorporated in later editions of the publication IBM may make improvements and or changes in the product s and or the program s described in this publication at any time Publication...

Page 3: ...ble protection against such interference when operated in a residential area If this typewriter interferes with radio or television reception which can be determined by switching the typewriter off an...

Page 4: ...ing cables Do not use the machine in an area where it can become wet Keep hair and personal articles away from moving parts in the machine to avoid the possibility of getting them caught Refer service...

Page 5: ...set of keys located to the right of your keyboard allows you to move quickly and easily along the paper to any location up down left or right This typewriter is like having several typewriters in one...

Page 6: ...Vi...

Page 7: ...ins 1 11 Tabs 1 12 Shiftand Lock Keys 1 13 ADB KEY ccusscccscrnranannnnssonaa 1 13 Correction Memory 1 14 Erasing Manually 115 Automatic Carrier Return 1 16 Required Spaces 1 17 One Half Backspace 1 1...

Page 8: ...heel Application Recommendations 4 4 Removing the Printwheel 4 6 Installing the Printwheel 4 7 Ribbon Cassette System 4 8 Removing the Cassettes 4 8 Installing the Cassettes 4 9 Ribbon Application Rec...

Page 9: ...the Typewriter Parts of the Typewriter Page End Paper Release Indicator Lever On Off Switch Paper Bail Load Lever Margin Es 0 Code Key Spacebar Correction Key Indicator Light Panel Operating the Typew...

Page 10: ...the typewriter on and off press the switch located on the right side of the typewriter If the Line Space lights flash when the typewriter is turned on the batteries are low See Batteries on page 4 12...

Page 11: ...hold down Code while you press B Bold Bold Key See Summary of Code Key Functions on page 1 25 for a listing of the keys that are used with the Code key Line Space Key To set line spacing hold down Co...

Page 12: ...you slide the indicator all the way forward e As you type the top of the paper comes out of the typewriter and moves up to the lines on the indicator e The lines on the indicator tell you approximatel...

Page 13: ...the paper in the typewriter using the indicator marks on the paper table 3 Pull the Paper Bail Load Lever all the way forward to the load position When the paper begins to feed let go of the Paper Bai...

Page 14: ...ve backward quickly on the same typing line When this key is held down the carrier moves backward until it reaches the left margin e Press and hold to move forward quickly on the same typing line Usin...

Page 15: ...he chart below The correct pitch is automatically selected by the typewriter when you install a printwheel The pitch determines the number of characters typed per horizontal inch The following table s...

Page 16: ...elite type use the lower scale An orange pointer moves along the scale on your typewriter to show the position of the next character to print The margin pitch scale also contains centering marks When...

Page 17: ...l The impression setting returns to normal when you turn the machine off and back on The difference between normal impression and high impression is most apparent when using several carbons Typematic...

Page 18: ...f the cardholder indicates the base of the printing line As the typewriter prints the bottom of each character rests just above the line as shown below typing lines on the ty Printwheel Pointer You ma...

Page 19: ...set the right margin The old margin is automatically eliminated when a new margin is set The carrier does not lock at the right margin This allows you to type or space through the right margin The typ...

Page 20: ...All Tabs 1 Hold down TCIr while you press CRtn 2 Release the keys e The carrier moves to the left margin and all tabs are cleared The carrier can be at any position when you clear all tabs Helpful Hin...

Page 21: ...he Lock function when you turn Caps on Caps Key If you need to type numbers andcapital letters together use the Caps key Caps is similar to Lock When the Caps function is on only the alphabetic letter...

Page 22: ...pe any character after Bksp 2z on the line you are typing Erasing on the Line You Are Typing To erase the character you have just typed press the Correction key one time and the character is automatic...

Page 23: ...n bold print turn on Bold Print before erasing e fthe characters were underlined turn on Underline before erasing 2 Press the Correction key The printwheel spins but the character is not erased 3 Type...

Page 24: ...Automatic Carrier Return On and Off 1 Hold down Code while you press R ARtn to turn Automatic Carrier Return on e The ARtn light comes on 2 Hold down Code while you press R to turn Automatic Carrier R...

Page 25: ...e right margin finish the word you are typing 2 Hold down Code while you press Spacebar 3 Type the next word 4 Continue typing required spaces between words that must be kept together 5 After you type...

Page 26: ...the words you want to center e As you type the carrier backs up without printing f you make an error press the Correction key and type the correct character 5 Hold down Code while you press C The wor...

Page 27: ...derline 1 Hold down Code while you press U Cont to begin under lining The Cont light comes on 2 Type the words to be underlined The words and spaces are underlined automatically as you type 3 Hold dow...

Page 28: ...ese new functions to help you with your work CRtn 1 Type until you reach the first line where you want to indent 2 Press Spacebar Tab or to move the carrier to the desired temporary left margin positi...

Page 29: ...e correct character 4 Hold down Code while you press O The characters print flush with the right margin The Right Flush function is turned off when the words print Typing Right Flush with Any Point on...

Page 30: ...e above the typing line 2 Type the superscript The paper moves back to the typing line Notes 1 If you do not want your subscript or superscript underlined make sure Continuous Underline is off before...

Page 31: ...prints An exponent 3 prints Bold Print Hold down Code while you press B Bold to turn Bold Print on or off The Bold light comes on to indicate that Bold Print is on The characters print in bold as you...

Page 32: ...es backward but does not print Type the decimal point The number and the decimal point print Type any characters or numerals after the decimal point Hold down Code while you press D to move to the nex...

Page 33: ...er can be inserted Page 1 17 Bold Prints characters in bold type Page 1 23 Caps Turns Caps on or off When Caps is on capital letters numbers and punctuation can be typed without shifting Page 1 13 Cen...

Page 34: ...right margin or at any point on the typing line Page 1 21 Space Required Keeps words together on the same line when Automatic Carrier Return is on Page 1 17 Paragraph Symbol Section Symbol and Specia...

Page 35: ...other languages such as French and Spanish or ASCII PC and Latin Supplemental ISO Matching Printwheels and Keyboards Each printwheel for alternate keyboards contains characters other than those printe...

Page 36: ...to locate the character you want to type 5 When you finish typing in the alternate keyboard hold down Code while you press L The keyboard returns to the primary keyboard 6 Remove the country or speci...

Page 37: ...9 Canada English MEARS N OO 0 Denmark on iy J Finland France 251 2 10 Germany West Greece Greek 219 2 10 2 10 o cds ieco on Greece Latin 207 Italy HS RN 1 3 Japan English Latin America 5 Io Latin Supp...

Page 38: ...Keyboard Alphabetic Cross Reference continued Keypomaname io mmber Woy wz lePage nN NN oo N I ip J N I On 2 4 Alternate Keyboards...

Page 39: ...how the keyboard ID numbers and the character locations The charts are arranged numer ically by Keyboard ID numbers Keyboard ID 1 Australia Canada English New Zealand United States DUBE EEE JEE B 3 5...

Page 40: ...2 6 Alternate...

Page 41: ......

Page 42: ...2 8 Alternate Keyboa...

Page 43: ...Keyboard ID 70 Spain Alternate Keyboards 2 9...

Page 44: ...Keyboard ID 103 ASCII P 2 10 Alternate Keyboards...

Page 45: ...ce representative and avoid unnecessary downtime and service costs Before you call for service 1 Find your problem in the index on the next page 2 Turn to the page referenced 3 Complete as many steps...

Page 46: ...Character or Correction Leaves Shadows Typewriter Does NotErase Print Quality Problems Characters DoNot Print Characters Print Too Lightly Characters Unclear Typing Problems Line Spacing Aligns Incorr...

Page 47: ...ter is on 1 Look at the batteries for correct installation 2 If the batteries are installed correctly the batteries may be weak or dead 3 Replace all three weak or dead batteries 4 Do not turn the typ...

Page 48: ...rvice e Tell your service person which lights are blinking when you place the call All Lights Stay On Turn the typewriter off wait 10 seconds then turn the typewriter on again If all the lights still...

Page 49: ...cor rection tape matches the ribbon See page 4 11 and page 4 9 in the Reference chapter Try a new correction tape Try plain bond paper Look for folds in the paper Make sure the typewriter is on a leve...

Page 50: ...ay back 5 Make sure you are using the same pitch or language 6 Try a new printwheel Characters Print Too Lightly 1 Make sure the ribbon is installed correctly 2 Look for folds in the ribbon 3 Change t...

Page 51: ...nder the platen 4 Make sure the paper release lever is pushed all the way back 5 Make sure the platen is latched down at both ends Pull the paper release lever all the way toward you e Push down firml...

Page 52: ...ng There is a problem with the spell check option Turn the spell check option off and contact your authorized service represen tative Spell Check Functions Do Not Work If a function of the option does...

Page 53: ...artridge Printwheel Il is designed for use with IBM Wheelwriter Typewriters and IBM Wheelprinters The protec tive cartridge makes installation easy and protects the printwheel from damage The wide var...

Page 54: ...pe IBM s variety of attractive type IBM s variety of attractive type IBM s variety of attractive type IBM s variety of attractive type IBM S VARIETY OF ATTRACTIVE TYPE IBM s variety of attractive type...

Page 55: ...pestyles suit IBM s variety of attractive typestyles suit IBM s variety of attractive typestyles suit IBM s variety of attractive typestyles suit IBM s variety of attractive typestyles suit IBM s vari...

Page 56: ...s Typestyle Artisan 10 A Bookface Academic Prestige Pica Bold Print 2Pichi Dual Gothic Bite Prestige Elite Ratings A Good B Fair C Marginal NR Not Recommended Based on proper selection of ribbon carbo...

Page 57: ...oe Ratings A Good B Fair C Marginal Based on proper selection of ribbon carbon paper and stencils Note There are three symbol printwheels Symbol 10 Symbol 12 and Symbol 15 For best results use a symb...

Page 58: ...is against the platen 1 Pull the print hammer all the way toward you and hold it 2 While you are holding the print hammer grasp the printwheel tab 3 Lift the printwheel straight up and out of the slo...

Page 59: ...ent unwanted carrier motion make sure the paper bail is against the platen 1 Hold the printwheel so the letters IBM are in the upper left corner 2 Pull the print hammer all the way toward you and hold...

Page 60: ...eel color helps you match the ribbon to the correction tape See Ribbon Cassette Reorder Numbers on page 4 11 The color also tells you which type of ribbon you are using Removing the Cassettes 1 Space...

Page 61: ...atch latches onto the correction tape Press the gray tabs on both ends of the correction tape to be sure the tape and ribbon cassettes are latched together Before installing the ribbon in the typewrit...

Page 62: ...y and care must be used in the selection of a specific material to be typed on typestyle impression control and ribbon to produce the best result The IBM Easystrike Superior Write Correctable Ribbon i...

Page 63: ...Numbers Reorder Number 1337761 black 1337765 1337762 brown 1337763 blue IBM Easystrike Superior IBM Easystrike Lift Off Write Correctable Ribbon Tape Cassette Cassettes Reorder Number Reorder Number...

Page 64: ...u turn the typewriter on check the following while the typewriter is on 1 Look at the batteries for correct installation 2 If the batteries are installed correctly the batteries may be weak or dead 3...

Page 65: ...s will be lost 1 Make sure the typewriter is turned on 2 Raise the typewriter cover 3 Locate the black plastic battery holder on the right front side of the typewriter 4 Remove the holder by putting y...

Page 66: ...e springs e Make sure the plus signs on the batteries match the plus signs inside the holder 2 Place the battery holder back into the typewriter Note The batteries will not save margins and other sett...

Page 67: ...er and keybuttons Certain cleaning fluids may be harmful Do not use IBM cleaning fluid Serial Number Lo Serial Number To locate the serial number on your typewriter raise the type writer cover and loo...

Page 68: ...4 16 Reference...

Page 69: ...is typed In the French and Spanish Spell Check Options only words containing 64 characters or fewer are checked You must end the word before it can be checked The end of a word is recognized and the w...

Page 70: ...tal dictionary must be matched exactly You use the 1 2 3 and 4 keys with the Code key to activate the various functions of the Spell Check Option The words labeled above the keys are printed in green...

Page 71: ...Check on hold down Code while you press 1 The spelling beeper beeps to indicate that Spell Check is on To turn Spell Check off hold down Code while you press 1 If you type a word not found in either...

Page 72: ...to beep as if it were a misspelled word Each time you add a word to the supplemental dictionary or type a word already in the supplemental dictionary that word becomes the first word in the dictionar...

Page 73: ...st word you typed from the supplemental dictionary Changing the Sound of the Spelling Beeper You may want to change the sound of the spelling beeper to a tone that is different from the typewriter nex...

Page 74: ...A 6 Spell Check Option...

Page 75: ...1 6 Reloc 1 6 1 6 1 6 carrier return automatic 1 16 centering 1 18 centering marks defined 1 8 characters per inch 1 7 checking the batteries 4 12 cleaning the typewriter cover Code key 1 3 B Bold 1...

Page 76: ...key summary 1 25 Line Space 1 3 Lock and Caps 1 13 margin 1 11 paper and carrier movement 1 6 keys continued Reloc 1 6 Tab 1 12 typematic repeat 1 9 L latching the ribbon cassettes together 4 9 left...

Page 77: ...pitch defined 1 7 pointer 1 8 primary keyboard 2 1 print hammer 4 6 print quality problems 3 6 printwheel applications 4 4 1 24 printwheel continued identification 1 7 identification numbers 2 1 inst...

Page 78: ...Spell Check Option A 1 spell check problems 3 8 subscripts 1 22 superscripts 1 22 supplies ordering procedures 4 1 switch on off 1 2 Tab key 1 12 tabs clearing 1 12 permanent 1 12 setting 1 12 TCir ke...

Page 79: ...the book well organized Yes No 2 Was the content of the book accurate and complete Yes J No I 3 Was the book easy to use Yes 1 No J 4 What can we do to improve the book 5 What is your job title Quest...

Page 80: ...LY MAIL FIRST CLASS PERMIT NO 123 LEXINGTON KY 40511 POSTAGE WILL BE PAID BY ADDRESSEE International Business Machines Corporation Department F98 Building 962 3 740 New Circle Road N W Lexington Kentu...

Page 81: ...ind the book well organized Yes J No J 2 Was the content of the book accurate and complete Yes No Was the book easy to use Yes No 4 What can we do to improve the book 0 What is your job title Question...

Page 82: ...LY MAIL FIRST CLASS PERMIT NO 123 LEXINGTON KY 40511 POSTAGE WILL BE PAID BY ADDRESSEE International Business Machines Corporation Department F98 Building 962 3 740 New Circle Road N W Lexington Kentu...

Page 83: ...Do not expose to temperatures above 140 F such as in a closed vehicle...

Page 84: ...uff International Business Machines Corporation Information Products Division Form No S544 4210 0 Printed in USA P N 1181112 3 88 S544 4210 00 MEO...

Reviews: