background image

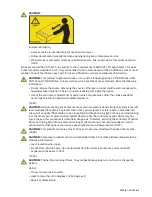
CAUTION:

Enclosure Integrity.
• Access covers are intended only for occasional removal.
• Follow documented procedures when opening during live or temporary service.
• When service is complete, promptly reinstall all covers, lids, and/or doors for correct operation.

(L031)

All lasers are certified in the U.S. to conform to the requirements of DHHS 21 CFR Subchapter J for class

1 laser products. Outside the U.S., they are certified to be in compliance with IEC 60825 as a class 1 laser

product. Consult the label on each part for laser certification numbers and approval information.

CAUTION: This product might contain one or more of the following devices: CD-ROM drive, DVD-

ROM drive, DVD-RAM drive, or laser module, which are Class 1 laser products. Note the following

information:
• Do not remove the covers. Removing the covers of the laser product could result in exposure to

hazardous laser radiation. There are no serviceable parts inside the device.

• Use of the controls or adjustments or performance of procedures other than those specified

herein might result in hazardous radiation exposure.

(C026)
CAUTION: Data processing environments can contain equipment transmitting on system links with

laser modules that operate at greater than Class 1 power levels. For this reason, never look into

the end of an optical fiber cable or open receptacle. Although shining light into one end and looking

into the other end of a disconnected optical fiber to verify the continuity of optic fibers may not

injure the eye, this procedure is potentially dangerous. Therefore, verifying the continuity of optical

fibers by shining light into one end and looking at the other end is not recommended. To verify

continuity of a fiber optic cable, use an optical light source and power meter. (C027)
CAUTION: This product contains a Class 1M laser. Do not view directly with optical instruments.

(C028)
CAUTION: Some laser products contain an embedded Class 3A or Class 3B laser diode. Note the

following information:
• Laser radiation when open.
• Do not stare into the beam, do not view directly with optical instruments, and avoid direct

exposure to the beam. (C030)

(C030)
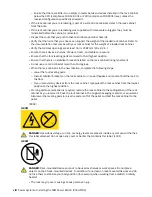
CAUTION: The battery contains lithium. To avoid possible explosion, do not burn or charge the

battery.
Do Not:
• Throw or immerse into water
• Heat to more than 100 degrees C (212 degrees F)
• Repair or disassemble

Safety notices  xi

Summary of Contents for Power E1050

Page 1: ...Power Systems Installing the IBM Power E1050 9043 MRX IBM GI11 0003 00...

Page 2: ...1110 and G229 9054 and the IBM Environmental Notices and User Guide Z125 5823 This edition applies to IBM Power Systems servers that contain the POWER10 processor and to all associated models Copyrig...

Page 3: ...ling the server and connecting expansion units 11 Completing the server setup 12 Setting up a preinstalled server 15 Prerequisite for installing the preinstalled server 15 Completing inventory for you...

Page 4: ...iv...

Page 5: ...erordnung geeignet Laser safety information IBM servers can use I O cards or features that are fiber optic based and that utilize lasers or LEDs Laser compliance IBM servers may be installed inside or...

Page 6: ...power attach the power cords to the outlets 5 For racks with a DC power distribution panel PDP restore the power from the Customer s DC power source and turn on the circuit breakers located in the PDP...

Page 7: ...g or overcurrent protection To provide the correct power connection to a rack refer to the rating labels located on the equipment in the rack to determine the total power requirement of the supply cir...

Page 8: ...ned at more than 10 degrees When the rack cabinet is in the new location complete the following steps Lower the four leveling pads Install stabilizer brackets on the rack cabinet or in an earthquake e...

Page 9: ...sition read the installation instructions Do not put any load on the slide rail mounted equipment mounted in the installation position Do not leave the slide rail mounted equipment in the installation...

Page 10: ...power cords and power cables L003 L007 CAUTION A hot surface nearby L007 L008 CAUTION Hazardous moving parts nearby L008 L018 or CAUTION High levels of acoustical noise are or could be under certain c...

Page 11: ...exposure C026 CAUTION Data processing environments can contain equipment transmitting on system links with laser modules that operate at greater than Class 1 power levels For this reason never look i...

Page 12: ...tended platform Only raise load if properly centered on platform Do not place more than 200 lb 91 kg on edge of sliding platform shelf also considering the load s center of mass gravity CoG Do not cor...

Page 13: ...ing System GR 1089 CORE The following comments apply to the IBM servers that have been designated as conforming to NEBS Network Equipment Building System GR 1089 CORE The equipment is suitable for ins...

Page 14: ...xiv Power Systems Installing the IBM Power E1050 9043 MRX...

Page 15: ...e Hardware Management Console Support and downloads website https www14 software ibm com webapp set2 sas f hmcl home html Consider the following prerequisites before you install the server Procedure 1...

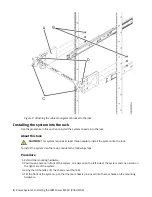
Page 16: ...ide flange locator studs on the slide rail into the rear EIA mounting holes 5 Position the slam latch bracket to cover the front EIA space of the slide rail Note Each side of the slam latch bracket is...

Page 17: ...t tool to install the system it is not necessary to remove components from the system chassis The following table lists the removal tasks you must perform so that you can lift the system and install i...

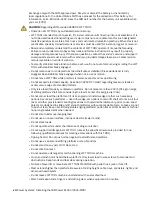
Page 18: ...if you will have three people to lift the system onto the rails and into the rack To reduce the weight of the system so that three people can lift it perform the following tasks Note If you are using...

Page 19: ...f the levers b Rotate the levers up and out to release the voltage regulator module from its connector c While holding the voltage regulator module by its levers pull upward to remove the voltage regu...

Page 20: ...edure 1 Ensure that you have the electrostatic discharge ESD wrist strap on and that the ESD clip is plugged into a ground jack or connected to an unpainted metal surface If not do so now 2 Remove the...

Page 21: ...management bracket takes up three EIA units Three screws are used to attach each side of the cable management bracket to the rack flange Each screw goes in the middle hole of each of the three EIA ra...

Page 22: ...ack To install the system into the rack complete the following steps Procedure 1 Extend the mounting hardware 2 Position one person in front of the system one person on the left side of the system and...

Page 23: ...in the system b Gently push the voltage regulator module into its connector c Rotate the levers in and press down on the latches to secure the voltage regulator module in its slot 3 Replace the system...

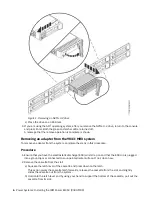
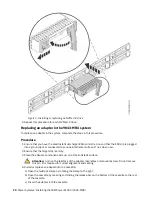
Page 24: ...not do so now 2 Ensure that the target slot is empty 3 Place the adapter component side up on a flat antistatic surface Attention A pin on the tailstock of the adapter resembles a removable screw Do n...

Page 25: ...es in the 9043 MRX system To replace a power supply complete the steps in this procedure Procedure 1 Ensure that you have the electrostatic discharge ESD wrist strap on and that the ESD clip is plugge...

Page 26: ...p by using an HMC with DHCP Perform these tasks to complete the server setup by using an HMC that uses a DHCP network configuration About this task Note Before you continue with this step ensure that...

Page 27: ...g the server setup by using an HMC with a static network configuration Perform these tasks to complete the server setup by using an HMC that uses a static network configuration Procedure 1 Connect an...

Page 28: ...necessary update your managed system firmware Select Actions Update Firmware System Firmware Update Completing the server setup without using the HMC To access the eBMC without using the HMC complete...

Page 29: ...s task Note Before you install your preinstalled server ensure that Each power cable is firmly seated into a corresponding power distribution unit receptacle All the circuit breaker buttons on each PD...

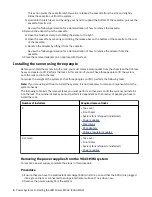
Page 30: ...cords and power distribution unit PDU for your preinstalled server Before you set up a console you must remove the shipping bracket and connect power cords About this task Attention Attach an electros...

Page 31: ...pply c Use the hook and loop fastener and tie the power cord to the power supply handle 3 Repeat this procedure for each power supply that you removed 4 Replace the system top cover 5 Remove the syste...

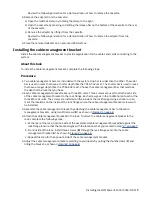
Page 32: ...for system service management monitoring maintenance and control The eBMC also provides access to the system event log files SEL The eBMC is a specialized service processor that monitors the physical...

Page 33: ...Ethernet port assuming that T3 ETH1 is connected to the HMC 2 If you haven t already done so connect the power cables to the power supplies The panel displays 01 N 3 Press the up arrow key to select...

Page 34: ...HMC 2 If you haven t already done so connect the power cables to the power supplies The panel displays 01 N 3 Press the up arrow key to select 02 and press Enter 4 Press Enter again A less than symbol...

Page 35: ...b Select Add Static IPv4 Address c Enter your IP address gateway and subnet information d Click Add Installing the IBM Power E1050 9043 MRX 21...

Page 36: ...22 Power Systems Installing the IBM Power E1050 9043 MRX...

Page 37: ...oduct s and or the program s described in this publication at any time without notice Any references in this information to non IBM websites are provided for convenience only and do not in any manner...

Page 38: ...st users who have a disability such as restricted mobility or limited vision to use information technology content successfully Overview The IBM Power servers include the following major accessibility...

Page 39: ...deployed for this Software Offering provide you as the customer the ability to collect personally identifiable information from end users via cookies and other technologies you should seek your own le...

Page 40: ...nforderungen der EU Richtlinie 2014 30 EU zur Angleichung der Rechtsvorschriften ber die elektromagnetische Vertr glichkeit in den EU Mitgliedsstaatenund h lt die Grenzwerte der EN 55022 EN 55032 Klas...

Page 41: ...ormationen Das Ger t erf llt die Schutzanforderungen nach EN 55024 und EN 55022 EN 55032 Klasse A Japan Electronics and Information Technology Industries Association JEITA Notice This statement applie...

Page 42: ...ssion FCC Notice This equipment has been tested and found to comply with the limits for a Class A digital device pursuant to Part 15 of the FCC Rules These limits are designed to provide reasonable pr...

Page 43: ...to reduce electromagnetic emissions to prevent interference to the reception of radio and television broadcasts Class B Notices The following Class B statements apply to features designated as electro...

Page 44: ...ormit tszeichen CE zu f hren Verantwortlich f r die Einhaltung der EMV Vorschriften ist der Hersteller International Business Machines Corp New Orchard Road Armonk New York 10504 Tel 914 499 1900 Der...

Page 45: ...by one or more of the following measures Reorient or relocate the receiving antenna Increase the separation between the equipment and receiver Connect the equipment into an outlet on a circuit differe...

Page 46: ...ay these publications or any portion thereof outside your enterprise without the express consent of IBM Rights Except as expressly granted in this permission no other permissions licenses or rights ar...

Page 47: ......

Page 48: ...IBM Part Number 03KG355 GI11 0003 00 1P P N 03KG355...

Reviews: