


5.
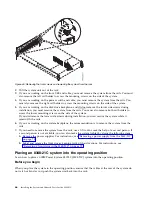
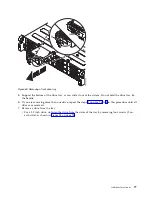
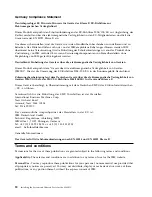
Support the bottom of the drive tray as you slide it out of the system. Do not hold the drive tray by
the handle.
6.
If you are removing more than one drive, repeat the steps 3 on page 76 to 5 in this procedure until all
drives are removed.
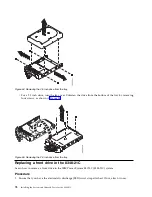
7.
Remove a drive from the tray.
v
For a 3.5 inch drive, unfasten the drive from the sides of the tray by removing four screws (2 on
each side), as shown in Figure 54 on page 78.
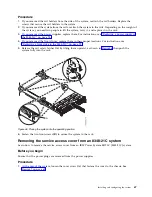
Figure 53. Removing a front drive tray
Additional procedures
77
Summary of Contents for Power Systems S812LC 8348-21C
Page 2: ......
Page 6: ...iv Installing the System and Ordered Parts for the 8348 21C...
Page 16: ...xiv Installing the System and Ordered Parts for the 8348 21C...
Page 76: ...or or 1 2 3 4 or 1 2 3 4 or 60 Installing the System and Ordered Parts for the 8348 21C...
Page 88: ...72 Installing the System and Ordered Parts for the 8348 21C...
Page 108: ...92 Installing the System and Ordered Parts for the 8348 21C...
Page 109: ......
Page 110: ...IBM Printed in USA...


