Procedure
1.
If you are installing a new feature, ensure that you have the software required to support the new
feature. See IBM Prerequisite.
2.
If you are performing an installation or replacement procedure that might put your data at risk,
ensure, wherever possible, that you have a current backup of your system or logical partition
(including operating systems, licensed programs, and data).
3.
Review the installation or replacement procedure for the feature or part.
4.
Note the significance of color on your system.
Blue or terra-cotta on a part of the hardware indicates a touch point where you can grip the hardware
to remove it from or install it in the system, open or close a latch, and so on. Terra-cotta might also
indicate that the part can be removed and replaced with the system or logical partition power on.
5.
Ensure that you have access to a medium flat-blade screwdriver, a Phillips screwdriver, and a pair of
scissors.
6.
If parts are incorrect, missing, or visibly damaged, do the following:
v
If you are replacing a part, contact the provider of your parts or next level of support.
v
If you are installing a feature, contact one of the following service organizations:
– The provider of your parts or next level of support.
– In the United States, the IBM Rochester Manufacturing Automated Information Line (R-MAIL) at
1-800-300-8751.
In countries and regions outside of the United States, use the following website to locate your service
and support telephone numbers:
7.
If you encounter difficulties during the installation, contact your service provider, your IBM reseller,
or your next level of support.
8.
Ensure that the top cover is on when running for thermal performance.
9.
If you are installing new hardware in a logical partition, you need to understand and plan for the
implications of partitioning your system. For information, see Logical Partitioning.
LEDs on the 8348-21C system
Use this information as a guide to the LEDs on the IBM Power System S812LC (8348-21C) system.
The LEDs indicate various system status. If the part does not have a problem indicator LED, you can use
a troubleshooting program such as
impitool
to identify the issue.
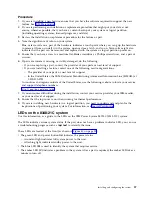
These LEDs are located at the front (as shown in Figure 40 on page 58).
v
The green LED and power button (A) indicates the power status.
– A constant light indicates full system power to the unit.
– A flashing light indicates standby power to the unit.
v
The blue LED (B) is used to identify the system that requires service.
v
The amber LED (C) indicates a problem in the system. After a part is repaired, the amber LED takes a
minute to turn off.
Installing and configuring the system
57
Summary of Contents for Power Systems S812LC 8348-21C
Page 2: ......
Page 6: ...iv Installing the System and Ordered Parts for the 8348 21C...
Page 16: ...xiv Installing the System and Ordered Parts for the 8348 21C...
Page 76: ...or or 1 2 3 4 or 1 2 3 4 or 60 Installing the System and Ordered Parts for the 8348 21C...
Page 88: ...72 Installing the System and Ordered Parts for the 8348 21C...
Page 108: ...92 Installing the System and Ordered Parts for the 8348 21C...
Page 109: ......
Page 110: ...IBM Printed in USA...

