What to do next
Go to the next procedure in the getting started process, “Configure appliance
settings.”
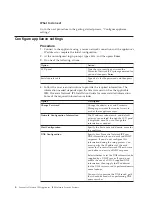
Configure appliance settings
Procedure
1.
Connect to the appliance using a secure network connection and the appliance's
IP address to complete the initial configuration.
2.
At the unconfigured login prompt, type
admin
, and then press
Enter
.
3.
Do one of the following actions:
Option
Action
LCD panel
Type the case-sensitive password the
Proventia Network IPS system generated for
you and then press
Enter
.
Serial console cable
Type
admin
for the password and then press
Enter
.
4.
Follow the on-screen instructions to provide the required information. The
information needed depends upon the firmware version. See the applicable
IBM Proventia Network IPS Installation Guide for more detailed information.
Some of the required information includes:
Option
Description
Change Password
Change the admin, root, and Proventia
Manager passwords that control access to
each of these appliance areas.
Network Configuration Information
The IP address, subnet mask, and default
gateway you entered through the LCD panel
is displayed here. You can change this
information as needed.
Host Configuration
Specify the host name and domain name for
the appliance.
DNS Configuration
Specify how Proventia Network IPS uses
DNS information to send e-mail and SNMP
responses. If you do not configure this
information during the setup process, you
must specify the IP address of the mail
server for Proventia Network IPS each time
you define an e-mail or SNMP response.
Select whether to let the DNS information be
supplied by a DHCP server. If you do not
enable the use of a DHCP-supplied DNS
information, then supply the IP addresses
for the DNS servers used to perform domain
name lookups.
You must also provide the DNS search path
that should be used when performing DNS
query searches.
4
Proventia Network IPS Appliances: IBM Internet Security Systems


