Using the Three-Button Mouse
The mouse is a hand-operated locating device. A three-button mouse is available for use with the system.
Consult your application publication for the exact use of the three-button mouse.
You can use the mouse to perform such functions as positioning a cursor, selecting items from a menu, or
moving around in your document much easier and faster than if you used only the keyboard. The cursor
moves exactly as you move the mouse on a flat surface, such as a desktop.
With the mouse buttons, you can perform functions such as selecting and deselecting options, extending
your selection, or choosing a command. The precise function of your mouse depends on the software you
are using.
The mouse cable plugs into the mouse connector at the rear of the system.
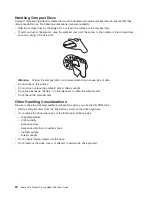
Handling the Mouse Correctly
For best operation, handle the mouse with care. Incorrect handling can damage the mouse.
Do not:
v
Operate the mouse on cloth, unfinished wood, newspaper, or carpet.
v
Drop or hit the mouse.
v
Carry the mouse by holding onto the cable.
v
Expose the mouse to extreme temperatures or direct sunlight.
v
Place the mouse in liquid spills.
Caring for the Mouse
The operating surface for the mouse should be smooth, clean, and flat. For example, you can operate the
mouse on the following surfaces:
v
Finished wood
v
Glass
v
Enamel
v
Plastic
v
Paper (except newspaper)
v
Metal
Rough surfaces collect contaminants that can be transferred to the interior of the mouse by the ball.
Rough surfaces can also cause the pads located on the bottom of the mouse to prematurely wear. A
deeply pitted surface could cause erratic operation of the mouse. The surface you use should be free from
spills, dirt, dust, lint, wax, eraser dust, and other foreign matter.
To care for the mouse:
v
Inspect the work surface for spills or other contaminants.
v
Dust the work surface.
v
If you are using a paper pad, inspect it for wear and replace it if necessary.
Cleaning the Mouse
Use the following steps to clean the mouse:
1. Remove the retaining ring by turning it counterclockwise, in the direction of the arrow, as shown in the
illustration.
Chapter 3. Using the System
19
Summary of Contents for pSeries 615 Model 6C3
Page 1: ...pSeries 615 Model 6C3 and Model 6E3 User s Guide SA38 0629 00 ERserver ...
Page 2: ......
Page 3: ...pSeries 615 Model 6C3 and Model 6E3 User s Guide SA38 0629 00 ERserver ...
Page 14: ...xii pSeries 610 Model 6C3 and Model 6E3 User s Guide ...
Page 16: ...xiv pSeries 610 Model 6C3 and Model 6E3 User s Guide ...
Page 20: ...xviii pSeries 610 Model 6C3 and Model 6E3 User s Guide ...
Page 26: ...6 pSeries 610 Model 6C3 and Model 6E3 User s Guide ...
Page 46: ...26 pSeries 610 Model 6C3 and Model 6E3 User s Guide ...
Page 86: ...66 pSeries 610 Model 6C3 and Model 6E3 User s Guide ...
Page 110: ...90 pSeries 610 Model 6C3 and Model 6E3 User s Guide ...
Page 146: ...126 pSeries 610 Model 6C3 and Model 6E3 User s Guide ...
Page 164: ...144 pSeries 610 Model 6C3 and Model 6E3 User s Guide ...
Page 168: ...148 pSeries 610 Model 6C3 and Model 6E3 User s Guide ...
Page 172: ...152 pSeries 610 Model 6C3 and Model 6E3 User s Guide ...
Page 204: ...184 pSeries 610 Model 6C3 and Model 6E3 User s Guide ...
Page 207: ......


