4.
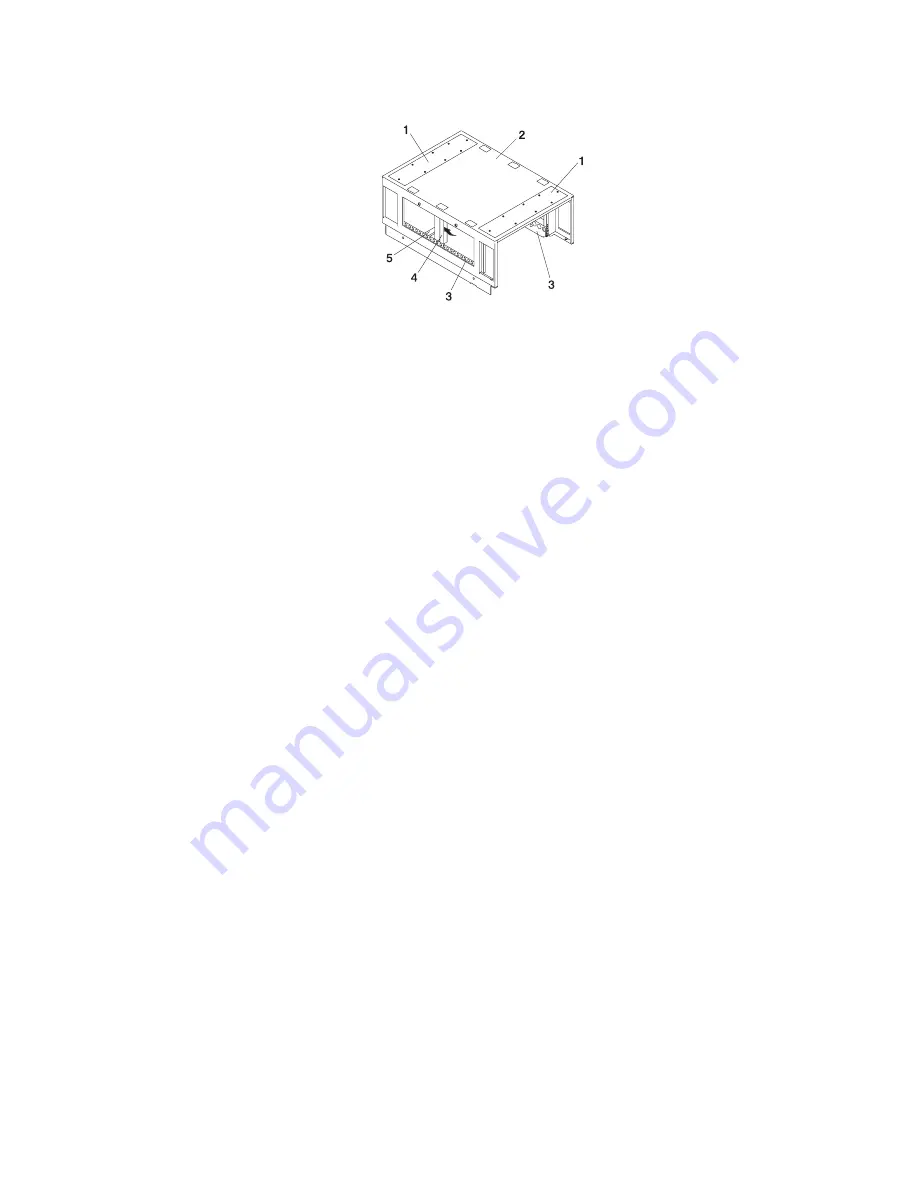
Install
the
left
and
right
BPE
rails,
(item
3
in
the
illustration
on
page
183).
1
Front
and
Rear
Rack
Top
Frame
Top
Panels
4
Foam
and
Metal
Air
Baffle
2
Rack
Top
Frame
5
Rack
Top
Frame
Cross
Brace
3
Left
and
Right
BPE
Rails
5.
Insert
and
align
the
foam
and
metal
air
baffle
(item
4
in
the
illustration
on
page
183)
to
the
left
side
of
the
rack
top
frame,
securing
it
in
place
with
a
screw.
6.
Install
the
rack
top-frame
cross
brace
(item
5
in
the
illustration
on
page
176).
7.
Install
the
front
and
rear
BPEs.
Refer
to
the
illustration
on
page
176.
8.
Install
the
BPRs
as
follows:
a.
Make
sure
the
ON/OFF
switch
is
in
the
UNLOCK/OFF
position.
b.
Push
the
BPR
straight
into
the
Bulk
Power
Enclosure
(BPE).
c.
Tighten
the
thumbscrew
on
each
side
of
the
BPR,
using
the
torque
tool
(part
number
6422789).
d.
Rotate
the
release
levers
down
on
each
side
of
the
BPR.
e.
Repeat
for
the
other
BPRs.
There
can
be
up
to
six
BPRs,
with
three
in
front
and
three
in
back.
9.
Install
the
Bulk
Power
Controllers
(BPCs)
as
follows:
a.
Push
the
BPC
straight
into
the
Bulk
Power
Enclosure
(BPE).
b.
Tighten
the
thumbscrew
on
each
side
of
the
BPC,
using
the
torque
tool
(part
number
6422789).
c.
Repeat
for
the
other
BPCs.
There
are
two
BPCs,
with
one
in
front
and
one
in
back.
10.
Install
the
BPDs
as
follows:
a.
Push
the
BPD
straight
into
the
Bulk
Power
Enclosure
(BPE).
b.
Tighten
the
thumbscrew
on
each
side
of
the
BPD,
using
the
torque
tool
(part
number
6422789).
c.
Repeat
for
the
other
BPDS.
There
can
be
up
to
four
BPDs,
with
two
in
front
and
two
in
back.
11.
Install
the
BPFs
as
follows:
Note:
A
grille
covers
the
fan
on
the
front
of
the
fan
assembly.
a.
Locate
the
BPF
to
be
installed.
b.
Install
the
fan
cover
plate.
c.
Push
the
BPF
straight
out
of
the
BPE.
d.
Tighten
the
upper
and
lower
fasteners,
using
the
torque
tool
(part
number
6422789).
e.
Repeat
for
the
other
BPF.
There
are
two
BPFs,
one
in
front
and
one
in
back.
12.
For
the
reduced-height
option,
remove
the
front
and
rear
upper
shipping
bars
(item
1
in
the
following
illustration).
Appendix
I.
Removing
and
Installing
the
Rack
Top
Frame
183
Summary of Contents for pseries 655
Page 1: ...pSeries 655 Installation Guide SA38 0616 03 ERserver...
Page 2: ......
Page 3: ...pSeries 655 Installation Guide SA38 0616 03 ERserver...
Page 14: ...xii Eserver pSeries 655 Installation Guide...
Page 22: ...6 Eserver pSeries 655 Installation Guide...
Page 54: ...38 Eserver pSeries 655 Installation Guide...
Page 101: ...2 1 1 Top of Cassette 2 Handle Chapter 4 Installation and Removal Procedures 85...
Page 125: ...1 Metal EMC Shield 2 Adapter Bracket Chapter 4 Installation and Removal Procedures 109...
Page 128: ...112 Eserver pSeries 655 Installation Guide...
Page 132: ...116 Eserver pSeries 655 Installation Guide...
Page 156: ...140 Eserver pSeries 655 Installation Guide...
Page 204: ...188 Eserver pSeries 655 Installation Guide...
Page 211: ......
Page 212: ...Part Number 80P3836 Printed in USA February 2004 SA38 0616 03 1P P N 80P3836...


