1
1
2
2
3
3
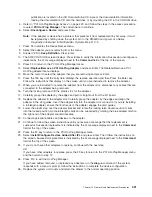
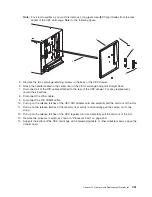
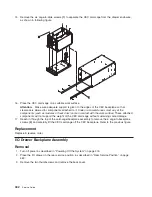
7.
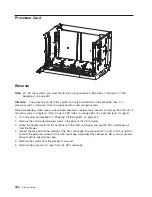
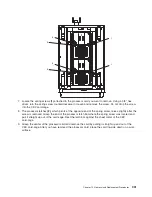
Locate
the
spring
screws
(1)
attached
to
the
processor
card
you
want
to
remove.
Using
a
3/8
″
hex
driver,
turn
the
spring
screw
counterclockwise
to
loosen
and
remove
the
screw.
Do
not
drop
the
screw
into
the
CEC
card-cage.
8.
The
processor
latches
(2)
,
which
pivots
at
the
opposite
end
of
the
spring
screw,
raises
slightly
after
the
screw
is
removed.
Grasp
the
end
of
the
processor
latch
bar
where
the
spring
screw
was
located
and
pull
it
straight
up
out
of
the
card-cage.
Rest
the
latch
bar
against
the
sheet
metal
of
the
CEC
card-cage.
9.
Grasp
the
center
of
the
processor
card
and
remove
the
card
by
pulling
it
straight
up
and
out
of
the
CEC
card-cage.
After
you
have
removed
the
processor
card,
place
the
card
top-side
down
on
a
work
surface.
Chapter
10.
Removal
and
Replacement
Procedures
431
Summary of Contents for RS/6000 Enterprise Server M80
Page 1: ...RS 6000 Enterprise Server Model M80 Eserver pSeries 660 Model 6M1 Service Guide SA38 0571 01...
Page 10: ...x Service Guide...
Page 14: ...xiv Service Guide...
Page 16: ...xvi Service Guide...
Page 22: ...Data Flow 4 Service Guide...
Page 30: ...CEC Card Cage Rear of CEC drawer viewed from top cover removed 12 Service Guide...
Page 84: ...66 Service Guide...
Page 176: ...158 Service Guide...
Page 376: ...358 Service Guide...
Page 430: ...412 Service Guide...
Page 485: ...Chapter 11 Parts Information This chapter contains parts information for the system 467...
Page 486: ...CEC Drawer Card Assembly 9 468 Service Guide...
Page 488: ...CEC Drawer Backplane 5 2a 1 2 3 4 470 Service Guide...
Page 490: ...CEC Drawer Power Supplies 1 2 3 4 5 6 7 8 9 472 Service Guide...
Page 492: ...CEC Drawer Fan Assemblies 2 1 3 4 5 6 8 9 10 11 12 13 7 14 474 Service Guide...
Page 496: ...7 8 9 10 6 1 2 3 4 4 5 478 Service Guide...
Page 508: ...490 Service Guide...
Page 520: ...502 Service Guide...
Page 522: ...504 Service Guide...
Page 526: ...508 Service Guide...
Page 558: ...540 Service Guide...
Page 565: ......

