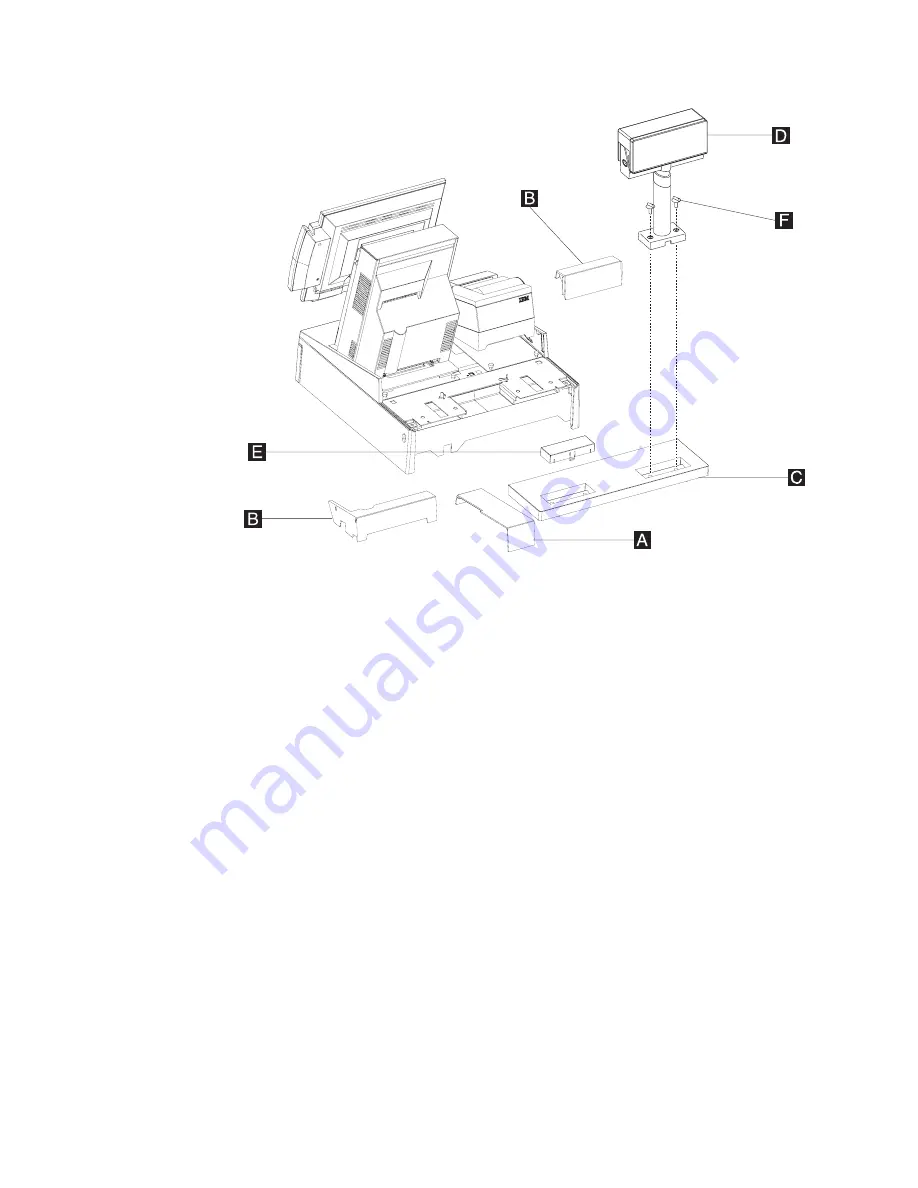
14.
Attach
the
distributed
customer
display
D
to
the
cash
drawer
with
two
thumbscrews
F
and
snap
the
entire
unit
into
place
at
the
rear
of
the
tray.
15.
Close
the
cash-drawer
rear
cover.
16.
Plug
the
AC
power
cords
for
the
printer
and
the
system
into
an
AC
outlet.
17.
After
your
installation
is
complete,
press
the
printer
power
switch
under
the
printer
cover
to
power
on
the
printer.
18.
Switch
ON
the
power
to
the
SurePOS
500
Model
514.
Verify
that
the
system
is
operating
correctly
by
checking
the
indicator
lights
(LEDs)
on
the
front
of
the
system.
See
“Powering
on
and
the
LED
states”
on
page
14.
19.
Install
your
software.
Refer
to
IBM
SurePOS
Model
514
Operating
System
Installation
Guide
.
Figure
24.
Attaching
filler
panels
and
the
rear
modesty
cover
Mounting
the
SurePOS
500
Model
514
Updated
October,
2008
32
SurePOS
500
Model
514
Summary of Contents for SurePOS 514
Page 2: ......
Page 8: ...Updated October 2008 vi SurePOS 500 Model 514 ...
Page 12: ...Updated October 2008 x SurePOS 500 Model 514 ...
Page 16: ...Updated October 2008 xiv SurePOS 500 Model 514 ...
Page 20: ...Figure 2 Serial number location Updated October 2008 4 SurePOS 500 Model 514 ...
Page 32: ...Installing the IBM SurePOS 500 Model 514 Updated October 2008 16 SurePOS 500 Model 514 ...
Page 64: ...Installing additional peripheral devices Updated October 2008 48 SurePOS 500 Model 514 ...
Page 68: ...Updated October 2008 52 SurePOS 500 Model 514 ...
Page 102: ...Updated October 2008 86 SurePOS 500 Model 514 ...
Page 138: ...Updated October 2008 122 SurePOS 500 Model 514 ...
Page 143: ...IBM IBM GA27 4004 GA27 4004 Updated October 2008 Appendix D Safety information 127 ...
Page 152: ...Updated October 2008 136 SurePOS 500 Model 514 ...
Page 156: ...Updated October 2008 140 SurePOS 500 Model 514 ...
Page 158: ...Updated October 2008 142 SurePOS 500 Model 514 ...
Page 161: ......


