10.
Remove
the
base
plate.
See
“Base
plate
-
removal
and
replacement”
on
page
77.
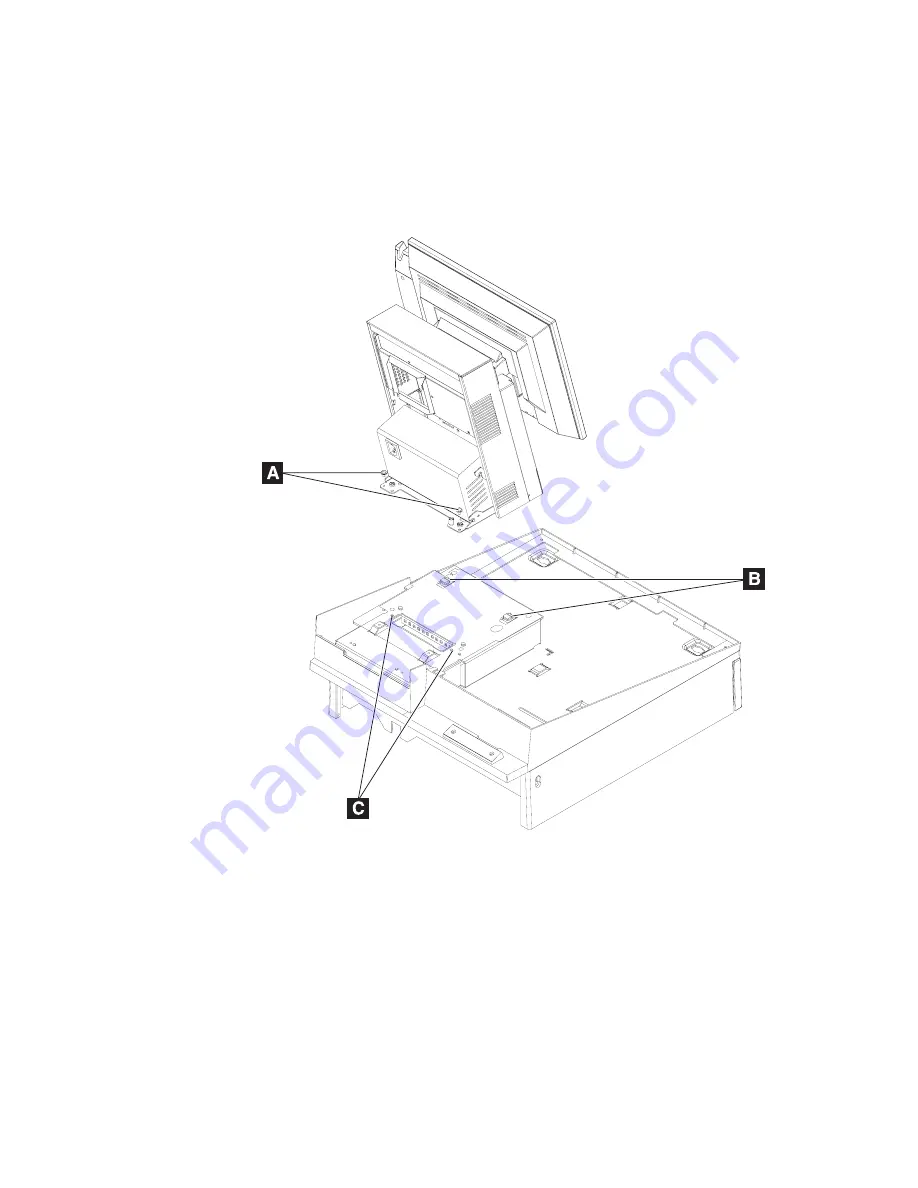
11.
Attach
the
SurePOS
500
Model
514
to
the
mounting
plate
as
shown
in
Figure
28.
Slide
the
unit
from
the
back
toward
the
front
until
the
frame
fits
into
the
tabs
B
,
and
the
screws
A
and
mounting
holes
C
are
lined
up.
Tighten
the
two
base-bracket
screws.
12.
Install
the
IBM
4610
SureMark
printer
on
the
integration
tray,
by
performing
the
following
steps:
Note:
See
the
4610
SureMark
Point-of-Sale
Printers
User’s
Guide
for
detailed
information
about
switch
settings
and
cabling
for
the
printer.
Figure
28.
Installing
the
SurePOS
500
Model
514
onto
the
integration
tray
Mounting
the
SurePOS
500
Model
514
Updated
October,
2008
Chapter
3.
Mounting
the
SurePOS
500
Model
514
37
Summary of Contents for SurePOS 514
Page 2: ......
Page 8: ...Updated October 2008 vi SurePOS 500 Model 514 ...
Page 12: ...Updated October 2008 x SurePOS 500 Model 514 ...
Page 16: ...Updated October 2008 xiv SurePOS 500 Model 514 ...
Page 20: ...Figure 2 Serial number location Updated October 2008 4 SurePOS 500 Model 514 ...
Page 32: ...Installing the IBM SurePOS 500 Model 514 Updated October 2008 16 SurePOS 500 Model 514 ...
Page 64: ...Installing additional peripheral devices Updated October 2008 48 SurePOS 500 Model 514 ...
Page 68: ...Updated October 2008 52 SurePOS 500 Model 514 ...
Page 102: ...Updated October 2008 86 SurePOS 500 Model 514 ...
Page 138: ...Updated October 2008 122 SurePOS 500 Model 514 ...
Page 143: ...IBM IBM GA27 4004 GA27 4004 Updated October 2008 Appendix D Safety information 127 ...
Page 152: ...Updated October 2008 136 SurePOS 500 Model 514 ...
Page 156: ...Updated October 2008 140 SurePOS 500 Model 514 ...
Page 158: ...Updated October 2008 142 SurePOS 500 Model 514 ...
Page 161: ......


