background image

Index

A

ac power connector

19

ac power LED

20

ac power supply specifications

6

accessible documentation

49

activity LED, hard disk drive

19

alerts, systems-management software

15

assistance, getting

45

attention notices

5

B

bezel

installing

37

LEDs

17

locator LED

18

overtemperature LED

19

power-on LED

18

removing

37

system error LED

19

C

cabling

13

caution statements

5

chaining the EXP2500s

13

Class A electronic emission notice

50

command-line interface

43

components of EXP2500

7

contamination, particulate and gaseous

49

CRU part numbers (EXP2512)

26

CRU part numbers (EXP2524)

27

D

danger statements

5

dc power LED

20

dimensions of EXP2500

6

documentation CD

3

documentation format

49

drive path, redundant

13

E

electrical input specifications

6

electronic emission Class A notice

50

emergency situation

restarting EXP2500

24

shutting down EXP2500

23

environmental service module (ESM)

43

environmental specifications

6

ESM

connectors

20

error LED

21

Ethernet link LED

21

Ethernet port

20

ESM (continued)

Ethernet speed LED

21

LEDs

21

locator LED

21

power-on LED

21

replacing

35

SAS in connector

20

SAS link LED

21

SAS out connector

20

service port

20

ESM error LED

21

Ethernet link LED (on ESM)

21

Ethernet port (ESM)

20

Ethernet speed LED (on ESM)

21

EXP2500

chaining

13

major components

7

F

fans and redundant cooling

7

fault LED (on power supply

20

FCC Class A notice

50

features and operating specifications

6

front LEDs

hard disk drive activity LED

19

locator LED

18

overtemperature LED

19

power-on LED

18

system error LED

19

G

gaseous contamination

49

getting help

45

H

hard disk drive

activity LED

19

information record

2

installing 2.5-inch

11, 33

installing 3.5-inch

12, 34

LED states and descriptions

30

removing 2.5-inch

31

removing 3.5-inch

32

replacing

30

specifications

6

status LED

19

hardware service and support

46

heat output specifications

6

help, getting

45

hot-swap components

hard disk drive

17

power supply

19

hot-swap power supply

controls and connectors

19

© Copyright IBM Corp. 2010, 2011

55

Summary of Contents for System Storage EXP2512 Express Storage...

Page 1: ...System Storage EXP2512 Express Storage Enclosure and System Storage EXP2524 Express Storage Enclosure Installation User s and Maintenance Guide GA32 0965 01...

Page 2: ......

Page 3: ...System Storage EXP2512 Express Storage Enclosure and System Storage EXP2524 Express Storage Enclosure Installation User s and Maintenance Guide GA32 0965 01...

Page 4: ...ty Notices and Environmental Notices and User Guide documents on the IBM Documentation CD and the Warranty Information document that comes with the product Third Edition November 2011 Copyright IBM Co...

Page 5: ...otteen lue turvaohjeet kohdasta Safety Information Avant d installer ce produit lisez les consignes de s curit Vor der Installation dieses Produkts die Sicherheitshinweise lesen Prima di installare qu...

Page 6: ...ystems Safety Notices document under D005a Be sure to read all caution and danger statements in this document before you perform the procedures Read any additional safety information that comes with t...

Page 7: ...DANGER Multiple power cords The product might be equipped with multiple power cords To remove all hazardous voltages disconect all power cords L003 1 2 or 1 2 Safety v...

Page 8: ...l be attached to this product to properly wired outlets v When possible use one hand only to connect or disconnect signal cables v Never turn on any equipment when there is evidence of fire water or s...

Page 9: ...CAUTION or 18 kg 39 7 lb or 18 32 kg 39 7 70 5 lb The weight of this part or unit is between 18 and 32 kg 39 7 and 70 5 lb It takes two persons to safely lift this part or unit C009 Safety vii...

Page 10: ...viii System Storage EXP2512 and EXP2524 Installation and Maintenance Guide...

Page 11: ...g off the EXP2500 22 Turning off the EXP2500 in an emergency 23 Turning on the EXP2500 after an emergency 24 Chapter 4 Parts listing EXP2512 and EXP2524 expansion enclosures 25 Replaceable EXP2500 com...

Page 12: ...e conformit la r glementation d Industrie Canada 50 Australia and New Zealand Class A statement 50 European Union EMC Directive conformance statement 50 Germany Class A statement 51 Japan Voluntary Co...

Page 13: ...logy for easy replacement without turning off the EXP2500 The EXP2500 comes with two 800 watt ac power supplies one environmental services module ESM a filler panel to cover the empty ESM bay and 12 o...

Page 14: ...he front of the EXP2512 The locations are the same for the EXP2524 Note The illustrations in this document might differ slightly from your hardware Machine type model and serial number Product name Us...

Page 15: ...ns of the documents and view documents using Adobe Acrobat Reader or xpdf The Documentation Browser automatically detects the regional settings in your server and displays the documents in the languag...

Page 16: ...Click View Book to view the selected document or documents in Acrobat Reader or xpdf If you selected more than one document all the selected documents are opened in Acrobat Reader or xpdf To search al...

Page 17: ...ght help you avoid inconvenient or problem situations v Attention These notices indicate potential damage to programs devices or data An attention notice is placed just before the instruction or situa...

Page 18: ...cm 3 4 in v Depth 55 6 cm 21 9 in v Width 44 6 cm 17 6 in v Weight approximate 8 7 kg 19 2 lb for an empty unit 16 6 kg 36 5 lb for a standard unit 26 7 kg 58 8 lb for a fully configured unit Environm...

Page 19: ...wo 800 watt hot swap power supplies which provide redundant power for all EXP2500 configurations If a problem occurs with one of the power supplies the other power supply can meet the power requiremen...

Page 20: ...e EXP2524 Hot swap hard disk drive Filler panel Bezels Rear view of the EXP2512 and EXP2524 Hot swap power supplies ESM Filler panel OK IN OK IN 8 System Storage EXP2512 and EXP2524 Installation and M...

Page 21: ...right One rack installation hardware kit Two rails right and left assembly Eight M5 screws Eight spacers v Printed documents IBM Rack Installation Instructions for the IBM System Storage EXP2512 and...

Page 22: ...d save it for future use Each of the drive bays must contain either a filler panel or a hard disk drive To install a hard disk drive in the EXP2500 complete the following steps You can install drives...

Page 23: ...ve the hard disk drive from the package b Make sure that the drive tray handle is in the open unlocked position c Align the drive assembly with the guide rails in the bay Filler panel Drive tray assem...

Page 24: ...LED is flashing the drive is rebuilding Controller management information In some cases the RAID controller automatically resets the drive to the Hot Spare or Rebuild state If the drive state does not...

Page 25: ...ontroller supports more than one EXP2500 per physical port you can connect two or more EXP2500s by chaining them together See the documentation that comes with your RAID controller or the device that...

Page 26: ...c Repeat steps 2a on page 13 and 2b on page 13 for each EXP2500 that you add 14 System Storage EXP2512 and EXP2524 Installation and Maintenance Guide...

Page 27: ...urchased separately For information about the initial startup of the EXP2500 see EXP2500 power features on page 21 Systems management software support The EXP2500 provides software alert functions thr...

Page 28: ...16 System Storage EXP2512 and EXP2524 Installation and Maintenance Guide...

Page 29: ...l up to 12 hot swap SAS or nearline SAS hard disk drives in the EXP2512 and up to 24 hot swap SAS or nearline SAS hard disk drives in the EXP2524 Filler panel The EXP2500 comes with filler panels in t...

Page 30: ...LED The LEDs on the front of the EXP2524 are shown in the following illustration Drive activity LED green Drive status LED amber Power on LED Reserved for future use System error LED Locator LED Over...

Page 31: ...the rear of the EXP2500 Attention The EXP2500 comes with two installed power supplies When one power supply fails the power supply unit must be replaced to reestablish redundancy When you replace a f...

Page 32: ...is not turned on OK to remove LED blue Not in use Rear view ESMs The connectors on the ESM are shown in the following illustration SAS out connector SAS in connectors Service port Ethernet port SAS o...

Page 33: ...ernet speed LED green When this green LED is lit it indicates that the Ethernet port is operating at 100 Mbps and when this LED is off the Ethernet port is operating at 10 Mbps EXP2500 power features...

Page 34: ...should remain lit If one or more amber fault LEDs remain lit see Chapter 5 Solving problems on page 41 Powering off the EXP2500 Attention Except in an emergency situation never power off if any fault...

Page 35: ...rgency Attention Emergency situations might include fire flood extreme weather conditions or other hazardous circumstances If a power outage or emergency situation occurs always turn off all power swi...

Page 36: ...he EXP2500 before or at the same time you power on the device that contains the RAID controller to which the EXP2500 is connected 3 Turn on each connected device according to the power on sequence tha...

Page 37: ...1 CRUs is your responsibility If IBM installs a Tier 1 CRU at your request you will be charged for the installation v Tier 2 customer replaceable unit You may install a Tier 2 CRU yourself or request...

Page 38: ...3 5 inch hard disk drive 300 GB 15 K SAS hard disk drive 49Y1935 450 GB 15 K SAS hard disk drive 49Y1936 600 GB 15 K SAS hard disk drive 49Y1937 1 TB 7 2 K nearline SAS hard disk drive 49Y1939 2 TB 7...

Page 39: ...15 K SAS hard disk drive 49Y1932 300 GB 15 K SAS hard disk drive 81Y9914 300 GB 10 K SAS hard disk drive 49Y1931 600 GB 10 K SAS hard disk drive 81Y9600 900 GB 10 K SAS hard disk drive 81Y9894 500 GB...

Page 40: ...arts listing continued Index Description CRU part number Tier 1 CRU part number Tier 2 FRU part number Power cord rack jumper 2 8 meter 39M5377 28 System Storage EXP2512 and EXP2524 Installation and M...

Page 41: ...EXP2500 to allow the cooling system to work correctly Leave approximately 50 mm 2 0 in of open space around the front and rear of the EXP2500 Do not place objects behind the power supplies v You have...

Page 42: ...d descriptions are shown in the following table LED LED state Description Activity green Flashing Flashes during read write or inquiry operations to the hard disk drive Status amber Flashing Flashes t...

Page 43: ...drive handle Filler panel Drive tray assembly Drive handle b Grasp the handle and pull the drive partially out of the bay and wait at least 20 seconds before you remove the drive from the EXP2500 Thi...

Page 44: ...partially out of the bay and wait at least 20 seconds before you remove the drive from the EXP2500 This enables the drive to spin down and avoids possible damage to the drive d Make sure that there is...

Page 45: ...e from the package b Make sure that the drive tray handle is in the open unlocked position c Align the drive assembly with the guide rails in the bay Filler panel Drive tray assembly Drive handle d Ge...

Page 46: ...tus LED are off v If the amber status LED is lit and not flashing remove the drive from the unit and wait 10 seconds then reinstall the drive If the status LED is flashing the drive is rebuilding Cont...

Page 47: ...connect the SAS cable from the ESM 4 Open the two release levers The ESM moves out of the bay approximately 0 6 cm 0 25 inch OK OK IN OK OK IN Release levers 5 Slide the ESM out of the bay and set it...

Page 48: ...ess the orange release tab to the right just enough to release the handle no more than 6 mm 0 25 in as you rotate the handle downward OK OK IN Handle Release tab Power supply OK OK IN 4 Using the hand...

Page 49: ...or extend the front over the table edge 2 Grasp the handle on the front of the bezel and pull until the bezel is clear of the bottom tab on the chassis flange 3 Lift the bezel off the chassis flange I...

Page 50: ...power supply on page 36 5 Remove the ESM and filler panel see Replacing an ESM on page 35 6 Remove the enclosure from the rack cabinet turn it on its side with the bottom facing toward you and place...

Page 51: ...at attach the midplane to the midplane assembly and lift off the failed midplane Midplane assembly Midplane 12 Unpack the replacement midplane and align the six screw holes on the midplane with the si...

Page 52: ...crews that you removed in step 8 on page 38 16 Turn the enclosure on its side with the bottom facing toward you and insert the two screws on the bottom of the enclosure by using the two screws that yo...

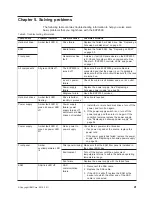
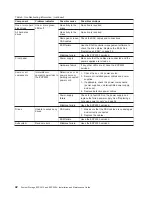
Page 53: ...lashing Drive rebuild or identity in process No action is required Power supply Amber fault LED lit green dc power LED off Power supply failure power supply turned off minimum hard disk drives not ins...

Page 54: ...500 serviced Some or all components Intermittent or sporadic power loss to the EXP2500 Defective ac or dc power source or partially connected power cord 1 Check the ac or dc power source 2 Secure all...

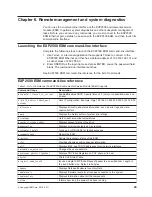
Page 55: ...pecified means no timeout cfgip IP_address Subnet_mask gateway Sets IP configuration Example cfgip 192 168 0 3 255 255 255 0 192 168 0 2 collsvcsnap Displays all config and status information such as...

Page 56: ...44 System Storage EXP2512 and EXP2524 Installation and Maintenance Guide...

Page 57: ...ostic tests that you can perform Most systems operating systems and programs come with documentation that contains troubleshooting procedures and explanations of error messages and error codes If you...

Page 58: ...e U S and Canada call 1 800 IBM SERV 1 800 426 7378 Hardware service and support You can receive hardware service through your IBM reseller or IBM Services To locate a reseller authorized by IBM to pr...

Page 59: ...s or implied warranties in certain transactions therefore this statement may not apply to you This information could include technical inaccuracies or typographical errors Changes are periodically mad...

Page 60: ...DVD drive speed is the variable read rate Actual speeds vary and are often less than the possible maximum When referring to processor storage real and virtual storage or channel volume KB stands for 1...

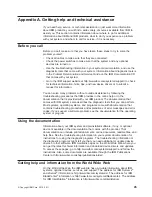
Page 61: ...f such remedial measures is a customer responsibility Table 8 Limits for particulates and gases Contaminant Limits Particulate v The room air must be continuously filtered with 40 atmospheric dust spo...

Page 62: ...y using other than recommended cables and connectors or by unauthorized changes or modifications to this equipment Unauthorized changes or modifications could void the user s authority to operate the...

Page 63: ...wortung f r die Einhaltung der Schutzanforderungen wenn das Produkt ohne Zustimmung der IBM ver ndert bzw wenn Erweiterungskomponenten von Fremdherstellern ohne Empfehlung der IBM gesteckt eingebaut w...

Page 64: ...adio interference may occur in which case the user may be required to take corrective actions Japan Electronics and Information Technology Industries Association JEITA statement Japanese Electronics a...

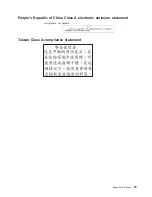
Page 65: ...People s Republic of China Class A electronic emission statement Taiwan Class A compliance statement Appendix B Notices 53...

Page 66: ...54 System Storage EXP2512 and EXP2524 Installation and Maintenance Guide...

Page 67: ...specifications 6 ESM connectors 20 error LED 21 Ethernet link LED 21 Ethernet port 20 ESM continued Ethernet speed LED 21 LEDs 21 locator LED 21 power on LED 21 replacing 35 SAS in connector 20 SAS li...

Page 68: ...requirement specifications 6 power supply controls and connectors 19 replacing 36 specifications 6 power off the EXP2500 23 power on LED on bezel 18 power on LED ESM 21 power on the EXP2500 21 power s...

Page 69: ...500 in an emergency 23 turning on the EXP2500 21 U United States electronic emission Class A notice 50 United States FCC Class A notice 50 W website publication ordering 45 support 45 support line tel...

Page 70: ...58 System Storage EXP2512 and EXP2524 Installation and Maintenance Guide...

Page 71: ......

Page 72: ...Part Number 90Y8809 Printed in USA GA32 0965 01 1P P N 90Y8809...

Reviews: