become illuminated. The error code remains on the Operator Control Panel until
a push button is pressed, which causes the Operator Control Panel to return to
the Home Screen.
v
Numeric error codes are only used for unrecoverable, fatal errors, otherwise text
status messages are displayed.
Power-ON Display
When the library powers ON or resets, it goes through several internally controlled
processes that allow it to get initialized and running. These processes are called
Power-On-Self-Test (POST). During the POST the Operator Control Panel displays
information that may be meaningless until POST is complete. When the POST is
finished, the library displays the Startup screen, then the Home screen.
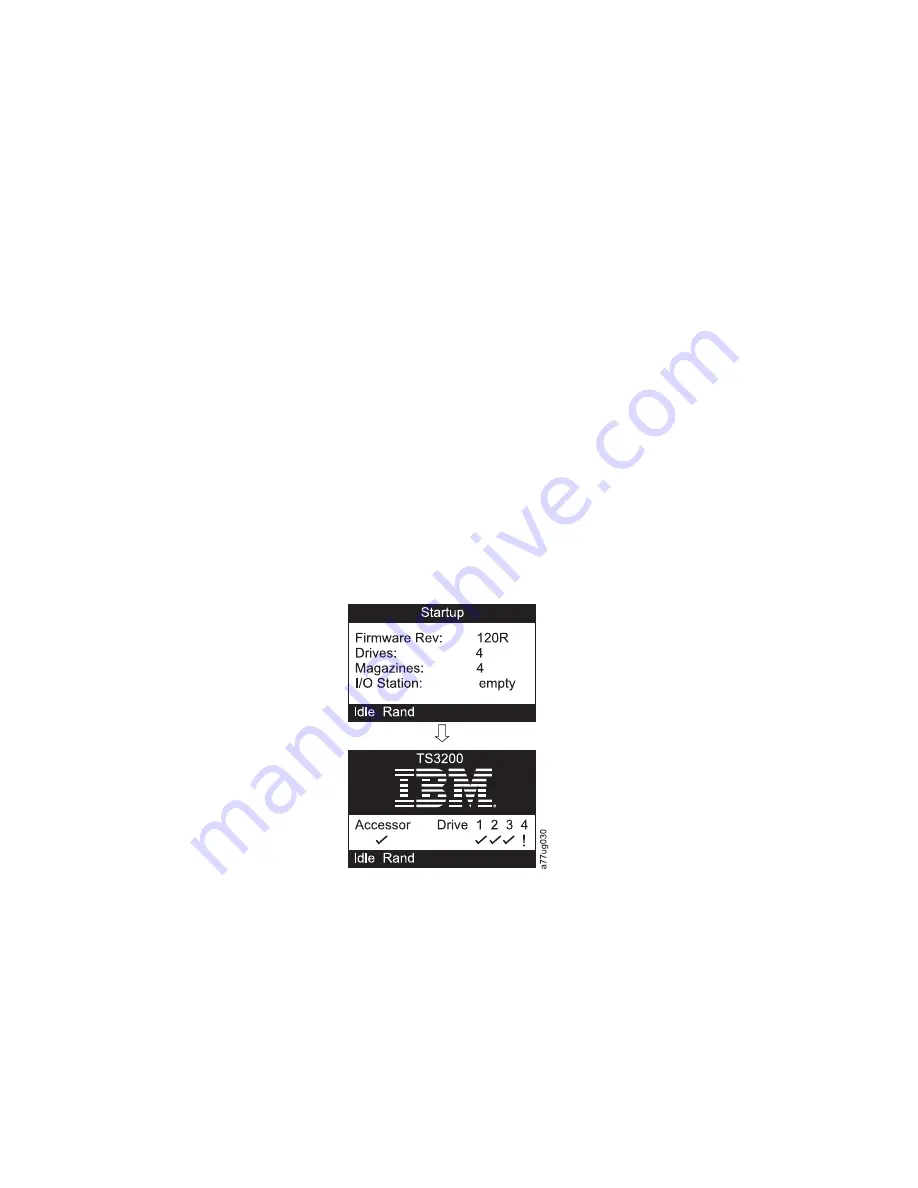
The Startup screen is the first screen that appears after powering ON the library. It
contains the following information:
v
Firmware Rev: the current level of library firmware
v
Drives: the total number of drives that the library can support
v
Magazines: the total number of magazines in the library
v
I/O Station: the current status of the I/O Station
The Home screen example below shows that the Accessor and Drives 1 through 3
are OK as shown by the check marks in the Home Screen, but that drive 4 either
has a problem, or is missing. The exclamation mark (!), which shows that there is
something wrong with drive 4 will not go away until the drive is either fixed, or is
replaced. At that time, the explanation mark will become a check mark.
Note about the Front Panel LEDs
All LEDs are updated during power ON and reset sequences. Upon power ON or
software reset, the library illuminates all LEDs as soon as POST allows. When
initialization starts, all LEDs are extinguished and the Ready/Activity LED flashes
at a rate of approximately one second per cycle. When the mechanical initialization
is complete, the Ready/Activity LED will stop flashing and be constantly
illuminated.
Figure 2-1. Power-ON screens
2-2
TS3100 Tape Library and TS3200 Tape Library Setup, Operator, and Service Guide
Summary of Contents for System Storage TS3100
Page 2: ......
Page 12: ...x TS3100 Tape Library and TS3200 Tape Library Setup Operator and Service Guide...
Page 16: ...xiv TS3100 Tape Library and TS3200 Tape Library Setup Operator and Service Guide...
Page 18: ...xvi TS3100 Tape Library and TS3200 Tape Library Setup Operator and Service Guide...
Page 30: ...xxviii TS3100 Tape Library and TS3200 Tape Library Setup Operator and Service Guide...
Page 110: ...4 44 TS3100 Tape Library and TS3200 Tape Library Setup Operator and Service Guide...
Page 190: ...5 80 TS3100 Tape Library and TS3200 Tape Library Setup Operator and Service Guide...
Page 240: ...8 14 TS3100 Tape Library and TS3200 Tape Library Setup Operator and Service Guide...
Page 246: ...9 6 TS3100 Tape Library and TS3200 Tape Library Setup Operator and Service Guide...
Page 318: ...B 8 TS3100 Tape Library and TS3200 Tape Library Setup Operator and Service Guide...
Page 348: ...F 2 TS3100 Tape Library and TS3200 Tape Library Setup Operator and Service Guide...
Page 352: ...H 2 TS3100 Tape Library and TS3200 Tape Library Setup Operator and Service Guide...
Page 372: ...X 4 TS3100 Tape Library and TS3200 Tape Library Setup Operator and Service Guide...
Page 373: ......
Page 374: ...Part Number 35P2859 Printed in USA GA32 0545 12 1P P N 35P2859...


