background image

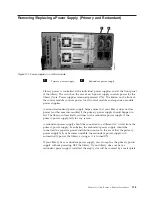
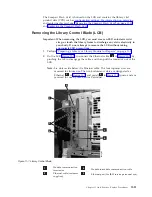
1

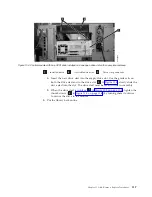
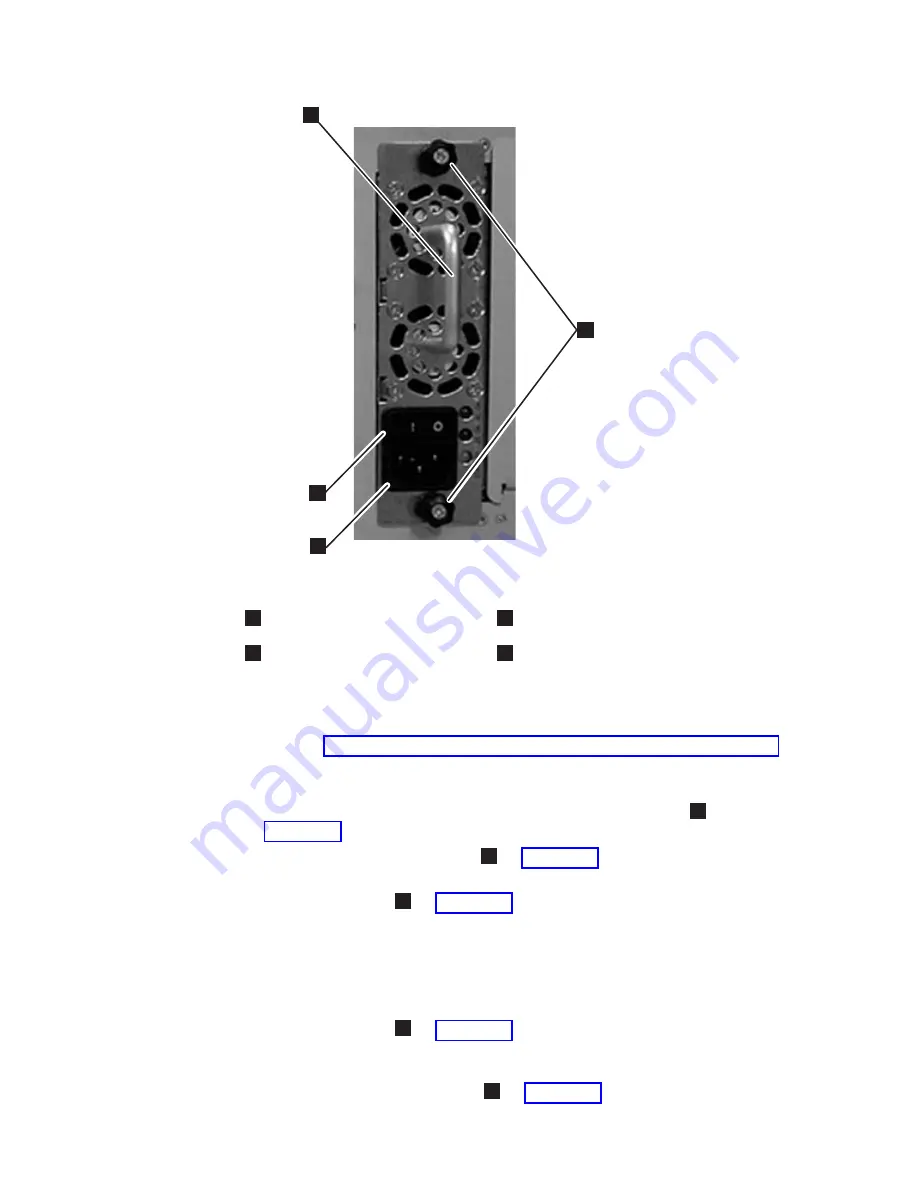
Handle


3


Power


cord


receptacle


2


Thumb


screws


4


Power


switch


Removing


a


Primary


Power


Supply


1.


Perform


“Preparing


a


Library


or


Library


Module


for


Repairs”


on


page


11-2.


2.


Unplug


each


end


of


the


power


cord


in


the


proper


sequence.


Attention:


First,


disconnect


the


power


cord


from


the


power


source.


Then,


disconnect


the


power


cord


from


the


power


supply


receptacle


(

3


in


Figure


11-2).


3.


Loosen


the


two


thumb


screws


(

2


in


Figure


11-2)


by


turning


them


counterclockwise.


4.


Grasp


the


handle


(

1


in


Figure


11-2)


and


slowly


pull


the


power


supply


toward


you,


while


supporting


it


from


underneath.


5.


Install


a


metal


cover


plate


over


the


vacant


power


supply


slot


if


you


are


not


immediately


installing


a


replacement.

Replacing


a


Primary


Power


Supply


1.


Grasp


the


handle


(

1


in


Figure


11-2)


while


supporting


the


power


supply


from


underneath.


Then,


line


up


the


power


supply


with


the


guides


in


the


slot,


and


carefully


push


the


power


supply


into


the


library.


2.


Tighten


the


two


thumb


screws


(

2


in


Figure


11-2)


by


turning


them


clockwise.


a66mi022

4

2

1

3


Figure


11-2.


Power


Supply


11-4


TS3310


Tape


Library


Setup


and


Operator


Guide

Summary of Contents for System Storage TS3310

Page 1: ...IBM System Storage TS3310 Tape Library Setup and Operator Guide GA32 0477 00...

Page 2: ......

Page 3: ...IBM System Storage TS3310 Tape Library Setup and Operator Guide GA32 0477 00...

Page 4: ...irst Edition November 2005 This edition applies to the IBM System Storage TS3310 Tape Library Setup and Operator Guide GA32 0477 00 and to the subsequent releases and modifications until otherwise ind...

Page 5: ...v E mailing IBM Internet or IBMLink from US starpubs us ibm com IBMLink from Canada STARPUBS at TORIBM Include the following information in your e mail Exact publication title Form number for example...

Page 6: ...iv TS3310 Tape Library Setup and Operator Guide...

Page 7: ...Media 1 14 Environmental and Shipping Specifications for Tape Cartridges 1 14 Multi Path Architecture 1 15 Specifications 1 15 Product Environment 1 16 Supported Servers Operating Systems and Softwar...

Page 8: ...eating Logical Libraries 7 3 Deleting Modifying a Logical Library 7 3 Assigning Cleaning Slots 7 3 Assigning I O Station Slots 7 4 Entering License Keys 7 4 Creating Users Accounts 7 4 Modifying Delet...

Page 9: ...peAlert Flag 8 Not Data Grade 10 17 T038 Drive TapeAlert Flag 9 Write Protected 10 17 T039 Drive TapeAlert Flag 12 Unsupported Format 10 18 T040 Drive TapeAlert Flag 15 MIC Chip Failure 10 18 T041 Dri...

Page 10: ...ersions 11 17 Desktop to Rack Mounted Library Conversion 11 17 Rack Mounted to Desktop Library Conversion 11 17 Removing Installing Library Foot Pads 11 19 Removing Library Foot Pads 11 19 Installing...

Page 11: ...LTO Ultrium 3 Tape Cartridge 8 6 8 4 Setting the write protect switch 8 7 8 5 Tape cartridges in a Turtlecase 8 8 8 6 Double boxing tape cartridges for shipping 8 9 8 7 Checking for gaps in the seams...

Page 12: ...x TS3310 Tape Library Setup and Operator Guide...

Page 13: ...2 8 2 6 Recommended maximum quantity of drives per SCSI bus 2 9 3 1 Shipment contents 3 2 3 2 Rack Mount Kit contents 3 5 3 3 Additional Rack Hardware Kit contents 3 6 5 1 Operator Panel Menu Command...

Page 14: ...xii TS3310 Tape Library Setup and Operator Guide...

Page 15: ...some existing condition A caution notice can be accompanied by one of several symbols If the symbol is It means A hazardous electrical condition with less severity than electrical danger A generally...

Page 16: ...provals to the latest standards as they apply Protective Devices The library has the following protective devices v Monitored access to the library v Main power switch The sections that follow describ...

Page 17: ...st devices in the bottom of the rack cabinet Always install servers and optional devices starting from the bottom of the rack cabinet v Rack mounted devices are not to be used as a shelf or work space...

Page 18: ...provide the correct power connection to a rack refer to the rating labels located on the equipment in the rack to determine the total pwer requirement of the supply circuit v For sliding drawers Do n...

Page 19: ...Ensure that the four leveling pads are raised to their highest position v Ensure that there is no stabilizer bracket installed on the rack cabinet during movement v Do not use a ramp inclined at more...

Page 20: ...EC concerning waste electrical and electronic equipment WEEE The Directive determines the framework for the return and recycling of used appliances as applicable throughout the European Union This la...

Page 21: ...s IBM has established a return process for reuse recycling or proper disposal of used IBM sealed lead acid nickel cadmium nickel metal hydride and other battery packs from IBM Equipment For informatio...

Page 22: ...xx TS3310 Tape Library Setup and Operator Guide...

Page 23: ...GA32 0478 provides information for installation operation and maintenance v IBM Ultrium Device Driver Installation and User s Guide GA32 0430 provides instructions for attaching IBM supported hardware...

Page 24: ...xxii TS3310 Tape Library Setup and Operator Guide...

Page 25: ...as doubled to 400 GB native capacity 800 GB with 2 1 compression with the IBM TotalStorage LTO Ultrium 400 GB Data Cartridge for use only with Ultrium 3 format tape drives and drive performance has mo...

Page 26: ...module 2 1 2 6 40 30 14U library 5U control module 9U expansion module 6 1 4 18 120 110 Storage slots increase by 10 slots whenever a module is connected to another module I O slots in an expansion mo...

Page 27: ...l module I O Station has a capacity of six cartridges A 9U expansion module I O Station has a capacity of 12 cartridges When an I O Station slot is assigned to a logical library only that logical libr...

Page 28: ...er which enables remote access to the library For more information on the Operator Panel and the Web User Interface see Chapter 5 User Interfaces on page 5 1 Power Button Pressing the Power Button 4 i...

Page 29: ...g system tests to ensure that the library is functioning properly The LCB houses the Compact Flash Card which stores vital product data VPD such as library settings serial number etc The LCB indicates...

Page 30: ...ion has dual AC line input and dual DC power supplies A power supply 3 in Figure 1 2 on page 1 5 can be hot swapped if the library has a redundant power supply A redundant power supply can be hot adde...

Page 31: ...tor 3 in Figure 1 4 the Picker 2 in Figure 1 4 which is attached to the Carrier 1 in Figure 1 4 and the Bar Code Scanner 4 in Figure 1 4 The Climber moves the Robotic System within the library The Pic...

Page 32: ...sentative 0500 For information on ordering additional features or replacement parts for your library see Chapter 12 Parts List on page 12 1 Ultrium 3 Tape Drives This library supports the Ultrium 3 Ta...

Page 33: ...oad If a line cord or power supply fails the second supply sources the complete power load Optionally a single power supply and line cord may be installed if redundant power is not required The second...

Page 34: ...O the control module slots can be configured as storage slots The number of available I O and storage slots listed in the table above are adjusted for the ten unusable slots in each configuration The...

Page 35: ...AN configuration availability and management For more information see Using Multiple Data Paths for Data Path Failover on page 2 3 Library Drive Code Update Feature Code 0500 Order feature code 0500 L...

Page 36: ...relative position to the CM The expansion module directly below the CM is number 1 Columns A storage column is a group of slots arranged vertically in the library Columns are represented by the second...

Page 37: ...within a module The drive bays within a module are numbered from top to bottom A one based numbering system is used The top drive bay is drive bay 1 A full address of a drive is of the form Module Dr...

Page 38: ...Specifications for Tape Cartridges Before using a tape cartridge acclimate it to the operating environment for 24 hours or the time necessary to prevent condensation in the drive the time will vary de...

Page 39: ...tics without middleware or a dedicated server host acting as a library manager The Multi Path Architecture is compliant with the following attachment interfaces v SCSI v Fibre Channel The library is c...

Page 40: ...media storage requirements see Environmental and Shipping Specifications for Tape Cartridges on page 1 14 and the section about media storage requirements in the Setup and Operator Guide The library...

Page 41: ...er documentation for the library on the Internet You can use one of the following procedures to access this material Note If you do not have Internet access and you need information about device drive...

Page 42: ...1 18 TS3310 Tape Library Setup and Operator Guide...

Page 43: ...e entire physical library v The library prevents requests from the server to move media across the boundaries of logical libraries Library Sharing The library s default configuration allows a single a...

Page 44: ...the library to simultaneously back up and restore data from heterogeneous applications For example the library can be partitioned so that it processes v Commands from Application 1 about Department X...

Page 45: ...ontrol Path Failover feature is activated by a license key For more information about using the control path failover feature see the IBM Ultrium Device Drivers Installation and User s Guide Note LTO...

Page 46: ...ation Coordinate Default SCSI IDs Control Module Drive 1 0 1 2 Drive 2 0 2 1 9U Expansion Module Drive 3 1 1 6 Drive 4 1 2 5 Drive 5 1 3 4 Drive 6 1 4 3 Note You can change a SCSI ID by using the Web...

Page 47: ...nd AL_PA the lower the priority of the device in the loop You can also specify Loop IDs that allow the drive to dynamically arbitrate the AL_PA with other Fibre Channel devices on the loop This method...

Page 48: ...4 X AE 77 X 5A 120 X 10 35 X AD 78 X 59 121 X 0F 36 X AC 79 X 56 122 X 08 37 X AB 80 X 55 123 X 04 38 X AA 81 X 54 124 X 02 39 X A9 82 X 53 125 X 01 40 X A7 83 X 52 126 X 00 41 X A6 84 X 51 127 42 X A...

Page 49: ...pe drive and the library see the IBM TotalStorage LTO Ultrium Tape Drive SCSI Reference and the IBM System Storage TS3310 Tape Library SCSI Reference Note The Medium Changer SCSI ID is the same as the...

Page 50: ...per SCSI bus Only use the maximum system to device cable length of 25 m 82 ft when attaching directly to one device a point to point interconnection Physical Characteristics of the SCSI Interface The...

Page 51: ...ending on the application and data compression ratio Note however that library Medium Changer control is required on at least one SCSI bus The Medium Changer device is required to be addressed via LUN...

Page 52: ...ss the devices in its own group Two types of zoning exist hardware zoning and software zoning Hardware zoning is based on physical fabric port number Software zoning is defined with WWNN or WWPN While...

Page 53: ...Storage Area Network With Storage Area Network SAN components the possibilities for connecting multiple systems and multiple drives have increased Not all software and systems are designed to share dr...

Page 54: ...2 12 TS3310 Tape Library Setup and Operator Guide...

Page 55: ...ck Without drive sleds and power supplies a 5U library control module weighs approximately 50 lbs Without drive sleds and power supplies a 14U library control module 9U expansion module weighs approxi...

Page 56: ...unt Kit if ordered 1 Additional Rack Hardware Kit for each expansion module ordered 1 Deskside Kit library feet and screws if optional Rack Mount Kit is ordered If a Rack Mount Kit was not ordered wit...

Page 57: ...brary Two module communication terminators 1 and 4 in Figure 3 2 Module to module communication cable 2 in Figure 3 2 Power cord in each power supply 5 and 6 in Figure 3 2 then into your power source...

Page 58: ...brary power cords from your power source then unplug the other end of each power cord from each power supply installed in the library Now you can proceed with the installation of your library Step 3 I...

Page 59: ...ts 5 in Figure 3 3 2 Rack ears 6 and 7 in Figure 3 3 4 Rack ear screws 8 in Figure 3 3 2 Rails 9 in Figure 3 3 Important If any of these items are missing please call the appropriate number listed on...

Page 60: ...information on Rack Safety in the Safety and Environmental Notices chapter Also verify that no foot pads are installed on the bottom of your library If foot pads are installed perform Removing Library...

Page 61: ...ck of each rail included in the Rack Mount Kit The rail studs will be positioned as indicated by the black filled circles in Figure 3 4 and Figure 3 5 a In the front vertical rack rails rail studs wil...

Page 62: ...hole of the tenth EIA v Top hole of the eleventh EIA These clip cage nuts will be positioned to secure the rack ear screws for the upper unit of a 14U library Installing the Rails Follow these steps t...

Page 63: ...a66ug019 Figure 3 6 Rails installed in rack front view Chapter 3 Installing the Library 3 9...

Page 64: ...Note The small shelf portion of the left rail should be positioned to the right side of the rail The small shelf portion of the right rail should be positioned to the left side of the rail Positioning...

Page 65: ...a rack Without drive sleds and power supplies a 5U library control module weighs approximately 50 lbs Without drive sleds and power supplies a 14U library control module 9U expansion module weighs ap...

Page 66: ...the drive sled from underneath Placing the Library in the Rack v To place a 5U library control module in a rack 1 With a person on each side lift the library and slide it onto the rail shelves in the...

Page 67: ...v In a 5U library over the holes in the rack rails that align with the holes in the rack kit rails v In a 14U library over the holes in the rack rails that clip cage nuts were installed c Place the sc...

Page 68: ...Reduction At this point in the installation procedure you reinstall the drive sleds and power supplies that were removed for weight reduction Replacing a Drive Sled Attention NEVER install a drive sl...

Page 69: ...or into the drive sled Tighten the thumb screws that hold the SCSI cable 4 in Figure 3 13 shows the SCSI receptacle and terminator 3 in Figure 3 13 in place by turning them clockwise b For a Fibre Cha...

Page 70: ...cation cable the module communication terminators the customer supplied Ethernet cable the drive sled cables and the power supply cabling Select and perform one of the following cabling procedures dep...

Page 71: ...ibre cable 5 in Figure 3 15 in a fibre drive in the library then connect the other end of the cable to your network Repeat this for every fibre drive in your library 5 Install one end of the power cor...

Page 72: ...in Figure 3 16 then connect the other end of the cable to the host v If you prefer to daisy chain your SCSI drives a Install a SCSI terminator in the upper receptacle of the top SCSI drive in the dai...

Page 73: ...r 5 Power cord upper module 2 Module to module communication cable 6 Power cord lower module 3 Ethernet cable customer supplied 7 Fibre drive to network cables 4 Module communication terminator 1 Inst...

Page 74: ...he power cord 5 and 6 in Figure 3 17 on page 3 19 in the receptacle in a power supply in your library then connect the other end of the cord to your power source Repeat this for every power supply in...

Page 75: ...host v If you prefer to daisy chain your SCSI drives a Install a SCSI terminator in the upper receptacle of the top SCSI drive in the daisy chain b Connect one end of a shorter drive to drive SCSI ca...

Page 76: ...to drive SCSI cable included in your shipment to the lower receptacle of the top SCSI drive in the daisy chain then connect the other end of the cable to the upper receptacle of the next drive in the...

Page 77: ...at steps 1 and 2 4 When initialization is complete configure the library Step 6 Configuring the Library Now it is time to configure the library using the Setup Wizard Read the information in Chapter 4...

Page 78: ...3 24 TS3310 Tape Library Setup and Operator Guide...

Page 79: ...CEL or allowing the assignment screen to time out will default all newly discovered cartridges in the I O Station as SYSTEM cartridges Once a cartridge is assigned to System or to a logical library th...

Page 80: ...would export any other data cartridge v The concepts of physical libraries and logical libraries must be considered when setting up cleaning procedures and methods Working with Logical Libraries Logi...

Page 81: ...umber of logical libraries that can be created is two Up to 12 slots can be allocated between the two logical libraries in any configuration If the library has only one logical library with all resour...

Page 82: ...the following information v The Online Offline button toggles between states v If a logical library is in use the Online Office button is grayed out v Set the button to read Online to take either the...

Page 83: ...sed Control Path Failover and or Data Path Failover the new license key replaces the current license key The new license key includes all previously licensed features along with the newly licensed fea...

Page 84: ...he user account you are creating v Password is a unique string of alphanumeric characters for the user account you are creating v Privilege level is set to either User or Admin Refer to User Privilege...

Page 85: ...HCP to automatically configure the library network settings Enable makes the IP Address Subnet Mask and Default Gateway text boxes unavailable Disable makes the IP Address Subnet Mask and Default Gate...

Page 86: ...4 8 TS3310 Tape Library Setup and Operator Guide...

Page 87: ...user interface The Web UI allows users to view and perform some library functions from remote sites and is best viewed using Internet Explorer 4 0 or higher Operator Panel The Operator Panel is physi...

Page 88: ...ss to the health of the library for faster recovery if problems occur You can select the buttons to view detailed information about the library and gain access to library subsystems The three subsyste...

Page 89: ...from the numeric keyboard The back arrow erases one character at a time Attention To use the touchscreen effectively tap lightly to make your selections Login Screen To fill in the User name lightly t...

Page 90: ...y appears If a user is logged in the first logical library that they have access to in alphabetical order appears Library View Library View provides a graphical representation of the library as well a...

Page 91: ...into logical groups v The Setup menu consists of commands that you can use to set up and configure various aspects of the library including logical libraries connectivity network physical library use...

Page 92: ...wn restart the library v The Tools menu consists of commands that you can use to maintain your library such as viewing operator interventions capturing the library snapshot identifying ports and updat...

Page 93: ...Media Export Cleaning Media Export Media Operator Interventions Drive IDs Update Drive Firmware Cleaning Slots Create Users Modify Users Load Drive Change Drive Mode Lock I O Station Shutdown Unload...

Page 94: ...er Interface Initial login information is as follows v User admin v Password secure For more information on user privileges see User Privileges on page 5 9 Important BEFORE EXITING THE WEB USER INTERF...

Page 95: ...ivileges include v A screen saver is invoked after 10 minutes of inactivity on the Operator Panel The Web User Interface UI does not use a screen saver The User Administrative user or Service user who...

Page 96: ...ice has logged out Table 5 1 Operator Panel Menu Commands and Access X access allowed access not allowed Menu Command Administrative User User Setup Setup Wizard X Logical Libraries Create X Logical L...

Page 97: ...allowed Menu Command Administrative User User Monitor System System Summary X X Manage Cartridges Data Cartridges X X Cleaning Cartridges X X I O Station X X Manage Drives Load X X Unload X X Clean X...

Page 98: ...5 12 TS3310 Tape Library Setup and Operator Guide...

Page 99: ...rd will close and you will be logged out of the library Use the default Admin account to log in on the Operator Panel v If you timeout of the Setup Wizard or do not complete all the Setup Wizard scree...

Page 100: ...og in screen 1 Touch the User name text field to access the alphanumeric keyboards 2 Use the alphabetic keyboard to enter admin then touch OK 3 Touch the Password text field to access the alphanumeric...

Page 101: ...brary remotely until the network settings are applied Library firmware can only be updated using the remote Web User Interface Touch No if you do not know your network settings and to continue configu...

Page 102: ...license key To enter a license key 1 Locate the license key labels 2 Touch Yes 3 Touch the License Key text field to access the alphanumeric keyboards 4 Use the alphanumeric keyboards to enter the key...

Page 103: ...lt The maximum number of logical libraries that can be configured is equal to the number of drives installed in the library If you do not wish to create additional libraries touch No to continue confi...

Page 104: ...if cleaning slots have been assigned and hold cleaning cartridges Storage slots are not assigned consecutively in a logical library To ensure that your cartridges get placed in the correct logical lib...

Page 105: ...ration Form on page D 1 IBM recommends that you update library and drive firmware when new levels become available v For instruction on updating library and drive firmware see Updating Library Firmwar...

Page 106: ...6 8 TS3310 Tape Library Setup and Operator Guide...

Page 107: ...tion on page 7 9 Locking Unlocking the I O Station on page 7 10 Firmware Upgrades Updating Library Firmware on page 7 10 Updating Drive Firmware on page 7 11 Using the ITDT SCSI Firmware Update Dump R...

Page 108: ...the open close and lock unlock sensors of the I O Station doors see DR011 I E I O Station Lock Diagnostic a Library Verify Test on page 10 33 v Bar code tests the ability of the bar code scanner to re...

Page 109: ...o delete or modify logical libraries within your library When all library resources are assigned to logical libraries at least one logical library must be deleted to make library resources available b...

Page 110: ...ies two license keys one for Control Path Failover and one for Data Path Failover For more information see Feature Licenses on page 1 9 After entering a license key place one of the extra license key...

Page 111: ...ed IP addresses You cannot have two devices with the same IP trying to communicate with the LCB The internal network is set by default to a 10 10 10 X set of IP s To prevent conflict with the other de...

Page 112: ...the modified settings to all tabs SSL Trap Registration and SNMP Version Setting Trap Registration The library ignores all SNMP SET operations so external management applications cannot register thems...

Page 113: ...w you to take logical libraries offline and online Shutting Down Restarting the Library From the Operator Panel Operations Shut down Restart When powering down the library under normal circumstances e...

Page 114: ...y offline using the Operator Panel select Operations Change Logical Library Mode v To take each drive offline using the Operator Panel select Operations Change Drive Mode 3 Shut down the library from...

Page 115: ...This menu item allows the capturing of a library log Wait for the Save window to appear then click on Save The log can be saved to the host and emailed to a remote site for diagnosis Viewing Library I...

Page 116: ...ting Library Firmware From the Web User Interface Service Library Update Library Firmware Administrative users can use the Update Library Firmware command to download firmware to the library Updating...

Page 117: ...7 12 The recommended method to update drive firmware 1 Download the latest drive firmware to your host computer by visiting http www 1 ibm com servers storage tape lto 2 Update all SCSI and or Fibre...

Page 118: ...idges are created using a blank scratch data cartridge To create an FMR cartridge of a drive firmware version already in use in your library follow the steps below 1 Select Tools Update Drive Firmware...

Page 119: ...and User s Guide To update firmware from a server that uses a non IBM tape device driver refer to the documentation for that device Drives The following sections contain information on operating the d...

Page 120: ...rary From the Operator Panel Setup Control Path The lowest drive physically in a logical library is automatically set as the control path drive for that logical library Each drive in a logical library...

Page 121: ...rstanding Cartridge Assignment in the Library on page 4 1 After the cartridge has been assigned to a logical library choose where in the logical library that the cartridge will reside Note Cartridges...

Page 122: ...its bar code in order for the library s bar code scanner to recognize it as a cleaning cartridge Note Cartridges can be damaged during shipping or from being mishandled Before importing a cartridge in...

Page 123: ...rtridge cannot be interchanged with the media used in other IBM non LTO Ultrium tape products The different generations of IBM TotalStorage Ultrium data cartridges can be identified by color Data Cart...

Page 124: ...racks are written and the cartridge is full or until all data is written 1 LTO cartridge memory cut away view 4 Write protect Switch 2 Cartridge door 5 Label area 3 Leader Pin 6 Insertion guide The ca...

Page 125: ...o WORM capable drive firmware and using a special WORM tape cartridge No physical hardware changes are required to make Ultrium 3 drives compatible with the WORM feature however appropriate WORM capab...

Page 126: ...om its designated cleaning slot export it from the library The IBM Cleaning Cartridges are valid for 50 uses The cartridge s LTO CM chip tracks the number of times that the cartridge is used Cartridge...

Page 127: ...tape libraries must meet predefined specifications They include but are not limited to v Eight uppercase alphanumeric characters where the last two characters must be L3 L2 or L1 v Label and printing...

Page 128: ...bject water or a chemical to clean the label area v Examine the label before applying it to the cartridge Do not use the label if it has voids or smears in the printed characters or bar code a library...

Page 129: ...can interfere with the reliability of a drive and may void the warranties of the drive and the cartridge Before inserting a tape cartridge inspect the cartridge case cartridge door and write protect...

Page 130: ...res Ensure Proper Packaging v When shipping a cartridge use the original or better packaging v Always ship or store a cartridge in a jewel case v Use only a recommended shipping container that securel...

Page 131: ...ons that are described in Environmental and Shipping Specifications for Tape Cartridges on page 8 17 Perform a Thorough Inspection After purchasing a cartridge and before using it perform the followin...

Page 132: ...age 8 11 Then immediately use data recovery procedures to minimize chances of data loss 3 Review media handling procedures Example Improper Placement of Leader Pin see Figure 8 8 on page 8 11 The lead...

Page 133: ...t is improperly seated inside a cartridge can interfere with the operation of the drive Figure 8 8 shows a leader pin in the incorrect 1 and correct 2 positions To place the leader pin in its proper p...

Page 134: ...the cartridge s hub 2 in Figure 8 10 and turn it clockwise until the tape becomes taut 6 Remove the rewind tool by pulling it away from the cartridge 7 If you suspect that the cartridge has been mish...

Page 135: ...this procedure on your tape cartridge only when the leader pin detaches from the magnetic tape and you must copy the cartridge s data onto another cartridge Destroy the damaged cartridge after you cop...

Page 136: ...e toward the cartridge door 3 in Figure 8 13 on page 8 15 3 Continue to turn the rewind tool counterclockwise until approximately 13 cm 5 in of tape hangs from the cartridge door If necessary grasp th...

Page 137: ...nd make sure that the clip s open side faces up 9 Place the leader pin into the cavity 3 in Figure 8 15 on page 8 16 of the leader pin attach tool Note To prevent the leader pin from rolling into the...

Page 138: ...excess tape 5 in Figure 8 15 so that it is flush with the reattached leader pin 6 in Figure 8 15 13 Use your fingers to remove the leader pin from the cavity 3 in Figure 8 15 in the leader pin attach...

Page 139: ...10 to 45 C 50 to 113 F 16 to 32 C 61 to 90 F 16 to 25 C 61 to 77 F 23 to 49 C 9 to 120 F Relative humidity non condensing 10 to 80 20 to 80 20 to 50 5 to 80 Maximum wet bulb temperature 26 C 79 F 26...

Page 140: ...starting volume serial information and optionally packed in individual jewel cases Attached labels have been preprinted with a Bar Code that ends with LT where L stands for LTO and T identifies the c...

Page 141: ...butor visit the web at http www ibm com storage media or v if you do not have Internet access order the cartridge from any authorized IBM Business Partner or your IBM Sales Representative or v call 1...

Page 142: ...ing Germany Telephone 49 8062 9455 http www datawarelabels com NetC P O Box 1067 Fairfield CT 06825 U S A Telephone 203 372 6382 http www netcllc com NetC Europe Ltd Town Farm Bungalow The Pavement No...

Page 143: ...ollowing criteria is met v The failure is repeatable v A dump is captured for emailing to IBM Service Use the ITDT tool for drive dumps Use the Web User Interface Service Library Capture Log for libra...

Page 144: ...the library operator interventions in the order in which they were created starting with the most recent Each message contains a Service Action Ticket SAT code see Service Action Tickets on page 10 1...

Page 145: ...erve the LEDs on all components For more information see Interpreting LEDs on page 9 6 If the LEDs on a component indicate that there is a problem reseat the component v Open the library doors and obs...

Page 146: ...m the drive refer to Contacting IBM Technical Support on page 9 15 Tape is broken stretched folded over or wrinkled inside the cartridge 1 Replace the tape cartridge 2 Ensure that the latest available...

Page 147: ...Supply LEDs on page 9 10 4 If necessary replace the failing power supply refer to Removing Replacing aPower Supply Primary and Redundant on page 11 3 Picker The Picker is stuck in one position and is...

Page 148: ...9 8 v Power Supply LEDs on page 9 10 v Picker LED on page 9 11 Some of these components may also include a fibre port link LED Power Button LEDs Two LEDs are located to the right of the library s pow...

Page 149: ...CB firmware is downloading v 1 blink per second Normal Processor operating v 10 blinks per second Identify mode v Solid OFF Processor not operating Amber Health status v 1 blink per second Main proces...

Page 150: ...bserve LEDs on other components before referring to Contacting IBM Technical Support on page 9 15 Servicing a Library Control Blade Based on LED Status When servicing a blade based on the status of an...

Page 151: ...activating varying online v 10 blinks per second Identify mode v Solid OFF Drive s main processor is not operating Amber Health of the drive v Solid ON Drive has failed v Solid OFF Normal drive operat...

Page 152: ...no light detected v Solid OFF Either the drive is off or the drive cannot detect light through a fiber optic cable which is equivalent to a missing fibre cable If the drive is varied OFF the blue stat...

Page 153: ...ormal No faults detected In the operator intervention associated with the defective power supply record both the number of the module and the number of the power supply connected to that module Each m...

Page 154: ...ring to the appropriate figure below 1 Module communication terminator 3 Module communication terminator 5 Fibre drive cable 2 Ethernet cable customer supplied 4 Power cord a66ug047 1 Figure 9 5 Picke...

Page 155: ...5 Power cord 2 Ethernet cable customer supplied 4 SCSI terminator 6 SCSI drive cable 1 2 3 4 5 6 a66ug024 Figure 9 7 Cabling of a 5U Library with SCSI Drives 1 2 3 4 5 6 7 a66ug021 Figure 9 8 Cabling...

Page 156: ...on terminator 7 Power cord 2 Module to module communication cable 5 SCSI terminators 8 Power cord 3 Ethernet cable customer supplied 6 SCSI drive to host cable 9 SCSI drive to host cable 2 Unplug the...

Page 157: ...drivers are at the most recent level see your server host manual for instructions v For the latest release of IBM device drivers visit the web v For the latest release of device drivers by Independen...

Page 158: ...n the past Have you changed anything recently 4 Pinpoint the exact location of your problem if possible Note the steps that led to the problem Can you duplicate the problem or is it a one time occurre...

Page 159: ...from Picker motion OK Description The Picker is logically not expecting to see a cartridge in the Picker but the cartridge present sensor indicates otherwise The cartridge cannot legitimately be retu...

Page 160: ...dware mechanical positioning error Detection Scenarios PUT is not successful PUT recovery is not successful and a cartridge is not known to be properly seated in the Picker or a storage slot Root Caus...

Page 161: ...cartridge is unknown There are no additional recovery logic paths Fundamental servo control appears to be OK If the operation was initiated by a host MOVE MEDIA the MOVE MEDIA command has failed with...

Page 162: ...O location The library has successfully returned the cartridge to the source location Fundamental servo control appears to be OK Detection Scenarios PUT is not successful and PUT recovery is not succe...

Page 163: ...tion profile failure cartridge in Picker motion NOT OK Description An unrecoverable motion failure occurs during a move with a cartridge in the Picker This problem only occurs during a move and NOT a...

Page 164: ...oving on the X axis or moving on the Y axis Detection Scenarios 1 A specified move in the X axis cannot complete 2 A specified move in the Y axis cannot complete 3 A specified movement in the axis can...

Page 165: ...e Sled Possible FRU Replacements v Picker Assembly v Y axis Assembly v Enclosure Resolution v Verify that no obstructions are present in the path of the Picker v Perform DR028 Motion Obstruction Diagn...

Page 166: ...ridge 3 Motion profile was successful as detected at motor encoders but cartridge did not get placed far enough 4 Picker dragged cartridge back out of drive but not far enough to trigger Picker cartri...

Page 167: ...s an invalid serial number Detection Scenarios 1 At first boot up during installation the library must establish the serial number for the first time There may be no serial number in system memory at...

Page 168: ...and the coordinates of each drive are calculated The calculated values are determined to be outside travel limits that have been established for the robot Detection Scenarios Calculated element posit...

Page 169: ...Description System cannot successfully calibrate the position of a storage magazine but the calibration search pattern completes successfully Detection Scenarios Calibration motion completes but edge...

Page 170: ...closing the ticket perform the following 1 If a drive is physically removed from the library reinstall the drive refer to Replacing a Drive on page 11 10 2 If a drive is unplugged reconnect the drive...

Page 171: ...a control module or any supply in any expansion module Detection Scenarios AC power status from the supply creates an interrupt that is managed by software Root Causes 1 AC supply is gone cord removed...

Page 172: ...on sensor not working properly 3 Mechanical binding or obstruction prevents proper motion and detection 4 Mechanical failure of sensor flag Possible CRU Replacements Library Control Blade Possible FRU...

Page 173: ...U Replacements v Cartridge v Tape Drive Resolution If the cartridge is managed by a host application export the cartridge via the host application If the cartridge is managed by the library perform th...

Page 174: ...lem per its internal algorithms Possible CRU Replacements Tape Cartridge Resolution If the cartridge is manage by a host application export the cartridge via the host application If the cartridge is m...

Page 175: ...hms Possible CRU Replacements Tape Cartridge Resolution If the cartridge is manage by a host application export the cartridge via the host application If the cartridge is managed by the library perfor...

Page 176: ...rive issues a TapeAlert 15 which is recognized by the library during the continuous four second polling cycle of drive status Root Causes Drive has determined that there is a problem per its internal...

Page 177: ...ry during the continuous four second polling cycle of drive status Root Causes Drive has determined that there is a problem per its internal algorithms Possible CRU Replacements v Tape Drive v Tape Ca...

Page 178: ...ive status Root Causes v User or library attempts to mount a cleaning tape but the tape is not actually a cleaning tape v User mistakenly loads a data tape as a cleaning tape v Inventory or applicatio...

Page 179: ...ements v Tape Cartridge v Drive Sled Resolution Before performing the following v Removing a Drive Sled on page 11 9 v Replacing a Drive on page 11 10 refer to Diagnosing a Problem on page 9 3 for add...

Page 180: ...library stack An unterminated library stack will appear to be equivalent to a three expansion unit stack Therefore the door open bit cannot be detection of three expansion units cannot be distinguishe...

Page 181: ...ed together 2 Five frames or greater are actually above the control module 3 Five frames or greater are actually below the control module 4 Hardware failure results in one or more invalid geo bit patt...

Page 182: ...10 32 Before you replace a library component refer to Diagnosing a Problem on page 9 3 for additional diagnostic procedures T064 Library Control Blade hardware failure Description The library encount...

Page 183: ...r current problem in one or more drives Detection Scenarios v Monitoring of voltage divider indicates partial or complete voltage drop Root Causes 1 Board level hardware failure 2 Permanent or tempora...

Page 184: ...he element is empty This is distinctly NOT a SCSI illegal request situation At the beginning of the move media the library inventory has indicated that the source element was not in an empty state and...

Page 185: ...ct the presence of a power supply that was previously physically installed and logically added to the system Detection Scenarios Regular polling between LCB and power supply checks for presence of the...

Page 186: ...on Perform DR034 IO Storage Door Open Resolution on page 10 39 T074 Sled Auto Leveling Failure Description The normal auto level process for a sled did not work When a drive sled is inserted into a bo...

Page 187: ...s not support a valid configuration Possible CRU Replacements Firmware Possible FRU Replacements Enclosure Resolution Perform DR026 Unsupported Module Configuration on page 10 37 T076 Robot Initializa...

Page 188: ...osed state at boot up Possible FRU Replacements v I O Lock assembly v I O mechanism v Enclosure Resolution Perform DR036 I O Station Partially Open or Unplugged on page 10 39 Diagnostic Resolutions Di...

Page 189: ...put a cartridge in a drive storage or the I O Station The destination location appears to be blocked or partially blocked The library has successfully returned the cartridge to the source location Tr...

Page 190: ...the bring all logical libraries OFFLINE screen 14 Touch Back to return to the Service Menu screen 15 Touch Exit to return to the Tools menu 16 Touch the Operations tab then touch the Logical Library...

Page 191: ...elf Test Self Test Failed Self Test failed Contact IBM Service to order replacement terminators See product documentation to determine how to order parts Self Test Passed Self Test passed Both termina...

Page 192: ...and opened v Self Test Failed Test failed Lock X is not opening and closing properly Replace I O Station Lock Assembly v Self Test Passed Lock test passed Attempt to open all I O Station doors to conf...

Page 193: ...rive via the Library GUI export the cartridge via the library Operations Media Export function Import the proper type of cartridge for the desired operation and continue If the cartridge was loaded to...

Page 194: ...will automatically notify host applications that the inventory status of the library has changed and host applications should synchronize to the new library inventory DR021 Contact Service This ticket...

Page 195: ...n on the floor of the library 3 Close the doors and wait for the System to complete initialization 4 Use the Tools Service Library Robot Test to exercise the robot and verify that the obstruction is c...

Page 196: ...ause Troubleshooting Steps 1 Open the library main access doors This will allow access to the robot and remove power from the robot Check for any obvious disconnected cables leading to the robot 2 If...

Page 197: ...d as storage 2 Any I O station that is not used for storage will normally remain unlocked DR035 Robot Fuse Blown Resolution Problem The robot has momentarily pulled too much current Circuit protection...

Page 198: ...partially open close them 2 If none of the doors is partially open open the access door and look for the unplugged cable on the back of the lock assembly 3 Contact IBM Technical Support if problem pe...

Page 199: ...n IBM Service Representative there will be a charge for the service Before ordering a replacement CRU ensure that the following criteria is met v The failure is repeatable v A dump is captured for ema...

Page 200: ...d to its original location 3 Power OFF the library v If the library is idle a Press the power button on the front panel of the control module b Toggle each power supply switch to the OFF O position v...

Page 201: ...ry automatically switches to the redundant power supply if the primary power supply fails for any reason A redundant power supply should be connected to a different AC circuit from the primary power s...

Page 202: ...erclockwise 4 Grasp the handle 1 in Figure 11 2 and slowly pull the power supply toward you while supporting it from underneath 5 Install a metal cover plate over the vacant power supply slot if you a...

Page 203: ...power switch 4 in Figure 11 2 on page 11 4 to the ON position 6 Check the status of the redundant power supply s LEDs The top green LED and the blue LED should remain solidly lit until the library is...

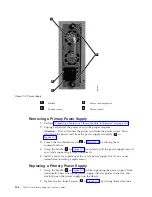
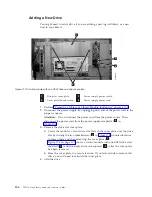
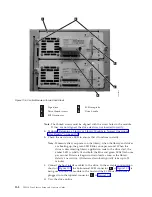
Page 204: ...ply receptacle 4 in Figure 11 3 3 Remove the drive slot cover plate a Locate the module s vacant drive slot Detach the cover plate over the drive slot by turning the two thumbscrews 2 in Figure 11 3 c...

Page 205: ...the slot The drive sled must be level to slide in smoothly b When the drive sled is in place 1 in Figure 11 5 on page 11 8 tighten the thumb screws 2 in Figure 11 5 on page 11 8 by turning them clockw...

Page 206: ...second When the drive is downloading library application code to the drive sled the amber LED is solidly lit and both the blue and green LEDs flash once per second Firmware begins to download as soon...

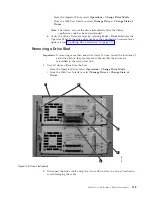
Page 207: ...Drive Firmware on page 7 11 Removing a Drive Sled Important If removing more than one drive sled at a time record the locations of each drive before they are removed Ensure that the drives are reinsta...

Page 208: ...into the drive sled Tighten the thumb screws that hold the SCSI cable and terminator in place by turning them clockwise Attention Visually inspect the connectors on the SCSI cable before installing it...

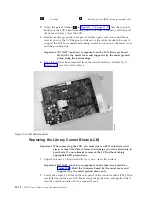
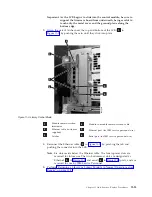
Page 209: ...rform Preparing a Library or Library Module for Repairs on page 11 2 2 On the LCB Figure 11 7 disconnect the Ethernet cable 2 in Figure 11 7 by pinching the tab to disengage the cable and then pull th...

Page 210: ...rom the control module carefully lay it Figure 11 8 on a clean flat surface Replacing the Library Control Blade LCB Important When removing the LCB you must wear an ESD anti static wrist strap or touc...

Page 211: ...t port for IBM service personnel use 3 Latches 6 Serial port for IBM service personnel use 4 Reconnect the Ethernet cable 2 in Figure 11 9 by pinching the tab and pushing the connector into the LCB No...

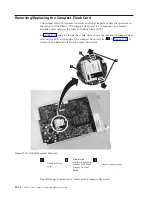
Page 212: ...inside the white circle shows the location of compact flash card on the LCB A close up of the compact flash card see 1 in Figure 11 10 is shown in the detailed view of the same illustration 1 Compact...

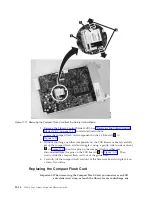
Page 213: ...malfunctions and needs to be replaced the compact flash card must be removed from the old LCB and mounted on the replacement LCB Removing the Compact Flash Card Important When removing the Compact Fla...

Page 214: ...e pins on the compact flash card become disconnected from the pins on the LCB board 3 in Figure 11 11 Then slowly slide the compact flash card out of the guide slots 4 Carefully lift the compact flash...

Page 215: ...nted to Desktop Library Conversion Desktop to Rack Mounted Library Conversion Complete the following to convert your library from a desktop unit to a rack mounted unit 1 Perform Preparing a Library or...

Page 216: ...from the rack Note Without drive sleds and power supplies a 5U library control module weighs approximately 50 lbs and a 14U library control module 9U expansion module weighs approximately 110 lbs a W...

Page 217: ...ng a Phillips screwdriver remove the foot pads attached to the bottom of the library Store these parts for future use 4 Carefully return the library to an upright position on top of the sling Installi...

Page 218: ...ack locking mechanism 2 in Figure 11 13 and push the gear rack down Ensure that the lock is not engaged in the hole in the frame v In an expansion module Verify that the gear racks are in the down pos...

Page 219: ...he gear rack down until it aligns with the gear rack in the expansion module then release your hold on the locking mechanism 3 Manually inspect the track to ensure there are no gaps 4 Repeat Steps 1 t...

Page 220: ...11 22 TS3310 Tape Library Setup and Operator Guide...

Page 221: ...s repeatable v A dump is captured for emailing to IBM Service Use the ITDT tool for drive dumps Use the Web User Interface Service Library Capture Log for library dumps CRU Type Description Feature Co...

Page 222: ...empty drive slot 23R2605 Library and Drive Firmware Update by an IBM Service Representative 0500 Rack ears 23R3349 Foot pads 23R2599 SCSI Cables HD68 HD68 0 4 m 19P0872 2 5 m 35L1307 5 0 m 19P0052 10...

Page 223: ...Nicaragua Panama Peru Philippines Saudi Arabia South Korea Suriname Taiwan Trinidad Tobago Venezuela US 1 Chicago v 1 8 m 125 V v FC 9986 v PN 6952301 NEMA 5 15P Chicago U S A 1 US Canada v 2 8 m 250...

Page 224: ...ia Iran Ivory Coast Jordan Kenya Korea Lebanon Luxembourg Macau Malagasy Mali Martinique Mauritania Mauritius Monaco Morocco Mozambique Netherlands Netherlands Antilles New Caledonia Niger Norway Pola...

Page 225: ...6 Chile Ethiopia Italy Libya Somalia 9 Israel v 2 8 m 250V v FC 9827 v PN 14F0087 S11 32 1971 Israel 10 Argentina v 2 8 m 250V v FC 9834 v PN 36L8880 IEC 83 A5 Argentina Brazil Colombia Paraguay Trini...

Page 226: ...12 6 TS3310 Tape Library Setup and Operator Guide...

Page 227: ...port to find the date and time of any errors related to library devices then use the detail report to obtain the sense data needed to identify the cause of the error 2 Press Enter to scroll through th...

Page 228: ...60 00 6 0 VPD Manufacturer IBM Machine Type and Model ULT3576 TL Serial Number IBM7810698 Device Specific FW x xx Firmware Level Description TAPE DRIVE FAILURE Probable Causes TAPE DRIVE Failure Cause...

Page 229: ...odel ULT3576 TD3 Serial Number 1300015078 Device Specific FW xxxx Firmware Level Description TAPE OPERATION ERROR Probable Causes TAPE User Causes MEDIA DEFECTIVE DIRTY READ WRITE HEAD Recommended Act...

Page 230: ...le Causes CABLE CABLE TERMINATOR DEVICE ADAPTER Failure Causes CABLE LOOSE OR DEFECTIVE DEVICE ADAPTER Recommended Actions PERFORM PROBLEM DETERMINATION PROCEDURES CHECK CABLE AND ITS CONNECTIONS Deta...

Page 231: ...lure Causes ADAPTER TAPE DRIVE Recommended Actions PERFORM PROBLEM DETERMINATION PROCEDURES Detail Data SENSE DATA 0600 0000 1200 0000 FF00 0000 0000 0000 0200 0800 0000 0000 0000 0000 0000 0000 0000...

Page 232: ...t8 TAPE DRIVE FAILURE 5537AC5F 1012091600 P H rmt8 TAPE DRIVE FAILURE 5537AC5F 1012091600 P H rmt8 TAPE DRIVE FAILURE C60BB505 1012082000 P S SOFTWARE PROGRAM ABNORM TERMINATED C42F11D4 1011183600 U S...

Page 233: ...og screen select Analyze log and press Enter 5 On the Select Subsystem Data screen select Magnetic media enter the From and To time period for searching the error log and press Enter 6 On the Select A...

Page 234: ...3 C9C3C9D6 4040E5F5 D9F3D4F0 40400000 00000000 63A00001 SLICIO V5R3M0 00000000 0100 01030000 00000000 00000141 00000000 00000000 01950000 00000000 00000197 n p 00000000 0120 00000000 00000000 00000000...

Page 235: ...the opt stddutil tapesrvc command Note You must have root authority to run the tape service program The program is menu driven Use discretion when running this program because it opens the device in d...

Page 236: ...A 10 TS3310 Tape Library Setup and Operator Guide...

Page 237: ...es add additional TapeAlerts that are not supported today However should this occur the MIB is written to minimize impact to the SNMP monitoring station At the time of this writing the TapeAlert flags...

Page 238: ...quired 12 Unsupported format Set when you load an unsupported cartridge type into the drive or when the cartridge format has been corrupted Use a supported tape cartridge 14 Unrecoverable snapped tape...

Page 239: ...ge is unsuccessfully downloaded to the tape drive through the SCSI or Fibre Channel interface Ensure that it is the correct FMR image Download the FMR image again 36 Drive temperature Set when the dri...

Page 240: ...B 4 TS3310 Tape Library Setup and Operator Guide...

Page 241: ...ers to obtain the sense data Raw sense data as returned from the drive is documented in the IBM TotalStorage LTO Ultrium Tape Drive SCSI Reference In addition to device drivers other methods exist for...

Page 242: ...ntacting IBM Technical Support on page 9 15 2 04h 83h The library is not ready due to aisle power being disabled Not Ready Library Has Not Been Set Up Library needs configuration and or calibration Ch...

Page 243: ...code is available install it Failure Isolation Procedure CRU FRU List 1 If the problem persists select Tools Service and run the Robotics Test 2 If the problem persists contact your next level of sup...

Page 244: ...f persistent reservation 6 28h 00h Door s opened and closed A cartridge has been loaded successfully into the drive and is now ready to be accessed 6 28h 01h I O station opened and closed The I O Stat...

Page 245: ...medium installed Incompatible Media A Write operation was requested on a cartridge which is not writable Failure Isolation Procedure No action is necessary This is only a status message 5 39h 00h Sav...

Page 246: ...Firmware detected an internal logic failure B 45h 00h Select or reselect failure Select or reselect failure Failure Isolation Procedure Review host error data to determine which control path drive rep...

Page 247: ...s B 4Eh 00h Overlapped commands attempted An initiator attempted to send a command to the drive even though it already had another command being processed in the drive Failure Isolation Procedure If t...

Page 248: ...l block address Error Code 1 Segment Number 0 2 Filemark EOM end of medium ILI Incorrect length indicator Reserved Sense Key Description 0 No sense 1 Recovered error 2 Not ready 3 Media error 4 Hardwa...

Page 249: ...Failure 09 00 Track Following Error Servo 0C 00 Write Error A Write operation has failed This is probably due to bad media but may be hardware related 11 00 Unrecovered Read Error A Read operation fa...

Page 250: ...there is no cartridge loaded 3B 00 Sequential Positioning Error A command has failed and left the logical position at an unexpected location 3B 0C Position Past Beginning of Medium A command that req...

Page 251: ...rator Medium Removal Request 5D 00 Failure Prediction Threshold Failure Prediction thresholds have been exceeded indicating that a failure may occur soon 5D FF Failure Prediction False A Mode Select c...

Page 252: ...only valid if the Valid flag is set This occurs only for current errors and not for deferred errors 7 The Field Replaceable Unit field Byte 14 is set to either zero or to a non zero vendor specific c...

Page 253: ...on this form will be helpful if a call to IBM Service is necessary Store this form in a secure location Library Information Machine type 3576 Serial No for Model L5x Serial No for Model E9x IP Addres...

Page 254: ...rive 0 1 Drive 0 2 Drive 1 1 Drive 1 2 Drive 1 3 Drive 1 4 Users Account Information The Administrator password is listed in the table below Add additional Administrator and User names and passwords t...

Page 255: ...ESS OR IMPLIED INCLUDING BUT NOT LIMITED TO THE IMPLIED WARRANTIES OF NON INFRINGEMENT MERCHANTABILITY OR FITNESS FOR A PARTICULAR PURPOSE Some states or regions do not allow disclaimer of express or...

Page 256: ...ice names may be the trademarks or service marks of others Electronic Emission Notices Federal Communications Commission FCC Class A Statement Note This equipment has been tested and found to comply w...

Page 257: ...of the product including the fitting of non IBM option cards This product has been tested and found to comply with the limits for Class A Information Technology Equipment according to European Standar...

Page 258: ...VG ist die IBM Deutschland Informationssysteme GmbH 70548 Stuttgart Informationen in Hinsicht EMVG Paragraph 4 Abs 1 4 Das Ger t erf llt die Schutzanforderungen nach EN 55024 und EN 55022 Klasse A EN...

Page 259: ...ty check that consists of control characters and graphic characters assigning a device The establishing of the relationship of a device to a running task process job or program assignment The naming o...

Page 260: ...en a channel path and a drive caused when a unit check occurs during an I O operation controller A device that provides the interface between a system and one or more tape drives CP Circuit protector...

Page 261: ...rget used for teaching a physical location to a robot field replaceable unit FRU An assembly that is replaced in its entirety when any one of its components fails file A named set of records stored or...

Page 262: ...The component that executes a command The initiator can be the host system or the tape control unit INST Installation interface A shared boundary An interface might be a hardware component to link tw...

Page 263: ...tify field replaceable units microdiagnostic utility A program that is run by the customer engineer to test the machine microinstruction A basic or elementary machine instruction microprogram A group...

Page 264: ...ential manner RAS Reliability availability and serviceability record A collection of related data or words treated as a unit recording density The number of bits in a single linear track measured per...

Page 265: ...asynchronously with a controlling system SUPP Support sync Synchronous synchronize Occurring with a regular or predictable time relationship T tachometer tach A device that emits pulses that are used...

Page 266: ...F 8 TS3310 Tape Library Setup and Operator Guide...

Page 267: ...key 4 5 assigning cleaning slots 6 4 assigning I O slots 6 5 assigning logical libraries 6 5 cleaning slots 4 1 creating user accounts 4 6 deleting user accounts 4 6 drive IDs 4 5 drive types 4 5 ensu...

Page 268: ...el drive compatibility with Multi Path Architecture 1 15 Fibre Channel interface 2 9 cables and speeds 2 9 connectors and adapters 2 11 LUN assignments 2 7 persistent binding 2 10 sharing on a SAN 2 1...

Page 269: ...ersion 7 6 SSL 7 6 trap registration 7 6 O operating procedures 7 1 library 7 2 logical libraries 7 2 viewing system information 7 2 operating systems supported 1 17 operator interventions 9 2 operato...

Page 270: ...10 11 T021 10 12 T022 10 12 T023 10 13 T024 10 13 T025 10 13 T031 10 14 T032 10 14 T033 10 15 T034 10 15 T035 10 16 T036 10 16 T037 10 17 T038 10 17 T039 10 18 T040 10 18 T041 10 18 T045 10 19 T046 10...

Page 271: ...book is Very Satisfied Satisfied Neutral Dissatisfied Very Dissatisfied Accurate h h h h h Complete h h h h h Easy to find h h h h h Easy to understand h h h h h Well organized h h h h h Applicable to...

Page 272: ...pment Department GZW 9000 South Rita Road Tucson Arizona U S A 85775 4401 _ _ _ _ _ _ _ _ _ _ _ _ _ _ _ _ _ _ _ _ _ _ _ _ _ _ _ _ _ _ _ _ _ _ _ _ _ _ _ _ _ _ _ _ _ _ _ _ _ _ _ _ _ _ _ _ _ _ _ _ _ _ _...

Page 273: ......

Page 274: ...Part Number 95P2271 Printed in USA GA32 0477 00 1P P N 95P2271...

Page 275: ...Spine information IBM System Storage TS3310 Tape Library TS3310 Tape Library Setup and Operator Guide...

Reviews:

Related manuals for System Storage TS3310