
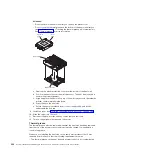


10. Install the system-board tray cover (see “Installing the system-board tray
11. Install the system-board tray in the chassis (see “Installing the system-board
tray in a 2U chassis” on page 279).
12. Push the power supplies back into the server.
13. Slide the server into the rack.
14. Reconnect the power cords and any cables that you removed.
15. Turn on the peripheral devices and the server.
16. Start the Setup utility and reset the configuration.
v
Set the system date and time.
v
Set the power-on password.
v
Reconfigure the server.
See “Using the Setup utility” on page 345 for details.
17. Either update the server with the latest RAID firmware or restore the
pre-existing firmware from a diskette or CD image.
18. Update the UUID (see “Updating the Universal Unique Identifier (UUID)” on
19. Update the DMI/SMBIOS (see “Updating the DMI/SMBIOS data” on page 361).
340
System x iDataPlex dx360 M4 Types 7912 and 7913: Problem Determination and Service Guide
Summary of Contents for System x iDataPlex dx360 M4 7912
Page 1: ...System x iDataPlex dx360 M4 Types 7912 and 7913 Problem Determination and Service Guide...
Page 2: ......
Page 3: ...System x iDataPlex dx360 M4 Types 7912 and 7913 Problem Determination and Service Guide...
Page 22: ...4 System x iDataPlex dx360 M4 Types 7912 and 7913 Problem Determination and Service Guide...
Page 278: ...260 System x iDataPlex dx360 M4 Types 7912 and 7913 Problem Determination and Service Guide...
Page 292: ...274 System x iDataPlex dx360 M4 Types 7912 and 7913 Problem Determination and Service Guide...
Page 392: ...374 System x iDataPlex dx360 M4 Types 7912 and 7913 Problem Determination and Service Guide...
Page 399: ......
Page 400: ...Part Number 46W8218 Printed in USA 1P P N 46W8218...