background image

Removing and replacing consumable parts and Tier 1 CRUs

Replacement of consumable parts and Tier 1 CRUs is your responsibility. If IBM
installs a consumable part or a Tier 1 CRU at your request, you will be charged for
the installation.

The illustrations in this document might differ slightly from your hardware.

Removing the side cover

Attention:

Operating the server for more than 30 minutes with the side cover

removed might damage server components. For proper cooling and airflow, install
the side cover before you turn on the server.

For 4U server models with non-hot-swap power supplies, complete the following
steps to remove the side cover. For the 5U server model with hot-swap power
supplies (Model name: 2582-F4x), please see the next sub-section.

1. Read the safety information that begins on page vii and “Installation guidelines”

on page 163.

2. Turn off the server and all attached devices; then, disconnect all power cords

and external cables.

3. Carefully turn the server on its side so that it is lying flat, with the cover facing

up.

Attention:

Do not allow the server to fall over.

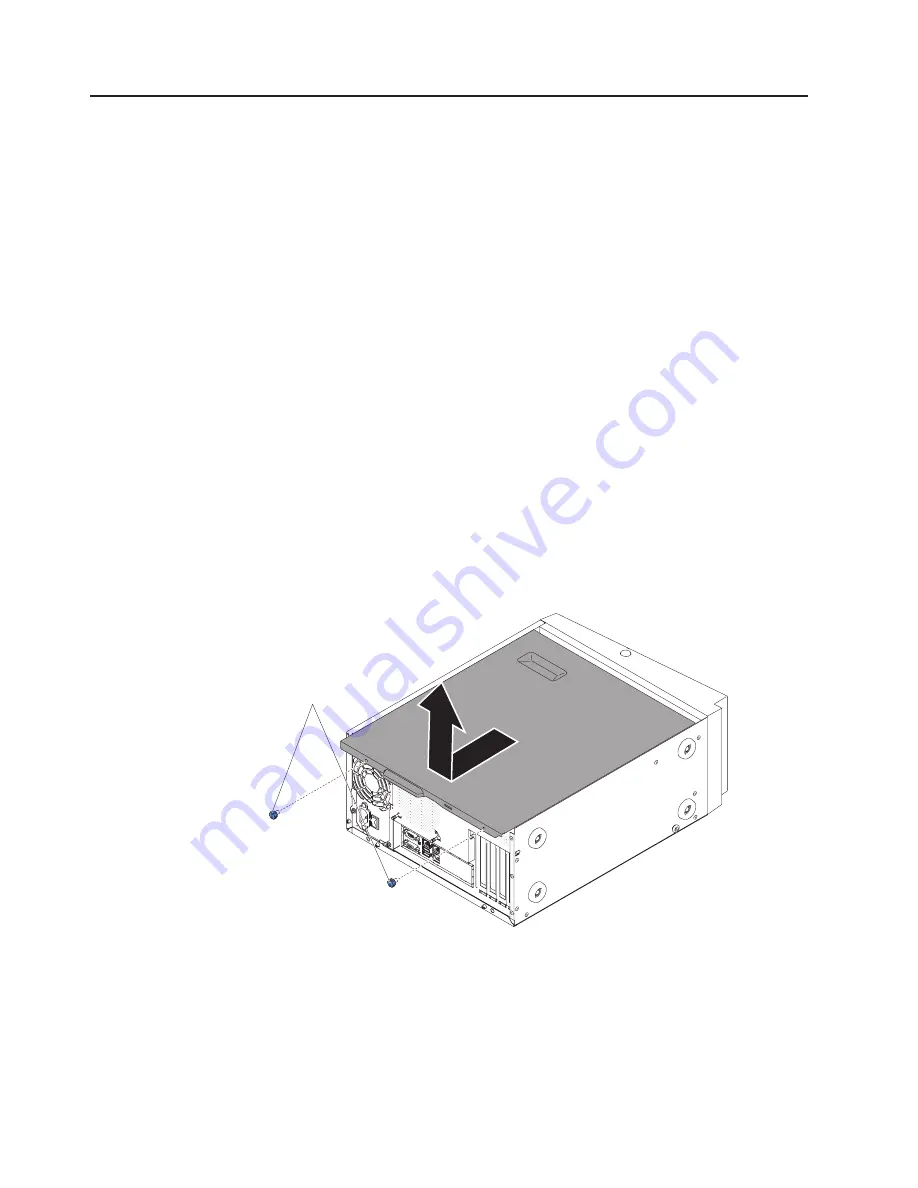
4. Unscrew the two chassis screws on the rear side of the server.

5. Pull the rear side cover handle and push the front side cover handle at the

same time.

Chassis screws

6. If you are instructed to return the side cover, follow all packaging instructions,

and use any packaging materials for shipping that are supplied to you.

For the 5U server model with hot-swap power supplies (Model name: 2582-F4x),
complete the following steps to remove the side cover. For 4U server models with
non-hot-swap power supplies, please see the above sub-section.

1. Read the safety information that begins on page vii and “Installation guidelines”

on page 163.

166

IBM System x3100 M4 Type 2582: Problem Determination and Service Guide

Summary of Contents for System x3100 M4

Page 1: ...IBM System x3100 M4 Type 2582 Problem Determination and Service Guide...

Page 2: ......

Page 3: ...IBM System x3100 M4 Type 2582 Problem Determination and Service Guide...

Page 4: ...y Information and IBM Environmental Notices and User s Guide on the IBM System x Documentation CD and the Warranty Information document that comes with the server Seventh Edition August 2012 Copyright...

Page 5: ...Diagnostics 23 Diagnostic tools 23 Event logs 24 Viewing event logs through the Setup utility 24 Viewing event logs without restarting the server 24 Clearing the event logs 26 POST 26 POST error codes...

Page 6: ...er bezel 173 Removing the upper bezel 174 Installing the upper bezel 175 Removing a ServeRAID adapter 176 Installing a ServeRAID adapter 178 Removing and installing internal drives 182 Removing a memo...

Page 7: ...tel Gigabit Ethernet Utility program 281 Configuring the Gigabit Ethernet controller 281 Enabling and configuring Serial over LAN SOL 281 Using the LSI Configuration Utility program 282 Creating a sof...

Page 8: ...s and Information Technology Industries Association JEITA statement 302 Korea Communications Commission KCC statement 302 Russia Electromagnetic Interference EMI Class A statement 303 People s Republi...

Page 9: ...installer ce produit lisez les consignes de s curit Vor der Installation dieses Produkts die Sicherheitshinweise lesen Prima di installare questo prodotto leggere le Informazioni sulla Sicurezza Les s...

Page 10: ...me can cause serious or fatal electrical shock v Explosive hazards such as a damaged CRT face or a bulging or leaking capacitor v Mechanical hazards such as loose or missing hardware To inspect the pr...

Page 11: ...7 Check for worn frayed or pinched cables 8 Make sure that the power supply cover fasteners screws or rivets have not been removed or tampered with Safety ix...

Page 12: ...pplies or remove or install main units v Before you work on the equipment disconnect the power cord If you cannot disconnect the power cord have the customer power off the wall box that supplies power...

Page 13: ...nger statement in the Safety Information document For example if a caution statement is labeled with Statement 1 translations for that caution statement are in the Safety Information document under St...

Page 14: ...turn on any equipment when there is evidence of fire water or structural damage v Disconnect the attached power cords telecommunications systems networks and modems before you open the device covers u...

Page 15: ...module containing a lithium battery replace it only with the same module type made by the same manufacturer The battery contains lithium and can explode if not properly used handled or disposed of Do...

Page 16: ...djustments or performance of procedures other than those specified herein might result in hazardous radiation exposure DANGER Some laser products contain an embedded Class 3A or Class 3B laser diode N...

Page 17: ...power control button on the device and the power switch on the power supply do not turn off the electrical current supplied to the device The device also might have more than one power cord To remove...

Page 18: ...parts contact a service technician Statement 12 CAUTION The following label indicates a hot surface nearby Statement 13 DANGER Overloading a branch circuit is potentially a fire hazard and a shock haz...

Page 19: ...Statement 15 CAUTION Make sure that the rack is secured properly to avoid tipping when the server unit is extended Safety xvii...

Page 20: ...result in splattered metal burns or both Attention This server is suitable for use on an IT power distribution system whose maximum phase to phase voltage is 240 V under any distribution fault conditi...

Page 21: ...system board LEDs v Event logs See Event logs on page 24 for information about notification events and diagnosis v Software or operating system error codes See the documentation for the software or op...

Page 22: ...ct an incorrect configuration If the server is incorrectly configured a system function can fail to work when you enable it if you make an incorrect change to the server configuration a system functio...

Page 23: ...or assistance with additional problem determination and possible hardware replacement To open an online service request go to the http www ibm com support entry portal Open_service_request call for se...

Page 24: ...4 IBM System x3100 M4 Type 2582 Problem Determination and Service Guide...

Page 25: ...ce technicians For a list of replaceable components for the server see Replaceable server components on page 151 For information about the terms of the warranty and getting service and assistance see...

Page 26: ...rom what is described in this document 1 Go to http www ibm com supportportal 2 Under Product support click System x 3 Under Popular links click Publications lookup 4 From the Product family menu sele...

Page 27: ...odule DIMM connectors two way interleaved v Minimum 1 GB v Maximum 32 GB v Types PC3 12800 single rank or dual rank 1066 1333 and 1600 MHz ECC DDR3 unbuffered SDRAM DIMMs only v Sizes 1GB single rank...

Page 28: ...ernet port v One VGA port Heat output Approximate heat output v Minimum configuration 119 Btu per hour 35 watts v Maximum configuration 1194 Btu per hour 350 watts Electrical input v Sine wave input 5...

Page 29: ...2133 6 m 7000 ft Server on 10 C to 28 C 50 0 F to 83 F altitude 2133 6 m 7000 ft to 3050 m 10000 ft Server off 10 C to 43 C 50 F to 109 4 F Shipping 40 C to 60 C 40 F to 140 F v Humidity operating an...

Page 30: ...ise emissions v Sound power idling 5 0 bels v Sound power operating 5 3 bels Notes 1 Power consumption and heat output vary depending on the number and type of optional features installed and the powe...

Page 31: ...fer slightly from your model Front view The following illustration shows the controls and LEDs on the front of 4U server models with non hot swap power supplies DVD drive activity LED green DVD eject...

Page 32: ...ation panel Power on LED Power control button Hard disk drive activity LED System error LED USB 2 USB 1 Hard disk drive status LED some models Hard disk drive activity LED some models Power control bu...

Page 33: ...e activity LED When this LED is lit it indicates that the DVD drive is in use Hot swap hard disk drive activity LED some models On some server models each hot swap drive has a hard disk drive activity...

Page 34: ...rear of the 5U server model with hot swap power supplies Model name 2582 F4x USB 3 and 4 Video Serial Com1 Ethernet connectors USB 1 and 2 AC Power LED DC power LED Fault error LED Power connectors Et...

Page 35: ...e Ethernet 0 connector the network can be shared with the IMM2 through a single network cable Ethernet transmit receive activity LED This LED is on the Ethernet connector When this LED is flashing it...

Page 36: ...trol button on the device and the power switch on the power supply do not turn off the electrical current supplied to the device The device also might have more than one power cord To remove all elect...

Page 37: ...ight vary slightly from your system board depending on your server model System board internal connectors The following illustration shows the internal connectors on the system board Battery DIMM 1 DI...

Page 38: ...board LEDs The following illustration shows the LEDs on the system board IMM Hearbeat LED RTMM Hearbeat LED DIMM 1 4 error LEDs Microprocessor error LED System board error LED Standby Power LED Note...

Page 39: ...ED Indicates the status of the boot process of the IMM2 When the server is connected to power this LED flashes quickly to indicate that the IMM2 code is loading When the loading is complete the LED st...

Page 40: ...2 Normal default v Pins 2 and 3 Activate low security Notes 1 If no jumper is present the server responds as default 2 Changing the position of the boot block jumper from pins 1 and 2 to pins 2 and 3...

Page 41: ...page 163 Handling static sensitive devices on page 165 and Turning off the server on page 16 2 Any system board switch or jumper blocks that are not shown in the illustrations in this document are res...

Page 42: ...22 IBM System x3100 M4 Type 2582 Problem Determination and Service Guide...

Page 43: ...n integrated USB memory The diagnostic programs collect the following information about the server System configuration Network interfaces and settings Installed hardware Vital product data firmware a...

Page 44: ...reen and details about the selected message is displayed on the right side of the screen To move from one entry to the next use the Up Arrow and Down Arrow keys The system event log indicates an asser...

Page 45: ...m x and BladeCenter Tools Center 3 Expand Tools reference expand Configuration tools expand IPMI tools and click IPMItool For an overview of IPMI go to http publib boulder ibm com infocenter systems i...

Page 46: ...trator password to view the error logs 3 Use one of the following procedures v To clear the IMM2 system event log select System Event Logs System Event Log Select Clear System Event Log then press Ent...

Page 47: ...website at http www ibm com servers eserver serverproven compat us 2 Check the IBM support website for a firmware update and update the server firmware to the latest level see Updating the firmware o...

Page 48: ...oven website at http www ibm com servers eserver serverproven compat us 2 Check the IBM support website for a firmware update and update the server firmware to the latest level see Updating the firmwa...

Page 49: ...the ServerProven website at http www ibm com servers eserver serverproven compat us 2 Check the IBM support website for a firmware update and update the server firmware to the latest level see Updati...

Page 50: ...e see Installing a microprocessor and heat sink on page 254 0018010 Microprocessors with mismatched stepping 1 Make sure that the microprocessor is on the ServerProven website at http www ibm com serv...

Page 51: ...ns replace the failing DIMM see Removing a memory module on page 200 and Installing a memory module on page 203 3 Trained service technician only If the problem occurs on the same DIMM connector check...

Page 52: ...he DIMMs are installed in the correct sequence see Installing a memory module on page 203 4 Trained service technician only Replace the microprocessor that controls the failing DIMMs see Removing the...

Page 53: ...ulation 3 If the error still occurs on the same DIMM replace the affected DIMM see Removing a memory module on page 200 and Installing a memory module on page 203 4 Trained service technician only If...

Page 54: ...ge 203 4 Trained service technician only If the problem occurs on the same DIMM connector check the DIMM connector If the connector contains any foreign material or is damaged replace the system board...

Page 55: ...page 209 3 Trained service technician only Replace the system board see Removing the system board on page 258 and Installing the system board on page 261 0068005 IOH or IIO has reported an error 1 Che...

Page 56: ...r uncorrected error 1 Check the riser card LEDs 2 Reseat all affected adapters and riser cards 3 Update the PCI adapter firmware 4 Replace the affected adapters and riser cards see Removing a ServeRAI...

Page 57: ...e sure that the server is attached to a reliable power source 3 Remove all hardware that is not listed on the ServerProven web site at http www ibm com servers eserver serverproven compat us 4 Update...

Page 58: ...er the server firmware see Recovering the server firmware on page 142 3818002 CRTM update aborted 1 Run the Setup utility select Load Default Settings and save the settings 2 Recover the server firmwa...

Page 59: ...on they record significant system level events such as when the server is started Warning Warning messages do not require immediate action they indicate possible problems such as when the recommended...

Page 60: ...blocking the air from coming into or preventing the air from exiting the server 80010901 0701xxxx Numeric sensor Ambient Temp going high upper critical has asserted Error An upper critical sensor goi...

Page 61: ...ch Error A power supply with a configuration error has been detected 1 Reseat the power supply and then restart the server 2 Replace the power supply n n power supply number 800b0108 1301xxxx Power Un...

Page 62: ...g power supply 3 Trained technician only Replace the system board n power supply number 80010202 0701xxxx Numeric sensor Planar 12V going low lower critical has asserted Error A lower critical sensor...

Page 63: ...ge 267 3 Run the DSA program 4 Reseat the adapter see Removing a ServeRAID adapter on page 176 and Installing a ServeRAID adapter on page 178 5 Replace the adapter 6 Trained technician only Replace mi...

Page 64: ...oprocessor 806f0607 0301xxxx An SM BIOS Uncorrectable CPU complex error for Processor has asserted Error The system management handler has detected an internal microprocessor error 1 Update the server...

Page 65: ...d correctly 4 Trained technician only Replace microprocessor see Removing the microprocessor and heat sink on page 250 and Installing a microprocessor and heat sink on page 254 80070301 0301xxxx Senso...

Page 66: ...4 Make sure that the two microprocessors are matching 5 Trained technician only Replace the system board see Removing the system board on page 258 and Installing the system board on page 261 Memory e...

Page 67: ...talling a memory module on page 203 for memory population 3 If the problem follows the DIMM replace the failing DIMM see Removing a memory module on page 200 and Installing a memory module on page 203...

Page 68: ...tion 3 If the problem follows the DIMM replace the failing DIMM see Removing a memory module on page 200 and Installing a memory module on page 203 4 Trained technician only If the problem occurs on t...

Page 69: ...emory error 2 Make sure that the DIMMs are firmly seated and no foreign material is found in the DIMM connector Then retry with the same DIMM 3 If the problem is related to a DIMM replace the failing...

Page 70: ...Removing the microprocessor and heat sink on page 250 and Installing a microprocessor and heat sink on page 254 8 Trained technician only Replace the system board see Removing the system board on pag...

Page 71: ...re the DIMM is installed correctly see Installing a memory module on page 203 2 If the DIMM was disabled because of a memory fault memory uncorrectable error or memory logging limit reached follow the...

Page 72: ...e Installing a memory module on page 203 for memory population 3 If the error still occurs on the same DIMM replace the affected DIMM 4 Trained technician only If the problem occurs on the same DIMM c...

Page 73: ...r is damaged replace the system board see Removing the system board on page 258 and Installing the system board on page 261 5 Trained technician only Remove the affected microprocessor and check the m...

Page 74: ...at the latest level 4 Check the SAS cable 806f010d 0400xxxx 806f010d 0401xxxx 806f010d 0402xxxx 806f010d 0403xxxx 806f010d 0404xxxx 806f010d 0405xxxx 806f010d 0406xxxx 806f010d 0407xxxx The Drive n S...

Page 75: ...disk drive number 1 Make sure that the RAID adapter firmware and hard disk drive firmware is at the latest level 2 Make sure that the SAS cable is connected correctly 3 Replace the SAS cable 4 Replace...

Page 76: ...vel of code is supported for the cluster solution before you update the code 4 Remove both adapters 5 Replace the riser cards 6 Trained technicians only Replace the system board see Removing the syste...

Page 77: ...before you update the code 4 Make sure that the adapter is supported For a list of supported optional devices see http www ibm com systems info x86servers serverproven compat us 5 Replace the adapter...

Page 78: ...f code is supported for the cluster solution before you update the code 4 Remove components one at a time restarting the server each time to see if the problem goes away 5 If the problem remains train...

Page 79: ...ed 1 Make sure the server meets the minimum configuration to start 2 Recover the server firmware from the backup page a Restart the server b At the prompt press F3 to recover the firmware 3 Update the...

Page 80: ...ail has deasserted Info An implementation has detected a sensor has deasserted No action information only 80070202 0701xxxx Sensor Planar Fault has transitioned to critical from a less severe state Er...

Page 81: ...LED on the system board 3 Replace any failing device 4 Check for a server firmware update Important Some cluster solutions require specific code levels or coordinated code updates If the device is pa...

Page 82: ...t and correctly generated 2 Try importing the certificate again 40000003 00000000 Ethernet Data Rate modified from arg1 to arg2 by user arg3 Info The specified user has changed the Ethernet data rate...

Page 83: ...0 Hostname set to arg1 by user arg2 Info The specified user has changed the Integrated Management Module host name No action information only 40000009 00000000 IP address of network interface modified...

Page 84: ...or Reset 2 IBM_ComputerSystem ElementName 3 user ID Info A user has used the IMM to perform a power function on the server No action information only 40000010 00000000 Security Userid 1 had 2 login fa...

Page 85: ...ser ID 2 IP address xxx xxx xxx xxx Error A user has attempted to log in from a Telnet session by using an invalid login ID or password 1 Make sure that the correct login ID and password are being use...

Page 86: ...o longer active Info The IMM Ethernet interface has been disabled No action information only 40000019 00000000 LAN Ethernet 0 interface is now active Info The IMM Ethernet interface has been enabled N...

Page 87: ...der Watchdog Error An operating system error has occurred and the screen capture failed Complete the following steps until the problem is solved 1 Reconfigure the watchdog timer to a higher value 2 Ma...

Page 88: ...ype of firmware mismatch has been detected No action information only 4000002b 00000000 Domain name set to arg1 Info Domain name set by user No action information only 4000002c 00000000 Domain Source...

Page 89: ...cate Signing Request link 1 Make sure that the certificate that you are importing is correct 2 Try to import the certificate again 40000023 00000000 Flash of 1 from 2 succeeded for user 3 1 CIM_Manage...

Page 90: ...the IMM Ethernet over USB interface is enabled 3 Reinstall the RNDIS or cdc_ether device driver for the operating system 4 Disable the watchdog 5 Check the integrity of the installed operating system...

Page 91: ...NET arg1 IPv6 LinkLocal HstName arg2 IP arg3 Pref arg4 Info IPv6 Link Local address is active No action information only 40000038 00000000 ENET arg1 IPv6 Static HstName arg2 IP arg3 Pref arg4 GW arg5...

Page 92: ...MP Agent port number changed from arg1 to arg2 by user arg3 Info A user has modified the SNMP Agent port number No action information only 40000044 00000000 SNMP Traps port number changed from arg1 to...

Page 93: ...hod arg4 EnhancedRBS arg5 TargetName arg6 GroupFilter arg7 GroupAttribute arg8 LoginAttribute arg9 Info A user configured an LDAP Miscellaneous setting No action information only 4000004e 00000000 Ser...

Page 94: ...000000 SMTP Server set by user arg1 to arg2 arg3 Info A user configured the SMTP server No action information only 40000057 00000000 Telnet arg1 by user arg2 Info A user enables or disables Telnet ser...

Page 95: ...rg2 Info A user installs License Key No action information only 40000061 00000000 License key for arg1 removed by user arg2 Info A user removes a License Key No action information only 40000062 000000...

Page 96: ...ly 4000006a 00000000 SSH Client key added for user arg1 Info User locally defined an SSH Client key No action information only 4000006b 00000000 SSH Client key imported for user arg1 from arg2 Info Us...

Page 97: ...lue changed No action information only 40000075 00000000 The measured power value exceeded the power cap value Warning Power exceeded cap No action information only 40000076 00000000 The new minimum p...

Page 98: ...only 40000083 00000000 The new minimum power cap value has returned below the power cap value Info Minimum Power Cap exceeds Power Cap recovered No action information only 40000084 00000000 IMM firmw...

Page 99: ...restores a Management Controller configuration from a file and the restoration fails to complete No action information only 4000008a 00000000 Management Controller arg1 Configuration restoration from...

Page 100: ...determine whether the failing server is part of a shared hard disk drive cluster two or more servers that share external storage devices If it is part of a cluster you can run all diagnostic programs...

Page 101: ...board LEDs on page 18 g Check for the following results v Successful completion of POST which is indicated by a single beep v Successful completion of startup which is indicated by a readable display...

Page 102: ...v If an action step is preceded by Trained service technician only that step must be performed only by a trained service technician Symptom Action The DVD ROM drive is not recognized 1 Make sure that...

Page 103: ...ED is not working or a similar problem has occurred If the part is a CRU replace it If the part is a FRU the part must be replaced by a trained service technician The server is hung while the screen i...

Page 104: ...pters or servers with SATA hard disk drives that use the onboard SATA SAS controller to create RAID arrays Use the Fixed Disk Test for SATA hard disk drives or servers that have RAID arrays Intermitte...

Page 105: ...ub disconnect the keyboard from the hub and connect it directly to the server 3 Replace the following components one at a time in the order shown restarting the server each time a Keyboard b Trained s...

Page 106: ...components one at a time in the order shown restarting the server each time a DIMMs b Trained service technician only System board Multiple rows of DIMMs in a branch are identified as failing 1 Reseat...

Page 107: ...programs the problem might be a video device driver 4 Replace the following components one at a time in the order shown restarting the server each time a Trained service technician only System board T...

Page 108: ...ens turn off the monitor Attention Moving a color monitor while it is turned on might cause screen discoloration Move the device and the monitor at least 305 mm 12 in apart and turn on the monitor Not...

Page 109: ...ver see http www ibm com servers eserver serverproven compat us v You followed the installation instructions that came with the device and the device is installed correctly v You have not loosened any...

Page 110: ...IMMs v The DIMMs are correctly seated v The LEDs on the power supply do not indicate a problem v The microprocessor is correctly installed 3 Reseat the following components a DIMMs b Power supply cabl...

Page 111: ...mponents one at a time in the order shown restarting the server each time a Failing serial device b Serial cable c Trained service technician only System board ServerGuide problems v Follow the sugges...

Page 112: ...d actions in the order in which they are listed in the Action column until the problem is solved v See Chapter 4 Parts listing System x3100 M4 Type 2582 on page 151 to determine which components are c...

Page 113: ...step is preceded by Trained service technician only that step must be performed only by a trained service technician Symptom Action A USB device does not work 1 Run USB diagnostics see Running the dia...

Page 114: ...gnostic programs can also provide diagnostics for the following system components if they are installed in the system v Intel Dual Gigabit Ethernet v Optical drives v Hard disk drives v SAS SATA RAID...

Page 115: ...the uEFI setup menu and enable software RAID 6 Save the setting and reboot the system 7 The system will boot back to NOS Diagnostic text messages Diagnostic text messages are displayed while the tests...

Page 116: ...e latest level For more information and to download the utilities go to http www ibm com systems support supportsite wss docdisplay brandind 5000008 lndocid SERV DSA 3 Run the test again 4 Make sure t...

Page 117: ...est again 4 Make sure that the system firmware is at the latest level The installed firmware level is shown in the DSA event log in the Firmware VPD section for this component For the latest level of...

Page 118: ...he DSA code is at the latest level For more information and to download the utilities go to http www ibm com systems support supportsite wss docdisplay brandind 5000008 lndocid SERV DSA 3 Run the test...

Page 119: ...I2C test stopped the IMM2 returned an incorrect response length 1 Turn off the system and disconnect it from the power source You must disconnect the system from ac power to reset the IMM2 2 After 45...

Page 120: ...cannot be completed for an unknown reason 1 Turn off the system and disconnect it from the power source You must disconnect the system from ac power to reset the IMM2 2 After 45 seconds reconnect the...

Page 121: ...rted IMM2 I2C test stopped the node is busy try later 1 Turn off the system and disconnect it from the power source You must disconnect the system from ac power to reset the IMM2 2 After 45 seconds re...

Page 122: ...stopped invalid command 1 Turn off the system and disconnect it from the power source You must disconnect the system from ac power to reset the IMM2 2 After 45 seconds reconnect the system to the powe...

Page 123: ...IMM2 I2C test stopped invalid command for the given LUN 1 Turn off the system and disconnect it from the power source You must disconnect the system from ac power to reset the IMM2 2 After 45 seconds...

Page 124: ...meout while processing the command 1 Turn off the system and disconnect it from the power source You must disconnect the system from ac power to reset the IMM2 2 After 45 seconds reconnect the system...

Page 125: ...est Aborted IMM2 I2C test stopped out of space 1 Turn off the system and disconnect it from the power source You must disconnect the system from ac power to reset the IMM2 2 After 45 seconds reconnect...

Page 126: ...tion canceled or invalid reservation ID 1 Turn off the system and disconnect it from the power source You must disconnect the system from ac power to reset the IMM2 2 After 45 seconds reconnect the sy...

Page 127: ...rted IMM2 I2C test stopped request data was truncated 1 Turn off the system and disconnect it from the power source You must disconnect the system from ac power to reset the IMM2 2 After 45 seconds re...

Page 128: ...request data length is invalid 1 Turn off the system and disconnect it from the power source You must disconnect the system from ac power to reset the IMM2 2 After 45 seconds reconnect the system to...

Page 129: ...I2C test stopped request data field length limit is exceeded 1 Turn off the system and disconnect it from the power source You must disconnect the system from ac power to reset the IMM2 2 After 45 se...

Page 130: ...d a parameter is out of range 1 Turn off the system and disconnect it from the power source You must disconnect the system from ac power to reset the IMM2 2 After 45 seconds reconnect the system to th...

Page 131: ...2C test stopped cannot return the number of requested data bytes 1 Turn off the system and disconnect it from the power source You must disconnect the system from ac power to reset the IMM2 2 After 45...

Page 132: ...ed sensor data or record is not present 1 Turn off the system and disconnect it from the power source You must disconnect the system from ac power to reset the IMM2 2 After 45 seconds reconnect the sy...

Page 133: ...IMM2 I2C test stopped invalid data field in the request 1 Turn off the system and disconnect it from the power source You must disconnect the system from ac power to reset the IMM2 2 After 45 seconds...

Page 134: ...illegal for the specified sensor or record type 1 Turn off the system and disconnect it from the power source You must disconnect the system from ac power to reset the IMM2 2 After 45 seconds reconnec...

Page 135: ...M2 I2C test stopped a command response could not be provided 1 Turn off the system and disconnect it from the power source You must disconnect the system from ac power to reset the IMM2 2 After 45 sec...

Page 136: ...nnot execute a duplicated request 1 Turn off the system and disconnect it from the power source You must disconnect the system from ac power to reset the IMM2 2 After 45 seconds reconnect the system t...

Page 137: ...a command response could not be provided the SDR repository is in update mode 1 Turn off the system and disconnect it from the power source You must disconnect the system from ac power to reset the I...

Page 138: ...MM2 I2C Test Aborted IMM2 I2C test stopped a command response could not be provided the device is in firmware update mode 1 Turn off the system and disconnect it from the power source You must disconn...

Page 139: ...d a command response could not be provided IMM2 initialization is in progress 1 Turn off the system and disconnect it from the power source You must disconnect the system from ac power to reset the IM...

Page 140: ...the destination is unavailable 1 Turn off the system and disconnect it from the power source You must disconnect the system from ac power to reset the IMM2 2 After 45 seconds reconnect the system to...

Page 141: ...est stopped cannot execute the command insufficient privilege level 1 Turn off the system and disconnect it from the power source You must disconnect the system from ac power to reset the IMM2 2 After...

Page 142: ...f the system and disconnect it from the power source You must disconnect the system from ac power to reset the IMM2 2 After 45 seconds reconnect the system to the power source and turn on the system 3...

Page 143: ...onnect it from the power source You must disconnect the system from ac power to reset the IMM2 2 After 45 seconds reconnect the system to the power source and turn on the system 3 Run the test again 4...

Page 144: ...source You must disconnect the system from ac power to reset the IMM2 2 After 45 seconds reconnect the system to the power source and turn on the system 3 Run the test again 4 Make sure that the DSA...

Page 145: ...wer source and turn on the system 3 Run the test again 4 Make sure that the DSA code is at the latest level For more information and to download the utilities go to http www ibm com systems support su...

Page 146: ...ware is at the latest level The installed firmware level is shown in the DSA event log in the Firmware VPD section for this component For more information see Updating the firmware on page 267 4 Run t...

Page 147: ...r more troubleshooting information at http www ibm com systems support supportsite wss docdisplay brandind 5000008 lndocid SERV CALL 201 804 xxx Memory Memory Test Aborted Test canceled the memory con...

Page 148: ...troubleshooting information at http www ibm com systems support supportsite wss docdisplay brandind 5000008 lndocid SERV CALL 201 807 xxx Memory Memory Test Aborted Test canceled the memory controlle...

Page 149: ...DSA 4 Make sure that the server firmware is at the latest level The installed firmware level is shown in the DSA event log in the Firmware VPD section for this component For more information see Upda...

Page 150: ...off the system and disconnect it from the power source 2 Reseat DIMM z 3 Reconnect the system to power and turn on the system 4 Make sure that the DSA code is at the latest level For more information...

Page 151: ...it and multi bit error failing DIMM z 1 Turn off the system and disconnect it from the power source 2 Reseat DIMM z 3 Reconnect the system to power and turn on the system 4 Make sure that the DSA code...

Page 152: ...t log in the Firmware VPD section for this component For more information see Updating the firmware on page 267 4 Run the test again 5 Turn off and restart the system if necessary to recover from a hu...

Page 153: ...and new device drivers or to submit a request for information Message number Component Test State Description Action 202 901 xxx Memory Memory Stress Test Failed Test failure 1 Run the standard memory...

Page 154: ...te with the device driver 1 Make sure that the DSA code is at the latest level For more information and to download the utilities go to http www ibm com systems support supportsite wss docdisplay bran...

Page 155: ...ain 5 Check the drive cabling at both ends for loose or broken connections or damage to the cable Replace the cable if it is damaged 6 Run the test again 7 Make sure that the DSA code is at the latest...

Page 156: ...tions or damage to the cable Replace the cable if it is damaged 4 Run the test again 5 For additional troubleshooting information go to http www ibm com support docview wss uid psg1MIGR 41559 6 Run th...

Page 157: ...e or broken connections or damage to the cable Replace the cable if it is damaged 4 Run the test again 5 Make sure that the DSA code is at the latest level For more information and to download the uti...

Page 158: ...he firmware is at the latest level 5 Run the test again 6 If the failure remains go to the IBM website for more troubleshooting information at http www ibm com systems support supportsite wss docdispl...

Page 159: ...PCI Information and Network Settings information in the DSA event log to determine the physical location of the failing component 4 If the failure remains go to the IBM website for more troubleshooti...

Page 160: ...up utility see Using the Setup utility on page 271 to assign a unique interrupt to the device 4 Replace the component that is causing the error If the error is caused by an adapter replace the adapter...

Page 161: ...information see Updating the firmware on page 267 3 Run the test again 4 Replace the component that is causing the error If the error is caused by an adapter replace the adapter Check the PCI Informa...

Page 162: ...ular links select Software and device drivers 4 From the Product family menu select System x3100 M4 to display the matrix of downloadable files for the server 5 Download the latest server firmware upd...

Page 163: ...operating system that is supported by the firmware update package that you downloaded 12 Perform firmware update following the instructions in the firmware update package readme file 13 Turn off the s...

Page 164: ...tart the server 4 At the firmware splash screen press F3 when prompted to restore to the primary bank The server boots from the primary bank Automated boot recovery ABR If the server is booting up and...

Page 165: ...oose screw is causing a short circuit on a circuit board 3 Remove the adapters and disconnect the cables and power cords to all internal and external devices until the server is at the minimum configu...

Page 166: ...ode of the hub v Check the Ethernet controller LEDs on the rear panel of the server These LEDs indicate whether there is a problem with the connector cable or hub The Ethernet link status LED is lit w...

Page 167: ...the failure Turn on the server and reconfigure it each time v Any external devices v Surge suppressor device on the server v Modem printer mouse and non IBM devices v Each adapter v Hard disk drives...

Page 168: ...s this configuration ever worked What changes if any were made before the configuration failed Is this the original reported failure v Diagnostic program type and version level v Hardware configuratio...

Page 169: ...and version level v Configuration option settings v Operating system control file setup See Appendix A Getting help and technical assistance on page 293 for information about calling IBM for service...

Page 170: ...150 IBM System x3100 M4 Type 2582 Problem Determination and Service Guide...

Page 171: ...If IBM acquires or installs a consumable component at your request you will be charged for the service v Tier 1 customer replaceable unit CRU Replacement of Tier 1 CRUs is your responsibility If IBM...

Page 172: ...R3 00D4957 4 Memory 8GB 2Rx8 UDIMM 1600 MHz DDR3 00D4961 5 System fan rear 81Y7481 6 Heat sink 81Y7493 7 Microprocessor Core i3 2100 3 1GHz 2C 3MB cache 69Y5148 7 Microprocessor Xeon E3 1270 3 4GHz 4C...

Page 173: ...D8904 7 Microprocessor Core i3 3240 3 4GHz 2C 3MB cache 00J6003 7 Microprocessor Core i3 3240T 3 0GHz 2C 3MB cache 00J6004 7 Microprocessor Core i3 3220 3 3GHz 2C 3MB cache 00J6005 7 Microprocessor Co...

Page 174: ...7480 Shield kit 13N2997 Shield kit simple swap 3 5 inch hard disk drive 81Y7479 Tower to rack kit assembly 00D4255 Friction slide 69Y4391 NetXtreme I Quad Port Adapter 90Y9355 NetXtreme I Dual Port Ad...

Page 175: ...6 Hard disk drive SATA 2 5 inch 900 GB hot swap 81Y9651 7 Operator information panel assembly 49Y8456 8 Front USB connector assembly 49Y8449 9 Bezel upper 00D8857 10 Bezel lower 90Y5210 11 Hard disk...

Page 176: ...n E3 1230v2 3 3GHz 4C 8MB cache 00D8556 14 Microprocessor Xeon E3 1265L v2 2 5GHz 4C 8MB cache 00D8557 14 Microprocessor Celeron G440 1 6GHz 1C 1MB cache 94Y6303 14 Microprocessor Core i3 2120 3 3GHz...

Page 177: ...r 39R9363 EIA brackets 39Y9758 Rack chassis 39Y9760 Cable management arm 39Y9761 Miscellaneous hardware for rack 00N7193 NetXtreme I Quad Port Adapter 90Y9355 NetXtreme I Dual Port Adapter 90Y9373 Emu...

Page 178: ...name 2582 F4x For 4U server models with non hot swap power supplies please see Table 8 continued Index Description CRU part number Tier 1 CRU part number Tier 2 FRU part number Miscellaneous hardware...

Page 179: ...nimum 18 AWG Type SVT or SJT three conductor cord a maximum of 15 feet in length and a parallel blade grounding type attachment plug rated 15 amperes 125 volts For units intended to be operated at 230...

Page 180: ...rica Sri Lanka Swaziland Uganda 39M5151 Abu Dhabi Bahrain Botswana Brunei Darussalam Channel Islands China Hong Kong S A R Cyprus Dominica Gambia Ghana Grenada Iraq Ireland Jordan Kenya Kuwait Liberia...

Page 181: ...IBM power cord part number Used in these countries and regions 39M5226 India 39M5233 Brazil Chapter 4 Parts listing System x3100 M4 Type 2582 161...

Page 182: ...162 IBM System x3100 M4 Type 2582 Problem Determination and Service Guide...

Page 183: ...ance To download firmware updates for your server go to http www ibm com support fixcentral Important Some cluster solutions require specific code levels or coordinated code updates If the device is p...

Page 184: ...eliability guidelines To help ensure proper cooling and system reliability make sure that the following requirements are met v Each of the drive bays has a drive or a filler panel and electromagnetic...

Page 185: ...f damage from electrostatic discharge observe the following precautions v Limit your movement Movement can cause static electricity to build up around you v The use of a grounding system is recommende...

Page 186: ...n page vii and Installation guidelines on page 163 2 Turn off the server and all attached devices then disconnect all power cords and external cables 3 Carefully turn the server on its side so that it...

Page 187: ...side cover removed might damage server components For 4U server models with non hot swap power supplies complete the following steps in order to remove the side cover For the 5U server model with hot...

Page 188: ...you have not left loose tools or parts inside the server Also make sure that all internal cables are correctly routed Important The cover lock must be in the unlocked opened position before you insta...

Page 189: ...with non hot swap power supplies such as the drives in bays 3 through 6 you must first remove the bezel to access the devices To remove the bezel on 4U server models with non hot swap power supplies...

Page 190: ...e instructed to return the bezel follow all packaging instructions and use any packaging materials for shipping that are supplied to you 170 IBM System x3100 M4 Type 2582 Problem Determination and Ser...

Page 191: ...h hot swap power supplies Model name 2582 F4x To access the hard disk drives on the 5U server model with hot swap power supplies Model name 2582 F4x you must first remove the lower bezel To remove the...

Page 192: ...nstructed to return the lower bezel follow all packaging instructions and use any packaging materials for shipping that are supplied to you 172 IBM System x3100 M4 Type 2582 Problem Determination and...

Page 193: ...rt the two bottom tabs on the lower bezel into the corresponding holes in the front of the chassis 2 Rotate the top of the lower bezel up to the chassis then press the blue colored release tab on the...

Page 194: ...3 2 If you are replacing a non hot swap component turn off the server and all attached devices then disconnect all power cords and external cables 3 Unlock and remove the side cover see Removing the s...

Page 195: ...oles on the right side of the chassis Bezel clips 2 Rotate the upper bezel to the left side of the chassis until the bezel clips are aligned with the corresponding indentations on the left side of the...

Page 196: ...ver see Removing the side cover on page 166 5 Remove the air duct 6 Disconnect any cables from the ServeRAID adapter or any cables that impede access to the ServeRAID adapter 7 Lift the end of the rea...

Page 197: ...all attached devices then disconnect all power cords and external cables 3 Unlock and remove the side cover see Removing the side cover on page 166 4 Carefully turn the server on its side so that it...

Page 198: ...e 17 Note If you are installing Intel Ethernet Quad Port Server Adapter I340 T4 part number 49Y4240 you can only install the adaptor in slot 1 slot 2 or slot 3 To install a replacement ServeRAID adapt...

Page 199: ...the chassis 12 Rotate the rear adapter retention bracket upward to remove it from the chassis 13 Remove the screw that secures the expansion slot cover to the chassis Store the expansion slot cover an...

Page 200: ...to place so that the hole in the opposite hinge point snaps into place over the hinge pin on the chassis 18 Connect any required cables to the adapter Route the cables so that they do not block the fl...

Page 201: ...kage that contains the adapter to any unpainted metal surface on the server Then remove the adapter from the static protective package Avoid touching the components and gold edge connectors on the ada...

Page 202: ...cover on page 167 14 Reconnect the external cables and power cords then turn on the attached devices and turn on the server Removing and installing internal drives The following figure shows the loca...

Page 203: ...2 Bay 4 Bay 5 Bay 6 Bay 7 Bay 8 Bay 3 Bay 9 Bay 10 The following notes describe the types of drives that the server supports and other information that you must consider when installing a drive v Mak...

Page 204: ...following steps For the 5U server model with hot swap power supplies Model name 2582 F4x please see the next sub section 1 Read the safety information that begins on page vii and Installation guideli...

Page 205: ...ress and hold the blue colored release button on the side of the bay to release the drive then pull the drive out of the front of the server Drive retainer clip Release buttons 8 Remove the drive reta...

Page 206: ...he beam Class 1 Laser Product Laser Klasse 1 Laser Klass 1 Luokan 1 Laserlaite Appareil A Laser de Classe 1 To install a DVD drive on 4U server models with non hot swap power supplies complete the fol...

Page 207: ...te the signal cable so that it does not block the airflow to the rear of the drives or over the microprocessor and dual inline memory modules DIMMs 13 If you have another drive to install or remove do...

Page 208: ...de cover see Installing the side cover on page 167 9 Reconnect the external cables and power cords then turn on the attached devices and turn on the server Removing a tape drive To remove a tape drive...

Page 209: ...ps For 4U server models with non hot swap power supplies please see the above sub section 1 Read the safety information that begins on page vii and Installation guidelines on page 163 2 Turn off the s...

Page 210: ...ver model with hot swap power supplies Model name 2582 F4x please see the next sub section 1 Read the safety information that begins on page vii and Installation guidelines on page 163 2 Turn off the...

Page 211: ...to the front to remove it from the drive cage then snap the drive retainer clip into the screw holes on the side of the drive Tape drive Drive retainer clip EMC filler 11 Remove the EMC filler Note Be...

Page 212: ...ide cover on page 167 19 Stand the server back up in its vertical position 20 Install bezel see Installing the bezel on page 171 Note Remove the bezel filler blocking the installed drive if any Bezel...

Page 213: ...d place it on a static protective surface 7 Set any jumpers or switches on the drive according to the documentation that comes with the drive 8 Slide the drive retainer clip to the front to remove it...

Page 214: ...then turn on the attached devices and turn on the server Removing a simple swap hard disk drive This procedure applies only to 4U server models with non hot swap power supplies Attention Simple swap...

Page 215: ...ou are instructed to return the drive assembly follow all packaging instructions and use any packaging materials for shipping that are supplied to you Chapter 5 Removing and replacing server component...

Page 216: ...ystem board as follows System board end cable connector 0 connects to the SATA 0 connector on the system board System board end cable connector 1 connects to the SATA 1 connector on the system board S...

Page 217: ...169 4 Touch the static protective package that contains the drive to any unpainted metal surface on the server then remove the drive from the package and place it on a static protective surface 5 Ali...

Page 218: ...port with disk partitions less than 2 TB Support with limitation SLES10 SP4 32bit legacy Support with disk partitions less than 2 TB Support with limitation Note 3TB hard disk drives are not supported...

Page 219: ...y 5 If you are instructed to return the drive assembly follow all packaging instructions and use any packaging materials for shipping that are supplied to you Installing a hot swap hard disk drive Thi...

Page 220: ...disk drive status LED for a drive is lit continuously it indicates that the drive is faulty and must be replaced If the green hard disk drive activity LED is flashing this indicates that the drive is...

Page 221: ...al inline memory module DIMM on the 5U server model with hot swap power supplies Model name 2582 F4x complete the following steps For 4U server models with non hot swap power supplies please see the a...

Page 222: ...re instructed to return the DIMM follow all packaging instructions and use any packaging materials for shipping that are supplied to you 202 IBM System x3100 M4 Type 2582 Problem Determination and Ser...

Page 223: ...a pair of DIMMs in DIMM connectors 1 and 3 the size and speed of the DIMMs that you install in DIMM connectors 1 and 3 must match each other However they do not have to be the same size and speed as t...

Page 224: ...vailable for the server are 1 GB 2 GB 4 GB and 8 GB when available DIMMs v The server supports up to two single rank or dual rank UDIMMs per channel v The following table lists the supported UDIMM pop...

Page 225: ...on might cause the server to halt which might result in the loss of data To avoid this potential problem always use an electrostatic discharge wrist strap or other grounding system when you work insid...

Page 226: ...applying pressure on both ends of the DIMM simultaneously The retaining clips snap into the locked position when the DIMM is firmly seated in the connector Note If there is a gap between the DIMM and...

Page 227: ...remove the new DIMM from the package 8 Turn the DIMM so that the DIMM keys align correctly with the connector 9 Insert the DIMM into the connector by aligning the edges of the DIMM with the slots at...

Page 228: ...m0 index jsp topic liaai ipmi ipmikick htm for more information Statement 2 CAUTION When replacing the lithium battery use only IBM Part Number 33F8354 or an equivalent type battery recommended by the...

Page 229: ...r on page 166 4 Carefully turn the server on its side so that it is lying flat with the system board facing up Attention Do not allow the server to fall over 5 Locate the battery on the system board s...

Page 230: ...the following steps For the 5U server model with hot swap power supplies Model name 2582 F4x please see the next sub section 1 Follow any special handling and installation instructions that come with...

Page 231: ...Configuration Setup Utility program and reset the configuration v Set the system date and time v Set the power on password v Reconfigure the server See Using the Setup utility on page 271 for details...

Page 232: ...hen pull the fan toward the front of the server to remove the rubber grommet through the hole on the chassis Repeat this step till all the remaining rubber grommets are removed c Lift the system fan u...

Page 233: ...ers to pull the grommets through the holes in the fan 2 Carefully turn the server on its side so that it is lying flat with the cover facing up Attention Do not allow the server to fall over 3 Remove...

Page 234: ...ve fan duct on the 5U server model with hot swap power supplies Model name 2582 F4x complete the following steps 1 Turn off the server and all attached devices then disconnect all power cords and exte...

Page 235: ...inutes with the side cover removed To install the hard disk drive fan duct on the 5U server model with hot swap power supplies Model name 2582 F4x complete the following steps 1 Unlock and remove the...

Page 236: ...up in its vertical position 6 Install and lock the side cover see Installing the side cover on page 167 7 Reconnect the external cables and power cords then turn on the attached devices and turn on th...

Page 237: ...n page vii and Installation guidelines on page 163 2 Turn off the server and all attached devices then disconnect all power cords and external cables 3 Remove the bezel see Removing the bezel on page...

Page 238: ...Cage release latches 10 Remove the backplate 218 IBM System x3100 M4 Type 2582 Problem Determination and Service Guide...

Page 239: ...the simple swap backplate This procedure applies only to 4U server models with non hot swap power supplies To install the simple swap backplate on 4U server models with non hot swap power supplies com...

Page 240: ...e swap backplate toward the drive cage 3 Make sure the tabs on the simple swap backplate are on the left of the upper drive cage tabs and then push the backplate till the end 4 Slide the disk drive ca...

Page 241: ...rd disk drive signal cables to the SATA connectors on the system board or the connector on the adapter if one is installed Note In the LSI RAID utility SATA 1 represents hard disk drive in drive bay t...

Page 242: ...p power supplies Model name 2582 F4x To remove the hot swap backplane on the 5U server model with hot swap power supplies Model name 2582 F4x complete the following steps 1 Read the safety information...

Page 243: ...s until the retaining tab on top of the cage locks into place Hard disk drive cage Release tab 9 Disconnect the power signal and configuration cables from the hard disk drive backplane Signal cables P...

Page 244: ...odel name 2582 F4x To install the hard disk drive backplane on the 5U server model with hot swap power supplies Model name 2582 F4x complete the following steps 1 Place the bottom edge of the hot swap...

Page 245: ...backplane to the drive cage Screws 4 Press and hold the retaining tab on the side of the cage then rotate the drive cage into the chassis until it locks into place Note You may need to slightly lift...

Page 246: ...el with hot swap power supplies Model name 2582 F4x please see the next sub section 1 Read the safety information that begins on page vii and Installation guidelines on page 163 2 Turn off the server...

Page 247: ...vices then disconnect all power cords and external cables 3 Unlock and remove the side cover see Removing the side cover on page 166 4 Remove the lower bezel see Removing the lower bezel on page 171 5...

Page 248: ...any packaging materials for shipping that are supplied to you Installing the front panel assembly To install the front panel assembly on 4U server models with non hot swap power supplies complete the...

Page 249: ...he external cables and power cords then turn on the attached devices and turn on the server To install the front panel assembly on the 5U server model with hot swap power supplies Model name 2582 F4x...

Page 250: ...ector assembly To remove the front USB connector assembly on 4U server models with non hot swap power supplies complete the following steps For the 5U server model with hot swap power supplies Model n...

Page 251: ...on that begins on page vii and Installation guidelines on page 163 2 Turn off the server and all attached devices then disconnect all power cords and external cables 3 Unlock and remove the side cover...

Page 252: ...ousing then tilt the top of the housing away from the chassis and lift the housing out of the opening in the chassis Front USB housing 10 Squeeze the spring clips on the sides of the front USB connect...

Page 253: ...el with hot swap power supplies Model name 2582 F4x please see the next sub section 1 Read the safety information that begins on page vii and Installation guidelines on page 163 2 Turn off the server...

Page 254: ...connector assembly on the 5U server model with hot swap power supplies Model name 2582 F4x complete the following steps For 4U server models with non hot swap power supplies please see the above sub...

Page 255: ...nto place Front USB housing 9 Carefully turn the server on its side so that it is lying flat with the system board facing up Attention Do not allow the server to fall over 10 Reroute and connect the f...

Page 256: ...xternal cables 2 Unlock and remove the side cover see Removing the side cover on page 166 3 Carefully turn the server on its side so that it is lying flat with the system board facing up Attention Do...

Page 257: ...vertical position 5 Install and lock the side cover see Installing the side cover on page 167 6 Reconnect the external cables and power cords then turn on the attached devices and turn on the server R...

Page 258: ...4U server models with non hot swap power supplies To install the hard disk drive cage on 4U server models with non hot swap power supplies complete the following steps 1 Read the safety information th...

Page 259: ...11 Install bezel see Installing the bezel on page 171 12 Reconnect the external cables and power cords then turn on the attached devices and turn on the server Removing the non hot swap power supply...

Page 260: ...us voltage current and energy levels are present inside any component that has this label attached There are no serviceable parts inside these components If you suspect a problem with one of these par...

Page 261: ...sconnect the hard disk power cables from the backplate 8 Disconnect the cables from the power supply to the system board and all internal components Note the routing of all power supply cables you wil...

Page 262: ...e present inside any component that has this label attached There are no serviceable parts inside these components If you suspect a problem with one of these parts contact a service technician To inst...

Page 263: ...ling the side cover on page 167 7 Stand the server back up in its vertical position 8 Install bezel see Installing the bezel on page 171 9 Reconnect the external cables and power cords then turn on th...

Page 264: ...urrent and energy levels are present inside any component that has this label attached There are no serviceable parts inside these components If you suspect a problem with one of these parts contact a...

Page 265: ...power supply that you are installing see http www ibm com systems info x86servers serverproven compat us v The server comes standard with one 430 watt hot swap power supply The input voltage is 110 V...

Page 266: ...ls are present inside any component that has this label attached There are no serviceable parts inside these components If you suspect a problem with one of these parts contact a service technician At...

Page 267: ...ng that the power supply is operating correctly 5 If you are adding a power supply to the server attach the redundant power information label that comes with this option on the server top cover near t...

Page 268: ...the server on its side so that it is lying flat with the system board facing up Attention Do not allow the server to fall over 6 Disconnect the cables from the power supply cage to the system board an...

Page 269: ...del with hot swap power supplies Model name 2582 F4x To install the hot swap power supply cage on the 5U server model with hot swap power supplies Model name 2582 F4x complete the following steps 1 Pl...

Page 270: ...the server Removing and replacing FRUs Field replaceable units FRUs must be installed only by trained service technicians Removing the microprocessor and heat sink To remove the microprocessor and he...

Page 271: ...microprocessor Important Be careful when you handle the microprocessor and heat sink If the microprocessor and heat sink will be reused do not contaminate the thermal material between them Heat sink S...

Page 272: ...ernal cables 3 Unlock and remove the side cover see Removing the side cover on page 166 4 Carefully turn the server on its side so that it is lying flat with the system board facing up Attention Do no...

Page 273: ...sing it to the open up position Microprocessor Alignment marks Microprocessor bracket frame Microprocessor release lever System board 8 Open the microprocessor bracket frame by lifting up the tab on t...

Page 274: ...en position before you insert the microprocessor in the socket Failure to do so might result in permanent damage to the microprocessor microprocessor socket and system board 4 Carefully grasp the micr...

Page 275: ...ated contact your service technician Heat sink System board 7 Reconnect any cables that you disconnected during the removal of the old microprocessor 8 Secure the SATA signal cables with the retention...

Page 276: ...ner of the microprocessor points to a 45 degree angle on the system board v Do not use excessive force when you press the microprocessor into the socket 5 Close the microprocessor bracket frame then c...

Page 277: ...grease must be replaced whenever the heat sink has been removed from the top of the microprocessor and is going to be reused or when debris is found in the grease When you are installing the heat sin...

Page 278: ...stem board To remove the system board on 4U server models with non hot swap power supplies complete the following steps For the 5U server model with hot swap power supplies Model name 2582 F4x please...

Page 279: ...sockets on the system board are fragile Any damage to the cable sockets may require replacing the system board 10 Remove any of the following components in addition to others that might not be listed...

Page 280: ...then disconnect all power cords and external cables 3 Unlock and remove the side cover see Removing the side cover on page 166 4 Carefully turn the server on its side so that it is lying flat with th...

Page 281: ...e 176 v DIMMs see Installing a memory module on page 203 v Battery see Removing the system battery on page 207 11 Remove the seven screws that secure the system board to the chassis System board 7 scr...

Page 282: ...supported for the cluster solution before you update the code To install the system board on 4U server models with non hot swap power supplies complete the following steps For the 5U server model wit...

Page 283: ...nnectors on page 17 8 Secure the cables with the retention clips 9 Install the air duct 10 Install the side cover see Installing the side cover on page 167 11 Stand the server back up in its vertical...

Page 284: ...ntil the screw holes on the system board align with the screw holes on the chassis System board 7 screws 4 Install the seven screws that secure the system board to the chassis 5 Install any of the fol...

Page 285: ...cables and power cords then turn on the attached devices and turn on the server Important Perform the following updates v Either update the server with the latest RAID firmware or restore the pre exi...

Page 286: ...266 IBM System x3100 M4 Type 2582 Problem Determination and Service Guide...

Page 287: ...you replace a device in the server you might have to either update the server with the latest version of the firmware that is stored in memory on the device or restore the pre existing firmware from a...

Page 288: ...unit SDR FRU data and to remotely manage a system For information about using these programs see Using the integrated management module II IMM2 on page 275 v Ethernet controller configuration For inf...

Page 289: ...ServerGuide program requires a supported IBM server with an enabled startable bootable CD drive In addition to the ServerGuide Setup and Installation CD you must have your operating system CD to insta...

Page 290: ...ystem installation program starts You will need your operating system CD to complete the installation 2 The ServerGuide program stores information about the server model service processor hard disk dr...

Page 291: ...ect settings to view or change Setup utility menu choices The following choices are on the Setup utility main menu for the UEFI Depending on the version of the firmware some menu choices might differ...

Page 292: ...to enable or disable UEFI to interact with PCI mass storage devices that are non UEFI compliant integrated management module II Select this choice to view or change the settings for the integrated man...

Page 293: ...to enter the System Event Manager where you can view the error messages in the system event logs You can use the arrow keys to move between pages in the error log The system event logs contain all eve...

Page 294: ...t change and delete a power on password and an administrator password The User Security choice is on the full Setup utility menu only If you set only a power on password you must type the power on pas...

Page 295: ...e Boot Selection Menu and press Enter Note OPROM configuration utility is only available for emulex 10G card The next time the server starts it returns to the startup sequence that is set in the Setup...

Page 296: ...net Managing tools and utilities with IMM2 and IBM System x Server Firmware This section describes the tools and utilities that are supported by IMM2 and IBM System x Server Firmware The IBM tools tha...

Page 297: ...ty complete the following steps 1 Go to http www 947 ibm com support entry portal docdisplay lndocid SERV XPRESS 2 Download IMM uEFI pDSA code from http www ibm com support fixcentral 3 Follow IMM uEF...

Page 298: ...static address of 169 254 95 118 with a subnet mask of 255 255 0 0 In the event of an IP address collision on the network the IMM2 might obtain a different IP address in the 169 254 xxx xxx range Bec...

Page 299: ...er to set up the LAN over USB manually use one of the following procedures For more information about LAN over USB configuration on different operating systems see the IBM white paper Transitioning to...

Page 300: ...Device Manager Verify that IBM USB Remote NDIS Network Device appears under Network Adapters 11 Open a command prompt type ipconfig and press Enter The local area connection for the IBM USB RNDIS is d...

Page 301: ...nd duplex mode full duplex or half duplex of the network and automatically operates at that rate and mode You do not have to set any jumpers or configure the controller However you must install a devi...

Page 302: ...Port Access Mode Disable v Legacy Option ROM Display COM Port 1 v Baud Rate 115200 v Data Bits 8 v Parity Select any of the following three options None Odd Even v Stop Bits 1 Attention In Linux opera...

Page 303: ...different capacities but the RAID controller treats them as if they all have the capacity of the smallest hard disk drive v If you use an integrated SATA controller with RAID capabilities to configur...

Page 304: ...t RAID Properties 3 Select the type of array that you want to create 4 Use the arrow keys to highlight the first drive in the pair then press the Minus or Plus key to change the mirror value to Primar...

Page 305: ...rray of hard disk drives complete the following steps 1 Turn on the server Note Approximately 1 to 3 minutes after the server is connected to ac power the power control button becomes active after the...

Page 306: ...lect the updates that you want to install and click Install to start the installation wizard If your management server is not connected to the Internet to locate and install updates and interim fixes...

Page 307: ...bootable media Note IBM provides a method for building a bootable media You can create a bootable media using the Bootable Media Creator BoMC application from the Tools Center website 3 Copy and unpac...

Page 308: ...ed Some operating systems have the IPMI driver installed by default ASU provides the corresponding mapping layer See the Advanced Settings Utility Users Guide for more details You can access the ASU U...

Page 309: ...ool that supports several operating systems Make sure that you download the version for your operating system You can download the ASU from the IBM website To download the ASU and update the DMI compl...

Page 310: ...number on the server Type sn zzzzzzz where zzzzzzz is the serial number asset_method The server asset tag number Type asset aaaaaaaaaaaaaaaaaaaaaaaaaaaaaaaaa where aaaaaaaaaaaaaaaaaaaaaaaaaaaaaaaaa is...

Page 311: ...do not use the userid and password default values asu set SYSTEM_PROD_DATA SYsInfoProdName m t_model asu set SYSTEM_PROD_DATA SYsInfoSerialNum s n asu set SYSTEM_PROD_DATA SYsEncloseAssetTag asset_tag...

Page 312: ...Tag asset_tag host IMM2_ip v Bootable media You can also build a bootable media using the applications available through the Tools Center website at http publib boulder ibm com infocenter toolsctr v1r...

Page 313: ...rproven compat us to make sure that the hardware and software is supported by your IBM product v Go to http www ibm com supportportal to check for information to help you solve the problem v Gather th...

Page 314: ...nformation is http www ibm com systems bladecenter The address for IBM IntelliStation information is http www ibm com systems intellistation How to send Dynamic System Analysis data to IBM Use the IBM...

Page 315: ...p www ibm com partnerworld and click Find Business Partners on the right side of the page For IBM support telephone numbers see http www ibm com planetwide In the U S and Canada call 1 800 IBM SERV 1...

Page 316: ...296 IBM System x3100 M4 Type 2582 Problem Determination and Service Guide...

Page 317: ...S FOR A PARTICULAR PURPOSE Some states do not allow disclaimer of express or implied warranties in certain transactions therefore this statement may not apply to you This information could include tec...

Page 318: ...volume KB stands for 1024 bytes MB stands for 1 048 576 bytes and GB stands for 1 073 741 824 bytes When referring to hard disk drive capacity or communications volume MB stands for 1 000 000 bytes an...

Page 319: ...Limits Particulate v The room air must be continuously filtered with 40 atmospheric dust spot efficiency MERV 9 according to ASHRAE Standard 52 21 v Air that enters a data center must be filtered to...

Page 320: ...e to radio communications Operation of this equipment in a residential area is likely to cause harmful interference in which case the user will be required to correct the interference at his own expen...

Page 321: ...es Produkt entspricht den Schutzanforderungen der EU Richtlinie 2004 108 EG zur Angleichung der Rechtsvorschriften ber die elektromagnetische Vertr glichkeit in den EU Mitgliedsstaaten und h lt die Gr...

Page 322: ...gen Germany Telephone 49 7032 15 2941 Email lugi de ibm com Generelle Informationen Das Ger t erf llt die Schutzanforderungen nach EN 55024 und EN 55022 Klasse A VCCI Class A statement This is a Class...

Page 323: ...e A Sellers and users need to pay attention to it This is for any areas other than home Russia Electromagnetic Interference EMI Class A statement People s Republic of China Class A electronic emission...

Page 324: ...304 IBM System x3100 M4 Type 2582 Problem Determination and Service Guide...

Page 325: ...ts on the server 151 configuration minimum 147 ServerGuide Setup and Installation CD 267 269 Setup utility 267 configuration continued using the Setup utility 271 configuration programs LSI Configurat...

Page 326: ...USB port 93 video 87 errors format diagnostic code 95 Ethernet activity LED 15 connector 15 link status LED 15 utility enabling 281 Ethernet controller configuration 268 Ethernet controller troublesh...

Page 327: ...228 heat sink 254 hot swap drives 199 hot swap power supply cage 249 hot swap SAS or SATA drives 199 installing continued internal drives 182 memory modules 203 microprocessor 254 power supply non hot...

Page 328: ...memory modules 203 order of installation hard disk drives 196 memory modules 206 207 P particulate contamination 7 9 299 parts listing 151 password 274 administrator 274 power on 274 password adminis...

Page 329: ...unning the diagnostic programs 95 S safety information Statement 12 xvi Statement 13 xvi Statement 15 xvii SAS backplane LEDs hot swap drive status 13 SAS or SATA hot swap drives installing 199 removi...

Page 330: ...rning off the server 16 integrated integrated management module 16 U UEFI boot recovery jumper 142 UEFI update failure recovery 142 undetermined problems 147 undocumented problems 3 United States elec...

Page 331: ......

Page 332: ...Part Number 00V9701 Printed in USA 1P P N 00V9701...

Reviews: