Power problems
v
Follow the suggested actions in the order in which they are listed in the Action column until the problem is
solved.
v
See Chapter 4, “Parts listing, System x3690 X5 Types 7147, 7148, 7149, and 7192,” on page 249 to determine
which components are customer replaceable units (CRU) and which components are field replaceable units
(FRU).
v
If an action step is preceded by “(Trained service technician only),” that step must be performed only by a
Trained service technician.
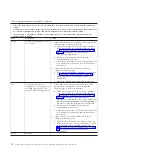
Symptom
Action
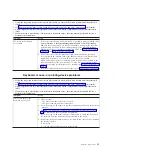
The power-control button does
not work, and the reset button
does work (the server does not
start).
Note:
The power-control button
will not function until
approximately 1 to 3 minutes
after the server has been
connected to ac power.
1.
Make sure that the top cover is closed and latched correctly.
2.
Make sure that the top cover/power cut-off switch cable is seated correctly.
3.
Make sure that the power-control button on the server is working correctly:
a.
Disconnect the server power cords.
b.
Reconnect the power cords.
c.
Reseat the operator information panel cables, and then repeat steps 3a and
3b.
v
If the server starts, reseat the operator information panel. If the problem
remains, replace the operator information panel.
v
If the server does not start, bypass the power-control button by using
the force power-on jumper (see “Server internal LEDs, connectors, and
jumpers” on page 18). If the server starts, reseat the operator
information panel. If the problem remains, replace the operator
information panel.
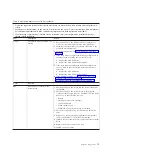
4.
Make sure that the reset button is working correctly:
a.
Disconnect the server power cords.
b.
Reconnect the power cords.
c.
Reseat the operator information panel cable, and then repeat steps 3a and
3b.
v
If the server starts, replace the operator information panel.
v
If the server does not start, go to step 5.
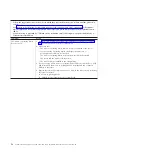
5.
Make sure that:
v
The power cords are correctly connected to the server and to a working
electrical outlet.
v
The type of memory that is installed is correct.
v
The DIMMs are fully seated.
v
The LEDs on the power supply do not indicate a problem.
v
The microprocessors are installed in the correct sequence.
6.
Reseat the following components:
a.
DIMMs
b.
Power supplies
c.
Top cover/power cut-off switch cable
7.
Replace the components listed in step 6 one at a time, in the order shown,
restarting the server each time.
8.
If you just installed an optional device, remove it, and restart the server. If the
server now starts, you might have installed more devices than the power
supply supports.
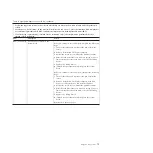
9.
See “Power-supply LEDs” on page 78.
10.
See “Solving undetermined problems” on page 245.
62
System x3690 X5 Types 7147, 7148, 7149, and 7192: Problem Determination and Service Guide
Summary of Contents for System x3690 X5
Page 1: ...System x3690 X5 Types 7147 7148 7149 and 7192 Problem Determination and Service Guide...
Page 2: ......
Page 3: ...System x3690 X5 Types 7147 7148 7149 and 7192 Problem Determination and Service Guide...
Page 8: ...vi System x3690 X5 Types 7147 7148 7149 and 7192 Problem Determination and Service Guide...
Page 13: ...Safety statements Safety xi...
Page 22: ...4 System x3690 X5 Types 7147 7148 7149 and 7192 Problem Determination and Service Guide...
Page 266: ...248 System x3690 X5 Types 7147 7148 7149 and 7192 Problem Determination and Service Guide...
Page 278: ...260 System x3690 X5 Types 7147 7148 7149 and 7192 Problem Determination and Service Guide...
Page 386: ...368 System x3690 X5 Types 7147 7148 7149 and 7192 Problem Determination and Service Guide...
Page 407: ...1 2 Chapter 5 Removing and replacing components 389...
Page 444: ...426 System x3690 X5 Types 7147 7148 7149 and 7192 Problem Determination and Service Guide...
Page 454: ...436 System x3690 X5 Types 7147 7148 7149 and 7192 Problem Determination and Service Guide...
Page 461: ...weight of memory enclosure 28 Index 443...
Page 462: ...444 System x3690 X5 Types 7147 7148 7149 and 7192 Problem Determination and Service Guide...
Page 463: ......
Page 464: ...Part Number 47C8865 Printed in USA 1P P N 47C8865...


