Increasing Memory Capacity
6
Which are you going to do?
Install a DIMM
Go to the next step.
Remove a DIMM
Go to step 9 on page 145.
7
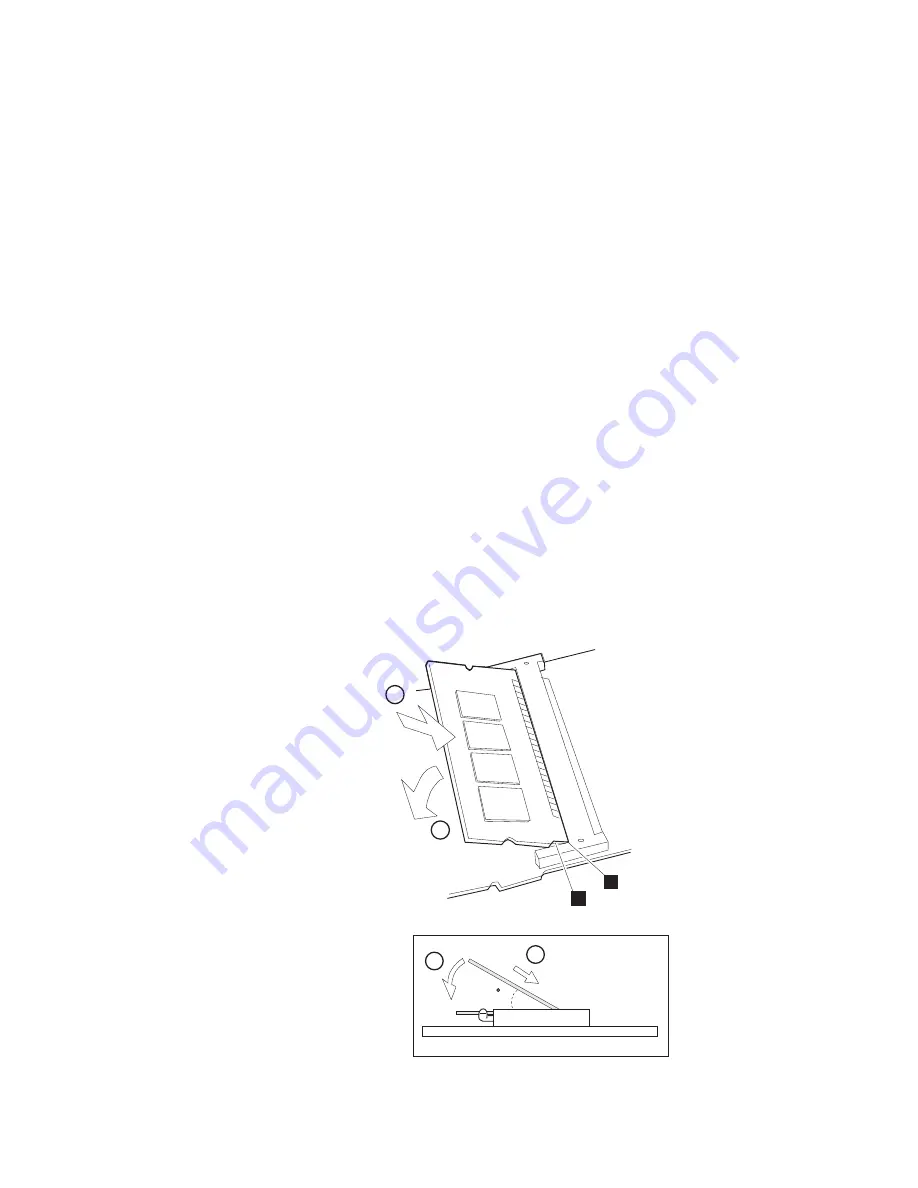
Insert the DIMM (available as an option) into either of
the sockets on the DIMM adapter.
a) Find the notch
1
on the side of the DIMM.
b) With the notched end of the DIMM toward the right side of
the socket
2
, insert the DIMM, at an angle of
approximately 20°, into the socket; then press it firmly.
c) Pivot the DIMM until it snaps into place.
If you have another DIMM to install, insert it into the other
socket in the same way.
1
2
1
2
2
1
20
Side View
144
IBM ThinkPad 760C User's Guide
Summary of Contents for ThinkPad 760C
Page 2: ...i...
Page 11: ...x IBM ThinkPad 760C User s Guide...
Page 17: ...Index 301 xvi IBM ThinkPad 760C User s Guide...
Page 27: ...Getting Started 5 4 1 1 2 2 10 IBM ThinkPad 760C User s Guide...
Page 29: ...Getting Started 6 7 8 2 2 3 3 1 1 12 IBM ThinkPad 760C User s Guide...
Page 53: ...Carrying the Computer Mwave Telephone Answering Machine 82 36 IBM ThinkPad 760C User s Guide...
Page 153: ...Using Locks 136 IBM ThinkPad 760C User s Guide...
Page 193: ...Attaching an IBM Dock I or Dock II Expansion Unit 176 IBM ThinkPad 760C User s Guide...
Page 259: ...Getting Service 242 IBM ThinkPad 760C User s Guide...
Page 265: ...Avoiding Hardware Conflicts 248 IBM ThinkPad 760C User s Guide...
Page 283: ...Advanced Information for PC Cards 266 IBM ThinkPad 760C User s Guide...
Page 289: ...Information for Mwave DSP Features 272 IBM ThinkPad 760C User s Guide...


