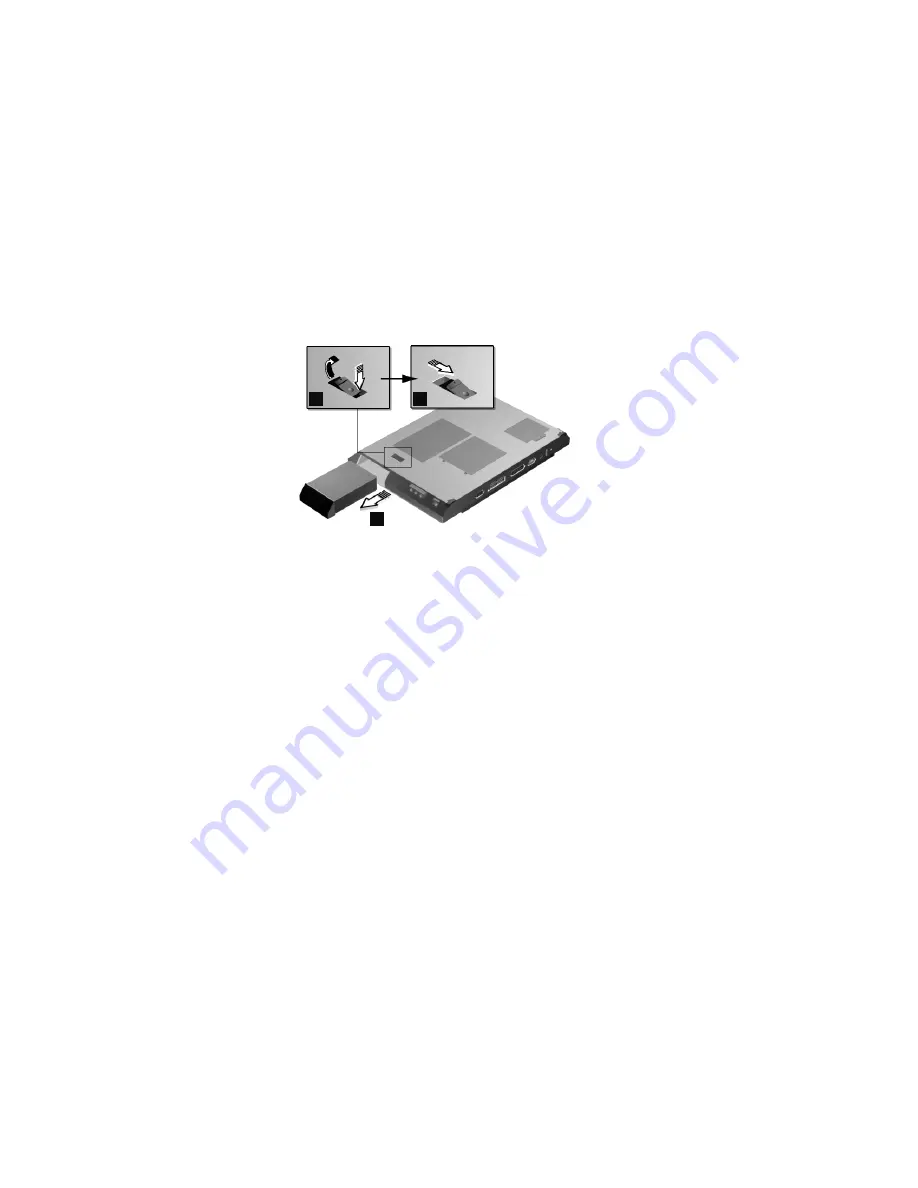
Battery Assembly
1
2
3
Reverse the steps described above when installing a newbattery pack.
36
ThinkPad i Series 1400
Page 1: ...es 1400 2611 This Manual Supports The Following Models 1412 1419 1452 1456 1459 1472 1476 1479 140A 140C 140F 140H 140K 140L 140M 140T 143C 143H 143K 143L 143M 143T 147A 147F 147A 149C 149F 149H 149K...
Page 2: ...nties in certain transactions there fore this statement may not apply to you This publication could include technical inaccuracies or typographical errors Changes are periodically made to the informat...
Page 3: ...15 Hibernation Mode 16 Symptom to FRU Index 17 Numeric Error Codes and Messages 17 Beep Symptoms 19 No Beep Symptoms 19 Keyboard TrackPoint Related Symptoms 20 LCD Related Symptoms 20 Indicator Relate...
Page 4: ...Audio PCB and S Video PCB 52 Audio Cable and Speaker Cable 53 Audio Connector Board 55 Fan Assembly 56 Diskette and CD ROM DVD ROM Drives Assembly 57 Planar Board 60 LCD Front Cover 12 1 inch 61 LCD F...
Page 5: ...single unreproducible failure Single failure can occur for a variety of reasons that have nothing to do with a hardware defect such as cosmic radiation electrostatic discharge or software error FRU re...
Page 6: ...e physical or operating environment or improper maintenance by the customer The following list provides some common items that are not covered under warranty and some symptoms that may indicate the sy...
Page 7: ...ol bag Always use new screws if you are instructed Use a torque screwdriver if you have one Loose screws can cause a reliability problem The IBM ThinkPad computer addresses this problem with nylon coa...
Page 8: ...position is bypass pass word the OFF position is check password Refer to Switch Locations on page 74 5 Plug in the AC adapter and turn on the system 6 While the ThinkPad logo is being displayed wait f...
Page 9: ...hinkPad i Series 1400 Maintenance Diskette P N 09N1025 1 Obtain the failing symptoms in as much detail as pos sible 2 Verify the symptoms by attempting to recreate the failure by running the diagnosti...
Page 10: ...e appropriate power supply check listed below Checking the AC Adapter Checking the Operational Charging on page 7 Checking the Battery Pack on page 7 Checking the AC Adapter If the computer fails only...
Page 11: ...r does not always indicate a defective adapter Checking the Operational Charging To check operational charging use a discharged battery pack or a battery pack that has less than 50 of the total power...
Page 12: ...nd start the PC Doctor program please refer to Running the PC Doctor Diagnostics Program on page 29 2 Run the System Board test to verify the symptom This test verifies both the planar board and the C...
Page 13: ...Note If an external keyboard is attached remove it if the internal keyboard has to be tested If the internal keyboard does not work or an unexpected character appears make sure that the flexible cabl...
Page 14: ...d TrackPoint IV Check If the external mouse is connected the TrackPoint does not work In this case please detach the external mouse to check the TrackPoint If this does not correct the TrackPoint prob...
Page 15: ...to Running the PC Doctor Diagnostics Program on page 29 2 Select Diagnostics 3 Select Diskette Drives 4 Follow the instructions in the message window If an error occurs with the internal diskette dri...
Page 16: ...rom the diagnostics diskette and start the PC Doctor program please refer to Running the PC Doctor Diagnostics Program on page 29 2 Select Diagnostics 3 Select Other Devices 4 Select Modem Loopback Te...
Page 17: ...change or remove a system password Change the system boot drive or display device Add or remove serial and parallel devices Set the video display features While the ThinkPad logo is being displayed w...
Page 18: ...parameters Press the up or down arrow keys to move from one parameter to another Press the left or right arrow keys to change parameter settings You have to change some settings when you add a compone...
Page 19: ...ment menu of the BIOS Utility is set to Enabled The system keyboard mouse hard disk drive par allel connector or diskette drive etc is idle for a certain period of time The battery power is critically...
Page 20: ...ndby mode if Battery low Warning Beep in the Power Management menu of the BIOS Utility is set to Enabled four short beeps will be issued every minute for three minutes The system keyboard mouse hard d...
Page 21: ...re available use narrative symptoms If the symptom is not listed go to Undetermined Problems on page 25 Note For any IBM device not supported by the diagnostic codes in this ThinkPad computer see the...
Page 22: ...ettings Backup battery RTC battery Planar board 072 CMOS Checksum Error Enter BIOS Utility and execute Load Setup Default Settings then reboot the system Backup battery RTC battery Planar board 006 Eq...
Page 23: ...e System Secu rity menu of the BIOS Utility is not set to Drive A Ensure the diskette drive con figuration in the Basic System Settings menu of the BIOS Utility is not set cor rectly Diskette drive ca...
Page 24: ...Keyboard TrackPoint Related Symptoms Symptom Error FRU Action in Sequence Keyboard one or more keys doesn t work Go to Keyboard and External Input Device Check on page 9 Reconnect keyboard cables Key...
Page 25: ...t cannot be adjusted Enter BIOS Utility and execute Load Setup Default Settings then reboot the system Reconnect the LCD connec tors Keyboard if contrast and brightness function keys do not work LCD i...
Page 26: ...stem doesn t power on Go to Power Systems Check on page 6 AC Adapter Charger board Planar board The system doesn t power off Go to Power Systems Check on page 6 Hold and press the power switch for mor...
Page 27: ...IA slot pin is damaged PC Card PCMCIA slots assembly Power Management Related Symptoms Symptom Error FRU Action in Sequence The system doesn t enter hibernation mode and four short beeps every minute...
Page 28: ...mittently Hard disk diskette CD ROM DVD ROM drive connector Fan Planar board Peripheral Device Related Symptom Symptom Error FRU Action in Sequence External display does not work correctly Press Fn F9...
Page 29: ...termined Problems The diagnostic tests did not identify which adapter or device failed which installed devices are incorrect whether a short circuit is suspected or whether the system is inop erative...
Page 30: ...blem remains replace the following FRUs one at a time Do not replace a non defective FRU TrackPoint board Charger board Audio battery function connection board LCD assembly Planar board 26 ThinkPad i...
Page 31: ...date is required for the fol lowing conditions New versions of system programs New features or options are added To update the flash memory do the following 1 Get the appropriate diskette containing t...
Page 32: ...on the keyboard is enabled You enable or disable the keypad by pressing and holding the Shift key and pressing the NumLk key For details see the User s Refer ence 5 Caps lock Green Caps Lock mode is...
Page 33: ...N 05K4693 Torque screwdriver P N 05K4695 5mm socket wrench P N 05K4694 Running the PC Doctor Diagnostics Program To run PC Doctor 1 Shutdown the computer 2 Insert the PC Doctor for DOS diskette 1 int...
Page 34: ...structions on the screen Setting the LCD Panel ID There is an EEPROM in the inverter which store its supported LCD type and ID code If you replace the LCD with one of a different brand the ID informat...
Page 35: ...need to reset the thermal sensor threshold Follow the steps below to set the thermal threshold 1 Boot from the Maintenance Program Diskette 2 Select Thermal Sensor Utility from PC DOS 7 0 Startup men...
Page 36: ...Utility defines all Fn key functions as well as ShortCut keys that can be customized F2 The Power Management Properties window appears F3 The computer blanks the screen to save power F4 The computer...
Page 37: ...rs 1024x768 pixel TFT color XGA LCD External monitor VGA connector and TV out S video jack optional Audio Internal system buzzer Internal speakers and microphone Internal line in microphone in headpho...
Page 38: ...t make sure all screws springs or other small parts are in place and are not left loose inside the computer Verify this by shaking the computer and listening for rat tling sounds Metallic parts or met...
Page 39: ...r by pulling up the two clasps on both sides of the connector with a plastic stick Then carefully pull out the cable from the connector Plugging the Cable To plug the cable back first make sure that t...
Page 40: ...Battery Assembly 1 2 3 Reverse the steps described above when installing a new battery pack 36 ThinkPad i Series 1400...
Page 41: ...ocket insert the DIMM at an angle of approximately 20 into the socket then press it firmly Pivot the DIMM until it snaps into place 1 2 Side View 1 2 Step Size Quan tity Head Color Torque Memo 1 M2 x...
Page 42: ...odem cable 4 then press the release latches on both sides of the modem board 5 and pull out the modem board 6 5 6 4 Step Size Quan tity Head Color Torque Memo 2 M2 x 5L 2 Bind head black 1 6kgf cm Not...
Page 43: ...1 2 Note Be careful not to scratch the surface of the name plate cover 3 Step Size Quan tity Head Color Torque Memo 3 M2 x 4L 2 Pan head silver 1 6 kgf cm Note Make sure you use the correct screw for...
Page 44: ...contact with the bottom of the connector Now press down on the latch of the connector to secure Note If the cables do not touch the bottom of the con nector the keyboard function will be rendered use...
Page 45: ...Assembly on page 36 Keyboard on page 39 1 2 Step Size Quan tity Head Color Torque Memo 1 M2 5 x 6L 3 Bind head black 3 2 kgf cm w nylock paste Note Make sure you use the correct screw for replacement...
Page 46: ...con tents to water Dispose of the battery as required by local ordiances or regulations Use of an incorrect battery can result in ignition or explosion of the battery Replacement batteries can be orde...
Page 47: ...e is sensitive to physical shock Incor rect handling can cause damage and permanent loss of data on the hard disk Before removing the hard disk dirve the user must have a backup copy of all the inform...
Page 48: ...MCIA holder make sure that the PCMCIA cards are removed and the eject levers are not sticking out 3 2 Attention When removing the PCMCIA holder pull them up at an angle It cannot be removed when pulle...
Page 49: ...1 2 1 1 3 5 4 8 6 7 Note For 14 1 inch LCD models a LVDS board is addi tionally installed as shown at 3 Step Size Quan tity Head Color Torque Memo 2 M2 5 x 13 5L 2 Pan head black 3 5 kgf cm w nylock p...
Page 50: ...r Torque Memo 3 M2 x 14L 2 for 12 1 inch LCD assembly Pan head silver 1 6 kgf cm M2 x 20L 2 for 14 1 inch LCD assembly Pan head silver 1 6 kgf cm Note Make sure you use the correct screw for replaceme...
Page 51: ...te on page 41 RTC Battery CPU EMI Shield and Hard Disk Drive on page 42 LCD Assembly on page 45 1 4 3 2 5 Step Size Quan tity Head Color Torque Memo 1 M2 5 x 13 5L 5 Pan head black 3 2 kgf cm w nylock...
Page 52: ...e these latches then raise the side of the upper cover facing the palm rest to remove it Be careful not to break the latches Step Size Quan tity Head Color Torque Memo 2 M2 5 x 6L 1 Pan head black 3 2...
Page 53: ...C Battery CPU EMI Shield and Hard Disk Drive on page 42 LCD Assembly on page 45 Upper Cover Keyboard Bezel on page 47 2 1 3 5 6 4 Step Size Quan tity Head Color Torque Memo 1 M2 x 4L 2 Pan head silver...
Page 54: ...EMI Shield and Hard Disk Drive on page 42 LCD Assembly on page 45 Upper Cover Keyboard Bezel on page 47 Note Before removing the modem phone jack make sure that the other end has been disconnected fr...
Page 55: ...y Assembly on page 36 Keyboard on page 39 CPU Thermal Plate on page 41 RTC Battery CPU EMI Shield and Hard Disk Drive on page 42 LCD Assembly on page 45 Upper Cover Keyboard Bezel on page 47 1 2 Think...
Page 56: ...Battery CPU EMI Shield and Hard Disk Drive on page 42 LCD Assembly on page 45 Upper Cover Keyboard Bezel on page 47 4 3 2 1 Step Size Quan tity Head Color Torque Memo 3 M2 5 x 6L 2 Bind head black 3...
Page 57: ...ry CPU EMI Shield and Hard Disk Drive on page 42 LCD Assembly on page 45 Upper Cover Keyboard Bezel on page 47 3 2 3 1 1 Step Size Quan tity Head Color Torque Memo 2 M2 5 x 6L 2 Bind head black 1 6 kg...
Page 58: ...ng the speaker cable one end is connected to the Audio Con nector Board underneath the palm rest You then align the cable following the border of the chassis and connect it to the inverter cable as sh...
Page 59: ...Battery CPU EMI Shield and Hard Disk Drive on page 42 LCD Assembly on page 45 Upper Cover Keyboard Bezel on page 47 2 1 Step Size Quan tity Head Color Torque Memo 1 M2 5 x 6L 2 Bind head black 3 2 kg...
Page 60: ...sk Drive on page 42 LCD Assembly on page 45 Upper Cover Keyboard Bezel on page 47 3 2 1 4 Step Size Quan tity Head Color Torque Memo 2 M2 5 x 6L 2 Bind head black 3 2 kgf cm w nylock paste 4 M2 5 x 4L...
Page 61: ...mbly on page 45 Upper Cover Keyboard Bezel on page 47 2 2 1 5 4 3 Attention You must pull out the CD DVD tray before removing the Diskette and CD ROM DVD ROM Drives Assembly Use a small stick to press...
Page 62: ...le parts inside The use of controls adjustments or performing procedures other than those specified may result in hazardous radiation exposure Do not apply any extra force to the CD ROM DVD ROM drive...
Page 63: ...ve FDD with Bezel 6 4 5 7 4 Step Size Quan tity Head Color Torque Memo 4 M2 5 x 3 5L 4 Bind head black 1 6 kgf cm w nylock paste Note Make sure you use the correct screw for replacement ThinkPad i Ser...
Page 64: ...from the base cover gently raise the side of the planar board facing the rear I O ports then pull out the planar board 2 When replacing the planar board align the power switch and power actuator Make...
Page 65: ...page 42 LCD Assembly on page 45 1 2 3 4 3 Note When removing the LCD take note of the following 1 Be careful not to scratch the LCD cover when removing the screw covers Step Size Quan tity Head Color...
Page 66: ...d Hard Disk Drive on page 42 LCD Assembly on page 45 LCD Front Cover 12 1 inch on page 61 2 3 2 1 4 4 3 Indicator Board and Microphone Cable Assembly Battery Assembly on page 36 Keyboard on page 39 CP...
Page 67: ...r Battery Assembly on page 36 Keyboard on page 39 CPU Thermal Plate on page 41 RTC Battery CPU EMI Shield and Hard Disk Drive on page 42 LCD Assembly on page 45 LCD Front Cover 12 1 inch on page 61 St...
Page 68: ...the instructions in Setting the LCD Panel ID on page 30 Step Size Quan tity Head Color Torque Memo 1 M3 x 5L 2 LCD Bind head black 3 2 kgf cm M2 x 4L 2 Inverter Pan head silver 2 0 kgf cm Note Make s...
Page 69: ...CPU EMI Shield and Hard Disk Drive on page 42 LCD Assembly on page 45 LCD Front Cover 12 1 inch on page 61 2 2 1 Step Size Quan tity Head Color Torque Memo 1 M2 5 x 6L 2 Bind head black 3 2 kgf cm w n...
Page 70: ...page 42 LCD Assembly on page 45 1 2 3 3 4 Note When removing the LCD take note of the following 1 Be careful not to scratch the LCD cover when removing the screw covers Step Size Quan tity Head Color...
Page 71: ...d Hard Disk Drive on page 42 LCD Assembly on page 45 LCD Front Cover 12 1 inch on page 61 3 4 4 1 2 2 3 Indicator Board and Microphone Cable Assembly Battery Assembly on page 36 Keyboard on page 39 CP...
Page 72: ...r Battery Assembly on page 36 Keyboard on page 39 CPU Thermal Plate on page 41 RTC Battery CPU EMI Shield and Hard Disk Drive on page 42 LCD Assembly on page 45 LCD Front Cover 12 1 inch on page 61 St...
Page 73: ...the instructions in Setting the LCD Panel ID on page 30 Step Size Quan tity Head Color Torque Memo 1 M3 x 5L 2 LCD Bind head black 3 2 kgf cm M2 x 4L 2 Inverter Pan head silver 2 0 kgf cm Note Make s...
Page 74: ...2 2 1 Step Size Quan tity Head Color Torque Memo 1 M2 x 4L 4 Pan head silver 2 0 kgf cm Note Make sure you use the correct screw for replacement 70 ThinkPad i Series 1400...
Page 75: ...CPU EMI Shield and Hard Disk Drive on page 42 LCD Assembly on page 45 LCD Front Cover 12 1 inch on page 61 1 2 2 Step Size Quan tity Head Color Torque Memo 1 M2 5 x 6L 2 Bind head black 3 2 kgf cm w n...
Page 76: ...ive 12 CD ROM DVD ROM eject button 13 CD ROM DVD ROM drive activity indicator 14 CD ROM DVD ROM drive emergency eject hole 15 CD ROM DVD ROM audio control panel 16 CD ROM DVD ROM previous track button...
Page 77: ...11 12 13 14 15 2 1 1 Power jack 2 Universal serial bus USB connector 3 External input device PS 2 connector 4 Serial connector 5 Parallel connector 6 Expansion connector 7 External monitor connector 8...
Page 78: ...e and speed The CPU board can sense the correct working voltage and speed itself Keyboard Language SW3 Switch 1 2 and 3 Setting Password SW3 Switch 4 Setting Non configurable Switches Keyboard Languag...
Page 79: ...System Unit Parts Listing 1 2 3 4 5 32 6 7 28 29 30 31 8 22 23 24 25 25 1 26 27 13 12 11 10 9 ThinkPad i Series 1400 75...
Page 80: ...FPC DVD 27L0468 1 FPC CD ROM 05K2806 1 10 FPC FDD 05K2799 1 11 FDD W BEZEL 05K8957 1 12 DVD MODULE 05K9113 1 24X CD ROM MODULE LG 05K9114 1 24X CD ROM MODULE TEAC 2ND SOURCE 05K9140 1 13 PLANAR ASM DI...
Page 81: ...CABLE Y CABLE FOR SPEAKER 05K2798 1 29 AUDIO CABLE ASM 27L0469 1 30 KBD BEZEL 10L1938 1 31 LID S W ASM 05K5479 1 32 KEYBOARD ALPS 1ST SOURCE KEYBOARD US 02K4737 1 KEYBOARD JAPAN 02K4738 1 KEYBOARD GER...
Page 82: ...CE 02K6372 1 KEYBOARD KOREA 02K6384 1 KEYBOARD UK 02K6371 1 KEYBOARD CANADIAN FRENCH 02K6369 1 KEYBOARD NORWEGIAN 02K6375 1 KEYBOARD SWEDISH FINNISH 02K6374 1 KEYBOARD DUTCH 02K6373 1 KEYBOARD ITALY 0...
Page 83: ...5 1 7 5 6 8 No Description FRU No Qty 1 LCD BEZEL ASM 12 1 05K5674 1 2 SPEAKER ASM R L 05K2827 1 3 HINGE R L 05K5669 1 3 1 HINGE COVER R L 05K5949 1 4 12 1 TFT LCD SANYO 05K9528 1 5 FPC 12 1 ASSY 27L0...
Page 84: ...No Description FRU No Qty 6 LCD INVERTER 12 1 10L1380 1 7 LED BD 10L1168 1 8 LCD REAR COVER ASM 12 1 TFT 05K6303 1 9 CABLE ASSEMBLY 05K2798 1 LG IBM LOGO KIT 05K6044 1 80 ThinkPad i Series 1400...
Page 85: ...8 No Description FRU No Qty 1 LCD BEZEL ASM 14 1 05K6232 1 2 SPEAKER ASM R L FOR 14 1 02K6299 1 3 HINGE R L FOR 14 1 05K6234 1 3 1 HINGE COVER R L 05K5949 1 4 14 1 TFT LCD LG 05K9396 1 14 1 TFT LCD IB...
Page 86: ...INVERTER 14 1 10L1383 1 7 LED BD 14 1 10L1315 1 8 LCD REAR COVER ASM 14 1 TFT 05K6231 1 9 14 1 TFT BRACKET R L 05K6233 1 10 CABLE ASSEMBLY 05K2798 1 11 LVDS COVER 05K5960 1 12 LVDS BOARD 10L1318 1 LG...
Page 87: ...M2 14L NI SCREW MACH PAN M2 4L NI SCREW WAFER NYLO M2 5 6L B ZN SCREW M3 5L 700 SCREW M2 5 L 13 5 STEEL SCREW MACH PAN M2 20L NI SCREW WAFER NYLO M2 5 3 5 B ZN SCREW HEX NUT W WASHER 4 NI 10L1911 MISC...
Page 88: ...0449 MODEM CABLE SPAIN 27L0450 MODEM CABLE BELGIUM 27L0451 MODEM CABLE SWITZERLAND 27L0462 MODEM CABLE PORTUGAL 27L0463 MODEM CABLE US C JPN TWN APN LA BRZ 27L0465 MODEM CABLE AUSTRALIA 27L0467 Psion...
Page 89: ...rd Description FRU No Qty US CANADA TAIWAN 76H3516 EUROPE 76H3518 UK 76H3524 ITALY 76H3530 SWITZERLAND 76H3528 JAPAN 13H5273 CHINA 02K0539 KOREA 76H3535 AUSTRALIA NEW ZEALAND 76H3514 ThinkPad i Series...
Page 90: ...esignated by IBM are the responsibility of the user IBM may have patents or pending patent applications cov ering subject matter in this document The furnishing of this document does not give you any...
Page 91: ...IBM Part Number 37L5192 Printed in U S A S37L 5192...