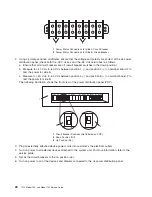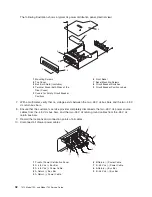
7.
Using
a
multimeter,
verify
that
no
voltage
exists
between
the
-48
V
dc
bus
bars
and
the
-48
V
dc
return
bus
bars,
A
and
B
sides.
8.
Record
the
locations
of
all
cables
or
wires
connected
to
the
three
connector
pins
on
the
circuit
breaker
that
is
being
removed.
Disconnect
the
wires
from
the
three
connector
pins
and
the
-48
V
dc
power
connector.
9.
Disconnect
the
wire
that
is
attached
to
the
bottom
of
the
circuit
breaker.
10.
Disconnect
the
mounting
nut
that
attaches
the
rear
of
the
circuit
breaker
to
the
dc
power
bus
bar.
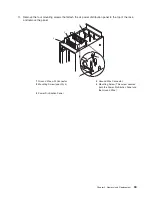
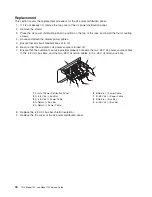
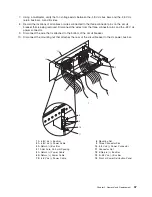
13
12
14
4
7
3
10
2
8
6
9
11
1
5
1
A
-48
V
dc
(-)
Bus
Bar
8
Mounting
Nut
2
A
-48
V
dc
(-)
Power
Cable
9
Three
Connector
Pins
3
A
Return
(+)
Bus
Bar
10
-48
V
dc
(-)
Power
Connector
4
10
mm
hole,
25.4
mm
Spacing
11
Connector
Nut
5
A
Return
(+)
Power
Cable
12
B
Return
(+)
Bus
Bar
6
B
Return
(+)
Power
Cable
13
B
-48
V
dc
(-)
Bus
Bar
7
B
-48
V
dc
(-)
Power
Cable
14
Front
of
Power
Distribution
Panel
Chapter
3.
Removal
and
Replacement
37
Summary of Contents for THINKPAD T42 -
Page 1: ...7014 Series Model T00 and Model T42 System Rack Service Guide SA38 0577 05 ERserver...
Page 2: ......
Page 3: ...7014 Series Model T00 and Model T42 System Rack Service Guide SA38 0577 05 ERserver...
Page 10: ...viii 7014 Model T00 and Model T42 Service Guide...
Page 36: ...24 7014 Model T00 and Model T42 Service Guide...
Page 72: ...60 7014 Model T00 and Model T42 Service Guide...
Page 80: ...68 7014 Model T00 and Model T42 Service Guide...
Page 85: ......

