background image

b.


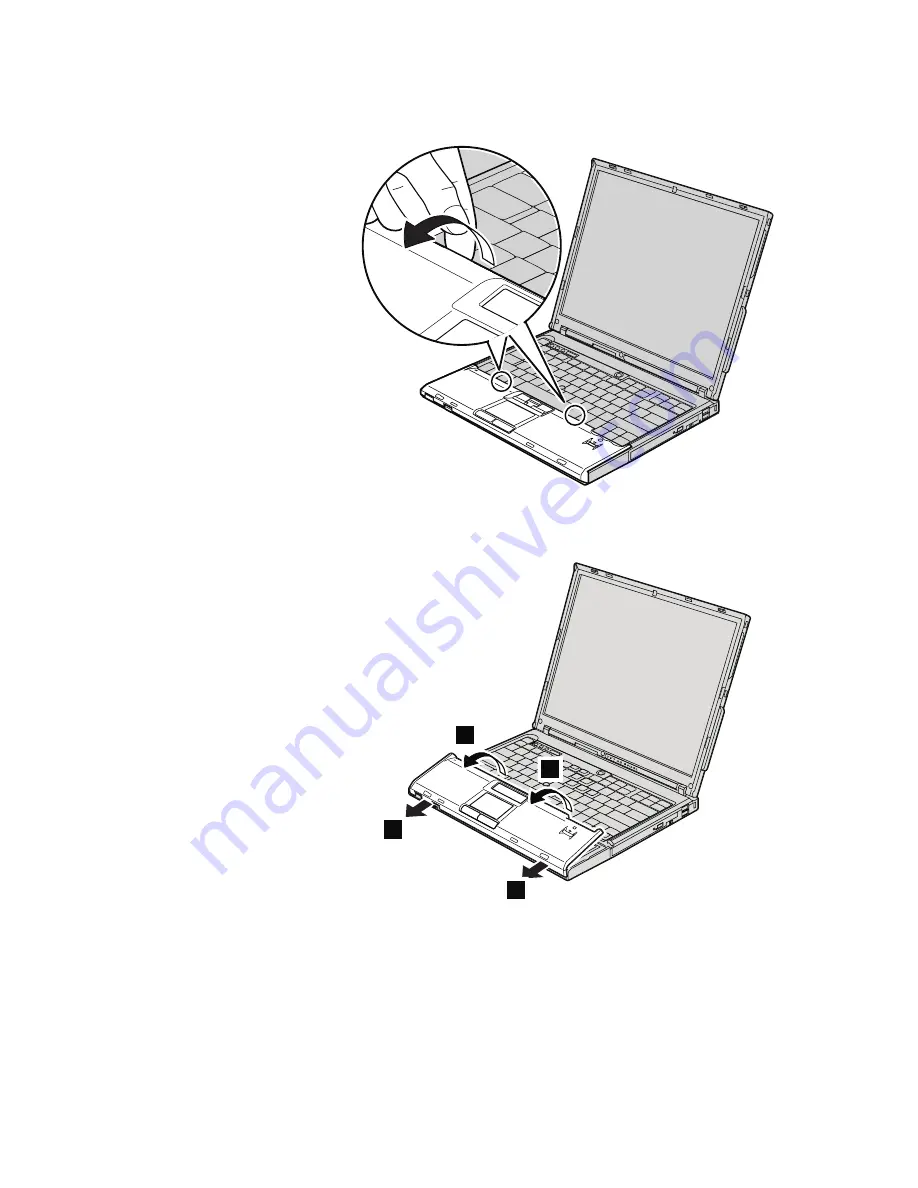
Turn


the


computer


over


again,


and


open


the


computer


display.


Pick


the


palm


rest


off


the


computer


as


shown


in


the


drawing


below.


c.


Open


up


the


keyboard


side


of


the


palm


rest


first


1

,


and


then


release


the


palm


rest


from


the


computer


2

.

2

1

1

2


Replacing


memory


Chapter


5.


Upgrading


and


replacing


devices


35

Summary of Contents for THINKVANTAGE T60

Page 1: ...ThinkPad T60 Service and Troubleshooting Guide...

Page 2: ......

Page 3: ...ThinkPad T60 Service and Troubleshooting Guide...

Page 4: ...All rights reserved U S GOVERNMENT USERS RESTRICTED RIGHTS Our products and or services are provided with RESTRICTED RIGHTS Use duplication or disclosure by the Government is subject to the GSA ADP S...

Page 5: ...oblem 24 Fingerprint authentication problems 24 A startup problem 25 Other problems 25 Starting BIOS Setup Utility 25 Chapter 4 Recovery options 27 Introducing Rescue and Recovery 27 Restoring factory...

Page 6: ...iv ThinkPad T60 Service and Troubleshooting Guide...

Page 7: ...pter in contact with any part of your body while using it Never use the ac adapter to warm your body Extended contact with your body even through clothing may cause a skin burn Route the cables of an...

Page 8: ...e and possible loss of data Do not drop bump scratch twist hit vibrate push or place heavy objects on your computer display or external devices Use a quality carrying case that provides adequate cushi...

Page 9: ...oaded features and tools or solve problems To open Access Help click Start move the pointer to All Programs in Windows 2000 Programs then to ThinkVantage Click Access Help Productivity Center provides...

Page 10: ...uctivity Center and get access to informative illustrations and easy to follow instructions for getting started and staying productive You can also use the ThinkVantage button to interrupt the startup...

Page 11: ...pter to warm your body Extended contact with your body even through clothing may cause a skin burn v Route the cables of an ac adapter a mouse a keyboard a printer or any other electronic device or co...

Page 12: ...of an optical drive before closing the tray v When installing your hard disk diskette or optical drive follow the instructions shipped with your hardware and apply pressure only where needed on the de...

Page 13: ...The static electricity could damage the device PC Card ExpressCard Smart Card Memory Card such as xD Picture Card SD Card Memory Stick and MultiMediaCard Memory module PCI Expess Mini Card Communicat...

Page 14: ...r was pressed from the outside 2 Wipe or dust the stain gently with a soft dry cloth 3 If the stain remains moisten a soft lint free cloth with water or a 50 50 mixture of isopropyl alcohol and water...

Page 15: ...oblem 18 Keyboard problems 18 A pointing device problem 19 Standby or hibernation problems 19 Computer screen problems 20 Battery problems 23 A hard disk drive problem 24 Fingerprint authentication pr...

Page 16: ...Access Help Where can I find the detailed specifications for my machine See http www lenovo com think support I need to upgrade a device or I need to replace one of the following the hard disk drive...

Page 17: ...Start 2 Move the pointer to All Programs in Windows 2000 Programs and then to PC Doctor for Windows 3 Click PC Doctor For more information about PC Doctor for Windows see the Help for the program Att...

Page 18: ...r code 0002 Read verification failed v Error code 0102 Speed test failed 7 If the diagnostic program returns no error message but you still have some concerns see the instructions in the Introducing R...

Page 19: ...em 0185 Bad startup sequence settings Enter BIOS Setup and load Setup defaults Checksum of the startup sequence setting in the EEPROM is not correct Press F1 to go to BIOS Setup Utility Press F9 and t...

Page 20: ...sure that the built in keyboard operates correctly If it does have the external keyboard serviced v Make sure that the external keyboard is connected to the correct connector Test the computer by usin...

Page 21: ...te the boot process Turn the computer off then turn it on to start the BIOS Setup Utility Verify the configuration and then restart the computer either by choosing the Exit Saving Changes option under...

Page 22: ...rea If the computer still does not start call the Customer Support Center Telephone numbers are listed in Worldwide telephone list on page 55 2100 Initialization error on HDD0 Main hard disk drive The...

Page 23: ...ing v The hard disk drive is correctly installed v A startable disc is in the drive If you still see the same error message check the boot sequence using the BIOS Setup Utility EMM386 Not Installed Un...

Page 24: ...computer serviced 0175 Bad CRC1 stop POST task 0177 Bad SVP data stop POST task Checksum of the supervisor password in the EEPROM is not correct 0187 EAIA data access error 0188 Invalid RFID serializ...

Page 25: ...et v The computer power is on Turn on the power switch again for confirmation If these items are properly set and the screen remains blank have the computer serviced Problem When I turn on the machine...

Page 26: ...take your computer to a Lenovo authorized servicer or a marketing representative to have the system board replaced Proof of purchase is required and a fee will be charged for parts and service Keyboa...

Page 27: ...TrackPoint driver is installed Standby or hibernation problems Problem The computer enters standby mode the standby indicator turns on immediately after Power on self test POST Solution Make sure tha...

Page 28: ...lution Check whether an external monitor was disconnected or turned off while the computer was in standby mode If you disconnected or turned off the external monitor connect it or turn it on before re...

Page 29: ...e image Note If you use the Fn F7 key combination to apply a presentation scheme press Fn F7 at least three times in three seconds and the image is displayed on the computer screen v If you are using...

Page 30: ...ion window Note The device driver name depends on the video chip that has been installed on your computer 6 Click the Properties button If you are prompted for an administrator password or confirmatio...

Page 31: ...t 9 Click the Properties button Check the Device status box and make sure the device is working properly If not click the Troubleshoot button Problem A message Unable to create overlay window appears...

Page 32: ...olving section in Access Help A hard disk drive problem Problem The hard disk drive does not work Solution In the startup menu in BIOS Setup Utility make sure that the hard disk drive is included in t...

Page 33: ...is set so that the computer starts from the device you want Also make sure that the device from which the computer starts is enabled In the startup menu in the BIOS Setup Utility make sure that the d...

Page 34: ...supervisor password however you cannot change the parameters that are protected by the supervisor password For more information see the on board help 6 Using the cursor keys move to an item you want t...

Page 35: ...disc or a Windows disc with your computer Lenovo provides simpler methods of accomplishing the tasks typically associated with these discs The files and programs for these alternative methods are on y...

Page 36: ...ed press the ThinkVantage button The Rescue and Recovery workspace opens 4 Click Restore your system and follow the instructions on the screen Recovering data If you performed a backup operation using...

Page 37: ...n disconnect the ac adapter and all cables from the computer Note If you are using a PC Card the computer might not be able to enter hibernation mode If this happens turn off the computer 2 Close the...

Page 38: ...he hard disk drive with one of greater capacity You can purchase a new hard disk drive from your reseller or Lenovo marketing representative Notes 1 Replace the hard disk drive only if you upgrade it...

Page 39: ...fore removing the hard disk drive make a backup copy of all the information on the hard disk and then turn the computer off Never remove the drive while the system is operating in standby mode or in h...

Page 40: ...he hard disk by pulling out the tab 2 2 1 6 Detach the side rubber rails from the hard disk drive 7 Attach the side rubber rails to a new hard disk drive Upgrading the hard disk drive 32 ThinkPad T60...

Page 41: ...ty and Warranty Guide before replacing memory Increasing memory capacity is an effective way to make programs run faster You can increase the amount of memory in your computer by installing a double d...

Page 42: ...ject This action reduces any static electricity in your body which could damage the SO DIMM Do not touch the contact edge of the SO DIMM 2 Turn off the computer then disconnect the ac adapter and all...

Page 43: ...er display Pick the palm rest off the computer as shown in the drawing below c Open up the keyboard side of the palm rest first 1 and then release the palm rest from the computer 2 2 1 1 2 Replacing m...

Page 44: ...rest cable by pulling the tab with your fingers Now the palm rest has been removed For the 15 4 inch widescreen model a Remove the four screws that secure the palm rest Replacing memory 36 ThinkPad T6...

Page 45: ...arrow 1 by picking up the projection tabs on the sides and then release the palm rest from the computer 2 1 2 2 c Detach the connector of the palm rest cable by pulling the tab with your fingers Now...

Page 46: ...he socket at the same time Be sure to save the old SO DIMM for future use 7 With the notched end of the SO DIMM toward the contact edge side of the socket firmly insert the SO DIMM into the socket at...

Page 47: ...of the palm rest cable 9 Reinstall the palm rest For the 14 inch display model a Align the palm rest with the front side of the computer then pivot it downward Replacing memory Chapter 5 Upgrading an...

Page 48: ...b Make sure that the palm rest completely covers the front side of the computer as shown in the drawing below Replacing memory 40 ThinkPad T60 Service and Troubleshooting Guide...

Page 49: ...sh the palm rest a little towards the keyboard 1 then press the left top 2 and right top 3 edges of the palm rest to fit it into place 1 1 2 3 Replacing memory Chapter 5 Upgrading and replacing device...

Page 50: ...est in the order shown in the drawing 2 1 4 3 For the 15 inch display model a Align the palm rest with the front side of the computer then holding it as shown in the drawing 1 attach the palm rest fro...

Page 51: ...re that the left top edge the right top edge and the front side of the palm rest are attached firmly c Close the computer display and turn the computer over Reinstall four screws for the palm rest in...

Page 52: ...4 inch widescreen model a Attach the connector of the palm rest cable b Press the left and right top edges of the palm rest to fit it into place Replacing memory 44 ThinkPad T60 Service and Troublesho...

Page 53: ...ed correctly do as follows 1 Turn the computer on 2 While the To interrupt normal startup press the blue ThinkVantage button message is displayed at the lower left of the screen press the ThinkVantage...

Page 54: ...er For example if your computer has 256 MB of memory and you install a 256 MB SO DIMM in it the quantity shown in Installed memory should be 512 MB Replacing memory 46 ThinkPad T60 Service and Trouble...

Page 55: ...n please contact the Customer Support Center at the phone number s listed in Worldwide telephone list on page 55 Some fees might apply Getting help on the Web The Lenovo Web site on the World Wide Web...

Page 56: ...w lenovo com think support and click Warranty then follow the instructions on the screen See your Lenovo hardware warranty for a full explanation of Lenovo warranty terms Be sure to retain your proof...

Page 57: ...y service Service methods and procedures vary by country and some services might not be available in all countries International Warranty Service is delivered through the method of service such as dep...

Page 58: ...50 ThinkPad T60 Service and Troubleshooting Guide...

Page 59: ...provides warranty service without charge for a parts and labor during the first year of the warranty period and b parts only on an exchange basis in the second and third years of the warranty period...

Page 60: ...ar 2 1 2613 US Parts and Labor 1 year Battery pack 1 year 6 1 2623 US Parts and Labor 3 years Battery pack 1 year 6 1 2009 Europe Middle East Africa EMEA Korea Parts and Labor 4 years Battery pack 1 y...

Page 61: ...r 3 years Battery pack 1 year 7 1 Japan Parts and Labor 1 year Battery pack 1 year 6 1 Other Parts and Labor 3 years Battery pack 1 year 6 1 8742 All Parts and Labor 3 years Battery pack 1 year 2 1 87...

Page 62: ...ctions and a container are shipped with the replacement CRU and 2 you may be charged for the replacement CRU if Lenovo does not receive the defective CRU within 30 days of your receipt of the replacem...

Page 63: ...EasyServ or EasyServ in some countries To obtain warranty service contact a Service Provider In Canada or the United States call 1 800 IBM SERV 426 7378 In other countries see the telephone numbers be...

Page 64: ...00 938 228 Hong Kong 0800 336 Macau Cantonese English Mandarin China Macau S A R ThinkPad Technical enquiry hotline 0800 839 Cantonese English Mandarin Colombia 1 800 912 3021 Spanish Costa Rica 800 0...

Page 65: ...9202 30 day up and running support 01 881 1444 Warranty service and support English Israel Givat Shmuel Service Center 972 3 531 3900 Hebrew English Italy 02 7031 6101 30 day up and running support 3...

Page 66: ...8 1426 English 63 2 995 8420 Filipino Poland 48 22 878 6999 Portugal 351 21 892 7147 Portuguese Romania 4 021 224 4015 Russian Federation Moscow 7 495 258 6300 Toll free 8 800 200 6300 Russian Singapo...

Page 67: ...om 01475 555 055 30 day up and running support 08705 500 900 Standard warranty support English United States 1 800 426 7378 English Uruguay 000 411 005 6649 Spanish Venezuela 0 800 100 2011 Spanish Vi...

Page 68: ...60 ThinkPad T60 Service and Troubleshooting Guide...

Page 69: ...drive X X X X Optical drive X X X Ultrabay device X X X AC adapter and power cord X TrackPoint cap X Tier 2 CRUs Memory standard X X X X Keyboard X X X Palm rest X X X X PCI Express Mini Card X X X Co...

Page 70: ...port Web site http www lenovo com think support site wss document do lndocid part video v The Customer Support Center For the telephone number of the Support Center for your country or region see Worl...

Page 71: ...y v Size 14 1 inch Resolution LCD Up to 1400 by 1050 depending on the model External monitor Up to 2048 by 1536 v Size 15 0 inch Resolution LCD Up to 1600 by 1200 depending on the model External monit...

Page 72: ...Integrated wireless WAN on some models Specifications Size 14 1 inch model v Width 311 mm 12 2 in v Depth 255 mm 10 0 in v Height 26 6 to 31 4 mm 1 0 to 1 2 in 15 0 inch model v Width 329 mm 13 0 in...

Page 73: ...v 65 W 222 Btu hr maximum or 90 W 307 Btu hr maximum depending on the model Power source ac adapter v Sine wave input at 50 to 60 Hz v Input rating of the ac adapter 100 240 V ac 50 to 60 Hz Battery p...

Page 74: ...Specifications 66 ThinkPad T60 Service and Troubleshooting Guide...

Page 75: ...27709 U S A Attention Lenovo Director of Licensing LENOVO GROUP LTD PROVIDES THIS PUBLICATION AS IS WITHOUT WARRANTY OF ANY KIND EITHER EXPRESS OR IMPLIED INCLUDING BUT NOT LIMITED TO THE IMPLIED WAR...

Page 76: ...pecific environment Electronic emissions notices The following information refers to ThinkPad T60 machine type 1951 1952 1953 1954 1955 1956 2007 2008 2009 2613 2623 2637 8741 8742 8743 8744 8745 8746...

Page 77: ...l apparatus complies with Canadian ICES 003 Avis de conformit la r glementation d Industrie Canada Cet appareil num rique de la classe B est conforme la norme NMB 003 du Canada European Union EMC Dire...

Page 78: ...ble to them for the return recycle recovery of WEEE and minimize any potential effects of EEE on the environment and human health due to the presence of hazardous substances For additional WEEE inform...

Page 79: ...ith timesaving features that give you a head start on your work and guide you through individual tasks v Lotus Word Pro Word Processor v Lotus 1 2 3 Spreadsheet v Lotus Freelance Graphics Presentation...

Page 80: ...Or Canada Call 800 690 3899 In Latin American Countries Via the Internet http smartsuite modusmedia com Mail address IBM Lotus Notes and SmartSuite Program Modus Media International 501 Innovation Ave...

Page 81: ...of International Business Machines Corporation in the United States other countries or both IBM used under license Lotus 1 2 3 Approach Domino Lotus FastSite Freelance Graphics Lotus Notes Notes Lotus...

Page 82: ...74 ThinkPad T60 Service and Troubleshooting Guide...

Page 83: ...s 3 installing an operating system 9 International Warranty Service 49 K keyboard cleaning 6 problems 18 M miscellaneous problems 25 N notice electronic emissions 68 EU environmental 70 for US users 7...

Page 84: ...Web help 47 76 ThinkPad T60 Service and Troubleshooting Guide...

Page 85: ......

Page 86: ...Part Number 42T8862 Printed in China 1P P N 42T8862...

Reviews: