19
Chapter 2: Installing and connecting the SAN Router
Task 4: Preparing to configure the SAN Router
You must first change the Management Port IP address through the
CLI as described in
Task 5: Connecting the VT100 or emulation terminal
to the RS-232 management port
on page 20 and
Task 6: Preparing the SAN
Router for Element Manager access
on page 21.
Table 8
and
Table 9
list and describe the default settings for the IP
SAN Router.
Refer to
Table 8
for the default setting for the Management Port IP
address, which is the only IP address that must be changed using CLI
to provide access for out-of-band management. All other default
setting can be changed using the Element Manager.
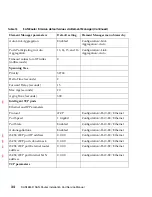
For a complete list of default values, review
SAN Router firmware
default values
on page 32
Table 8
Default management and SAN Router addresses
Port
IP Address
Subnet Mask
Default Gateway
Mgmt
192.168.100.100
255.255.255.0
0.0.0.0
Table 9
Other defaults
Parameter
Default Setting
Zoning
No Zone (No devices zoned by default)
iFCP SAN ID
0
FC Port Type
FC - Auto
Intelligent Port Interface
Depends upon the configuration purchased.
Intelligent Port Type
Depends upon the configuration purchased.
E_Port Zone Policy
Append router zones
Compression
Off
MTU
Auto
Summary of Contents for TotalStorage SAN16M-R SAN
Page 2: ......
Page 8: ...SAN16M R SAN Router Installation And Service Manual vi...
Page 10: ...SAN16M R SAN Router Installation And Service Manual viii...
Page 12: ...SAN16M R SAN Router Installation And Service Manual x...
Page 36: ...SAN16M R SAN Router Installation And Service Manual 12...
Page 98: ...SAN16M R SAN Router Installation And Service Manual 74...
Page 115: ......
Page 116: ...Printed in USA GC26 7744 02...


