Attention:
Make
sure
that
the
cables
do
not
block
the
flow
of
air
from
the
fans
or
air
baffles.
15.
Perform
any
configuration
tasks
that
are
required
for
the
adapter.
See
the
documentation
that
comes
with
the
adapter
for
information
about
installing
the
adapter
firmware
and
configuring
the
adapter.
After
you
initially
configure
the
adapter,
create
a
backup
copy
of
the
configuration
so
that
if
you
have
to
replace
the
adapter
in
the
future,
you
can
restore
the
configuration
and
resume
normal
operation
more
quickly.
If
you
have
other
devices
to
install
or
remove,
do
so
now.
Otherwise,
go
to
“Completing
the
installation”
on
page
51.
Removing
a
riser
card
The
server
supports
PCIe
x16,
PCIe
x8,
and
HTX
adapters
and
riser
cards.
However,
the
server
does
not
support
both
an
HTX
adapter
and
a
PCIe
x8
adapter
in
the
same
configuration.
If
one
of
the
supported
types
of
adapters
is
installed
and
you
decide
to
remove
it
so
that
you
can
change
your
server
configuration,
you
must
first
remove
the
corresponding
riser-card
assembly.
The
instructions
in
this
section
apply
to
all
of
the
supported
types
of
adapters
and
riser-card
assemblies.
To
remove
a
riser-card
assembly,
complete
the
following
steps.
1.
Read
the
safety
information
that
begins
on
page
v
and
“Installation
guidelines”
on
page
21.
2.
Turn
off
the
server
and
all
attached
peripheral
devices.
Disconnect
all
power
cords;
then,
disconnect
all
external
signal
cables
from
the
server.
3.
Remove
the
server
from
the
rack;
then,
remove
the
server
cover
(see
“Removing
the
cover”
on
page
23).
4.
If
you
have
not
already
done
so,
determine
the
type
of
riser-card
assembly
(PCIe
x16,
PCIe
x8,
or
HTX)
that
you
want
to
remove.
For
the
locations
of
the
riser-card
slots
on
the
system
board,
see
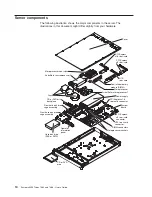
“Server
components”
on
page
14.
Attention:
Before
you
remove
a
riser-card
assembly
that
contains
an
adapter,
make
sure
that
you
have
selected
the
correct
riser-card
assembly.
Removing
the
wrong
riser-card
assembly
might
cause
unpredictable
results,
if
it
contains
an
adapter
that
has
already
been
installed
and
configured.
5.
Disconnect
any
cables
from
the
adapter.
28
System
x3455
Types
7984
and
7986:
User’s
Guide
Summary of Contents for x3455 - System - 7984
Page 1: ...System x3455 Types 7984 and 7986 User s Guide...
Page 2: ......
Page 3: ...System x3455 Types 7984 and 7986 User s Guide...
Page 70: ...56 System x3455 Types 7984 and 7986 User s Guide...
Page 111: ......
Page 112: ...Part Number 42D2184 Printed in USA 1P P N 42D2184...

