


5.
Disconnect
the
power
and
signal
cables
from
the
CD
or
DVD
drive
backplane.
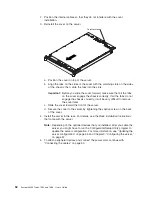
Retention latch
Hard disk drive
tray assembly
6.
Open
the
drive-cage
assembly
retention
latch;
then,
release
the
drive-cage
assembly
by
sliding
it
slightly
toward
the
rear
of
the
server.
7.
Disconnect
the
power
and
signal
cables
from
the
hard
disk
drive.
Note
the
cable
locations
for
later
use
when
you
install
the
replacement
hard
disk
drive.
8.
Lift
the
drive-cage
assembly
out
of
the
server.
9.
Place
the
drive-cage
assembly
on
a
flat,
static-protective
surface.
10.
Remove
the
four
hard
disk
drive
mounting
screws
from
the
sides
of
the
drive
cage
and
slide
the
drive
out
of
the
cage.
11.
Touch
the
static-protective
package
that
contains
the
replacement
drive
to
any
unpainted
metal
surface
on
the
outside
of
the
server;
then,
remove
the
drive
from
the
package.
12.
Mount
the
drive
in
the
front
hard
disk
drive
cage,
using
the
four
mounting
screws
that
come
with
the
drive
kit
option.
13.
Connect
the
signal
and
power
cables
to
the
rear
of
the
drive.
The
signal
cable
for
the
drive
in
the
front
hard
disk
drive
cage
is
labeled
“HDD1”.
Keep
the
cables
clear
of
the
airflow
paths
of
the
fans
and
air
baffles.
14.
Insert
the
drive-cage
assembly
into
the
server;
then,
slide
the
drive-cage
assembly
forward
until
it
seats
securely.
15.
Close
the
drive-cage
assembly
retention
latch.
16.
Reinstall
the
CD
or
DVD
drive
in
the
server
(see
“Installing
a
CD
or
DVD
drive”
on
page
39).
If
you
have
other
devices
to
install
or
remove,
do
so
now.
Otherwise,
go
to
“Completing
the
installation”
on
page
51.
38
System
x3455
Types
7984
and
7986:
User’s
Guide
Summary of Contents for x3455 - System - 7984
Page 1: ...System x3455 Types 7984 and 7986 User s Guide...
Page 2: ......
Page 3: ...System x3455 Types 7984 and 7986 User s Guide...
Page 70: ...56 System x3455 Types 7984 and 7986 User s Guide...
Page 111: ......
Page 112: ...Part Number 42D2184 Printed in USA 1P P N 42D2184...


