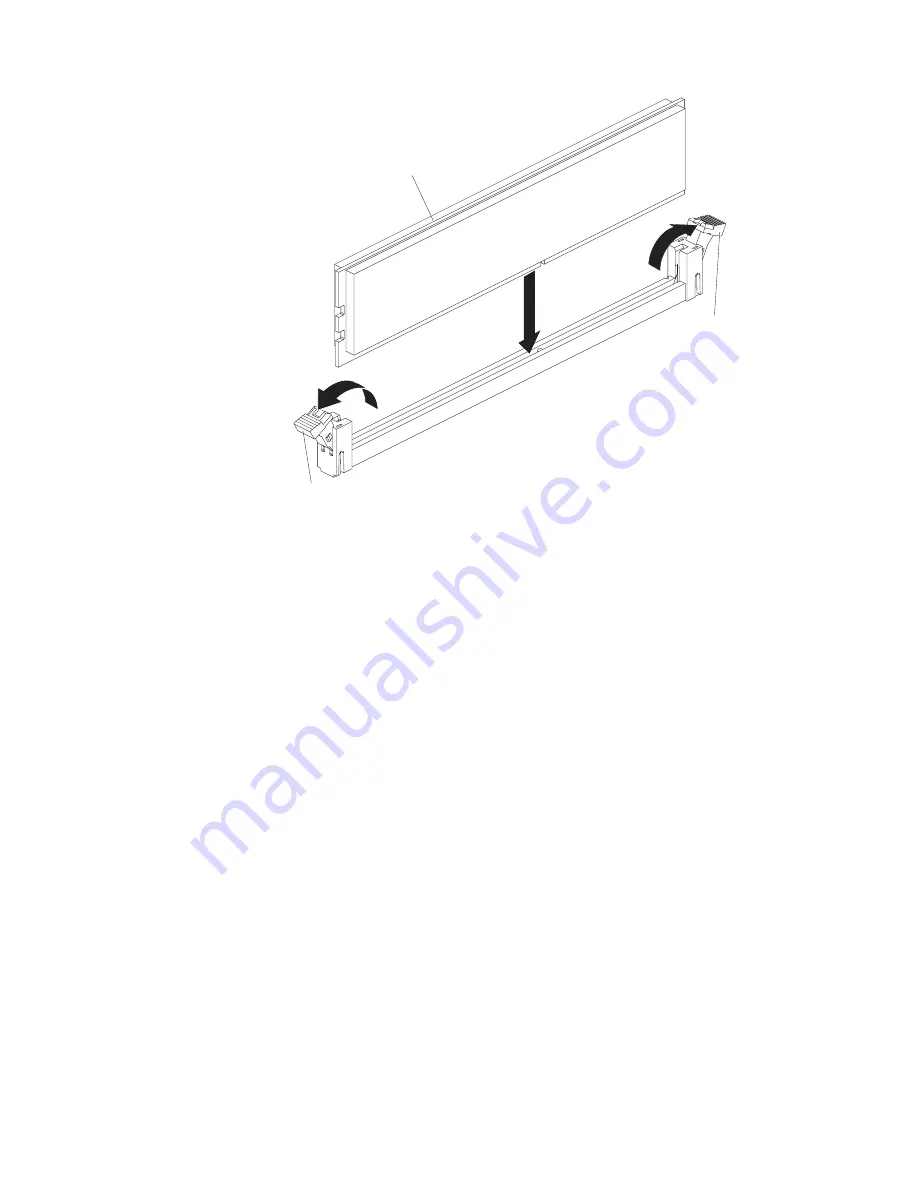
DIMM
Retaining
clip
Retaining
clip
6.
Touch the static-protective package that contains the DIMM to any unpainted
metal surface on the outside of the server. Then, remove the DIMM from the
package.
7.
Turn the DIMM so that the DIMM keys align correctly with the connector.
8.
Insert the DIMM into the connector by aligning the edges of the DIMM with
the slots at the ends of the DIMM connector.
9.
Firmly press the DIMM straight down into the connector by applying pressure
on both ends of the DIMM simultaneously. The retaining clips snap into the
locked position when the DIMM is firmly seated in the connector.
Note:
If there is a gap between the DIMM and the retaining clips, the DIMM
has not been correctly inserted; open the retaining clips, remove the DIMM,
and then reinsert it.
10.
Replace the compute book cover. Align the cover on the DDR3 compute book
and slide it forward toward the front to the expansion module until it is
firmly seated.
Chapter 2. Installing optional devices
65
Summary of Contents for X3850 X6
Page 1: ...System x3850 X6 and x3950 X6 Types 3837 and 3839 Installation and Service Guide...
Page 2: ......
Page 3: ...System x3850 X6 and x3950 X6 Types 3837 and 3839 Installation and Service Guide...
Page 138: ...120 System x3850 X6 and x3950 X6 Types 3837 and 3839 Installation and Service Guide...
Page 225: ...25 26 27 Chapter 5 Parts listing System x3850 X6 and x3950 X6 Types 3837 and 3839 207...
Page 1682: ...1664 System x3850 X6 and x3950 X6 Types 3837 and 3839 Installation and Service Guide...
Page 1706: ...1688 System x3850 X6 and x3950 X6 Types 3837 and 3839 Installation and Service Guide...
Page 1710: ...1692 System x3850 X6 and x3950 X6 Types 3837 and 3839 Installation and Service Guide...
Page 1728: ...1710 System x3850 X6 and x3950 X6 Types 3837 and 3839 Installation and Service Guide...
Page 1729: ......
Page 1730: ...Part Number 00FH434 Printed in USA 1P P N 00FH434...


