v
While
the
device
is
still
in
its
static-protective
package,
touch
it
to
an
unpainted
metal
part
on
the
outside
of
the
server
for
at
least
2
seconds.
This
drains
static
electricity
from
the
package
and
from
your
body.
v
Remove
the
device
from
its
package
and
install
it
directly
into
the
server
without
setting
down
the
device.
If
it
is
necessary
to
set
down
the
device,
put
it
back
into
its
static-protective
package.
Do
not
place
the
device
on
the
server
cover
or
on
a
metal
surface.
v
Take
additional
care
when
handling
devices
during
cold
weather.
Heating
reduces
indoor
humidity
and
increases
static
electricity.
Removing
the
cover
and
bezel
To
remove
the
cover
and
bezel,
complete
the
following
steps:
1.
Read
the
safety
information
that
begins
on
page
v
and
“Installation
guidelines”
on
page
21.
2.
If
you
are
installing
or
replacing
a
non-hot-swap
component,
turn
off
the
server
and
all
attached
peripheral
devices.
Disconnect
all
power
cords;
then,
disconnect
all
external
signal
cables
from
the
server.
3.
Slide
the
server
out
of
the
rack
until
the
slide
rails
lock
into
place.
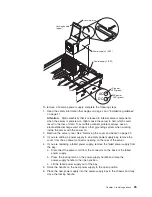
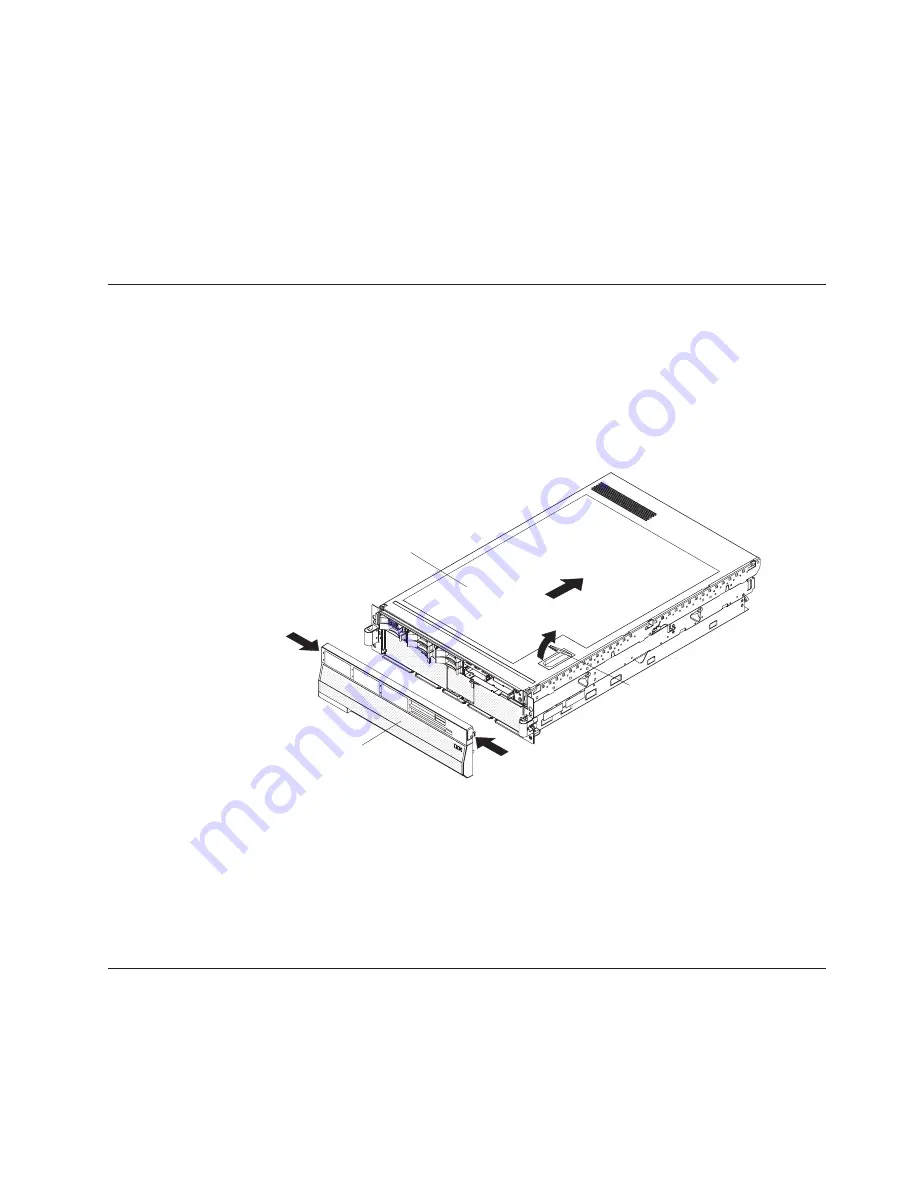
Bezel
Top cover
Cover release
latch
4.
Lift
the
cover-release
latch.
The
cover
slides
to
the
rear
approximately
13
mm
(0.5
inch).
Lift
the
cover
off
the
server.
Attention:
For
proper
cooling
and
airflow,
replace
the
top
cover
before
turning
on
the
server.
Operating
the
server
for
more
than
2
minutes
with
the
top
cover
removed
might
damage
server
components.
5.
Press
on
the
bezel
retention
tabs
at
the
top
edge
of
the
bezel,
and
pull
the
top
of
the
bezel
slightly
away
from
the
server.
6.
Lift
the
bezel
up
to
release
the
two
tabs
at
the
bottom
edge
of
the
bezel.
Installing
a
hot-swap
power
supply
The
following
notes
describe
information
that
you
must
consider
when
installing
a
hot-swap
power
supply
in
the
server:
v
The
server
comes
with
a
minimum
of
one
power
supply
and
supports
up
to
two
power
supplies
(hot-swappable
at
220
V
ac
only).
Chapter
2.
Installing
options
23
Summary of Contents for x3950 8872
Page 1: ...IBM System x3950 Type 8872 and System x3950 E Type 8874 User s Guide...
Page 2: ......
Page 3: ...IBM System x3950 Type 8872 and System x3950 E Type 8874 User s Guide...
Page 68: ...56 IBM System x3950 Type 8872 and System x3950 E Type 8874 User s Guide...
Page 98: ...86 IBM System x3950 Type 8872 and System x3950 E Type 8874 User s Guide...
Page 100: ...88 IBM System x3950 Type 8872 and System x3950 E Type 8874 User s Guide...
Page 109: ......
Page 110: ...Part Number 31R1856 Printed in USA 1P P N 31R1856...


