background image

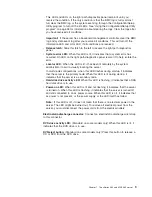
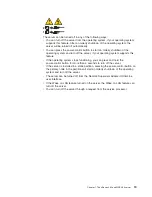
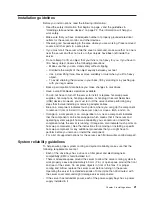
This


LED


and


LEDs


on


the


light


path


diagnostics


panel


remain


lit


until


you


resolve


the


condition.


If


the


only


condition


is


that


the


BMC


log


is


full


or


almost


full,


clear


the


BMC


log


or


the


system-event


log


through


the


Configuration/Setup


Utility


program


to


turn


off


the


lit


LEDs.


See


“Using


the


Configuration/Setup


Utility


program”


on


page


58


for


information


about


clearing


the


logs.


Clear


the


logs


after


you


have


resolved


all


conditions.


Important:


If


the


server


has


a


baseboard


management


controller,


clear


the


BMC


log


and


system-event


log


after


you


resolve


all


conditions.


This


will


turn


off


the


information


LED


and


LOG


LED,


if


all


conditions


are


resolved.


v


Release


latch:


Slide


this


latch


to


the


left


to


access


the


light


path


diagnostics


panel.


v


System-error


LED:


When


this


LED


is


lit,


it


indicates


that


a


system


error


has


occurred.


An


LED


on


the


light


path


diagnostics


panel


is


also


lit


to


help


isolate


the


error.


v


Locator


LED:


When


this


LED


is


lit,


it


has


been


lit


remotely


by


the


system


administrator


to


aid


in


visually


locating


the


server.


In


multi-node


configurations,


when


this


LED


flashes


during


startup,


it


indicates


that


the


server


is


the


primary


node.


When


this


LED


is


lit


during


startup,


it


indicates


that


the


server


is


a


secondary


node.


v


Hard


disk


drive


activity


LED:


When


this


LED


is


flashing,


it


indicates


that


a


SAS


hard


disk


drive


is


in


use.


v


Power-on


LED:


When


this


LED


is


lit


and


not


flashing,


it


indicates


that


the


server


is


turned


on.


When


this


LED


is


flashing,


it


indicates


that


the


server


is


turned


off


and


still


connected


to


an


ac


power


source.


When


this


LED


is


off,


it


indicates


that


ac


power


is


not


present,


or


the


power


supply


or


the


LED


itself


has


failed.


Note:


If


this


LED


is


off,


it


does


not


mean


that


there


is


no


electrical


power


in


the


server.


The


LED


might


be


burned


out.


To


remove


all


electrical


power


from


the


server,


you


must


disconnect


the


power


cords


from


the


electrical


outlets.

Electrostatic-discharge


connector:


Connect


an


electrostatic-discharge


wrist


strap


to


this


connector.


DVD


drive


activity


LED:


(Standard


on


some


models


only)


When


this


LED


is


lit,


it


indicates


that


the


DVD


drive


is


in


use.


DVD-eject


button:


(Standard


on


some


models


only)


Press


this


button


to


release


a


CD


or


DVD


from


the


DVD


drive.


Chapter


1.


The


xSeries


460


and


MXE


460


server


9

Summary of Contents for xSeries MXE 460

Page 1: ...IBM xSeries 460 Type 8872 and xSeries MXE 460 Type 8874 User s Guide ERserver...

Page 2: ......

Page 3: ...IBM xSeries 460 Type 8872 and xSeries MXE 460 Type 8874 User s Guide ERserver...

Page 4: ...general information in Notices on page 85 Second Edition August 2005 Copyright International Business Machines Corporation 2005 All rights reserved US Government Users Restricted Rights Use duplicati...

Page 5: ...the server with the power on 22 Handling static sensitive devices 22 Removing the cover and bezel 23 Installing a hot swap power supply 23 Installing an adapter 26 Installing a hot swap hard disk driv...

Page 6: ...rogram 76 Using the baseboard management controller utility programs 78 Using the SAS SATA Configuration Utility program 79 Starting the SAS SATA Configuration Utility program 79 SerialSelect Utility...

Page 7: ...alleert eerst de veiligheidsvoorschriften Ennen kuin asennat t m n tuotteen lue turvaohjeet kohdasta Safety Information Avant d installer ce produit lisez les consignes de s curit Vor der Installation...

Page 8: ...f the caution or danger statement in the IBM Safety Information book For example if a caution statement begins with a number 1 translations for that caution statement appear in the IBM Safety Informat...

Page 9: ...quipment when there is evidence of fire water or structural damage v Disconnect the attached power cords telecommunications systems networks and modems before you open the device covers unless instruc...

Page 10: ...AUTION When laser products such as CD ROMs DVD drives fiber optic devices or transmitters are installed note the following v Do not remove the covers Removing the covers of the laser product could res...

Page 11: ...power control button on the device and the power switch on the power supply do not turn off the electrical current supplied to the device The device also might have more than one power cord To remove...

Page 12: ...levels are present inside any component that has this label attached There are no serviceable parts inside these components If you suspect a problem with one of these parts contact a service technicia...

Page 13: ...ility For more information see What your server offers on page 4 and Reliability availability and serviceability on page 6 You can obtain up to date information about the server and other IBM server p...

Page 14: ...ct xSeries 460 or MXE 460 5 Click Continue Notices and statements in this document The caution and danger statements that appear in this document are also in the multilingual Safety Information docume...

Page 15: ...IBM EXA 32 Chipset with integrated memory and I O controller v Service processor support for Remote Supervisor Adapter II SlimLine v Light path diagnostics v Three Universal Serial Bus USB ports 2 0...

Page 16: ...innovative IBM designs to make your Intel processor based server powerful scalable and reliable For more information see http www ibm com pc us eserver xseries xarchitecture enterprise index html Acti...

Page 17: ...evice drivers are installed this switching occurs without data loss and without user intervention v Redundant cooling and power capabilities The redundant cooling of the fans in the server enable cont...

Page 18: ...workgroup hardware management tool v Information and light path diagnostics LED panels v Optional service processor adapter for remote system management v Parity checking on the small computer system...

Page 19: ...tems management industry standards v Integration into leading workgroup and enterprise systems management environments v Ease of use training and setup IBM Director also provides an extensible platfor...

Page 20: ...drive is in use Operator information panel This panel contains controls and LEDs The following illustration shows the controls and LEDs on the operator information panel Power control button Power on...

Page 21: ...rver In multi node configurations when this LED flashes during startup it indicates that the server is the primary node When this LED is lit during startup it indicates that the server is a secondary...

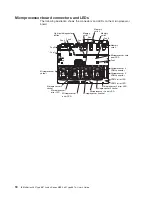
Page 22: ...n this LED is lit it indicates that there is an active connection on the Ethernet port USB 2 connector Connect a USB device to this connector System serial connector Connect a 9 pin serial device to t...

Page 23: ...ndicates that there is an active connection on the Ethernet port Power supply connector Connect the power cord to this connector SMP Expansion Port 1 link LED When this LED is lit it indicates that th...

Page 24: ...ture the Wake on LAN feature can turn on the server Note When 4 GB or more of memory physical or logical is installed some memory is reserved for various system resources and is unavailable to the ope...

Page 25: ...ing system stops functioning you can press and hold the power control button for more than 4 seconds to turn off the server v If the server is installed in a static partition pressing the power contro...

Page 26: ...14 IBM xSeries 460 Type 8872 and xSeries MXE 460 Type 8874 User s Guide...

Page 27: ...illustrations in this document might differ slightly from your hardware F R O N T Memory card Hot swap power supply I O board Hot swap fans 92 mm Hot swap fans 80 mm Operator information panel Hot sw...

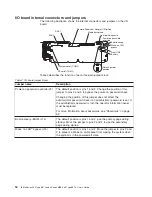
Page 28: ...on of this jumper to pins 2 and 3 to bypass the power on password check Changing the position of this jumper does not affect the administrator password check if an administrator password is set If the...

Page 29: ...llustration shows the LEDs on the memory card DIMM 1 error LED DIMM 2 error LED DIMM 3 error LED DIMM 4 error LED Light path diagnostics button Light path diagnostics button power LED Memory card erro...

Page 30: ...ket Microprocessor 3 socket Microprocessor 3 error LED VRM 3 error LED VRM 4 error LED Microprocessor 4 error LED Microprocessor 2 error LED Microprocessor 1 error LED Microprocessor 1 socket Micropro...

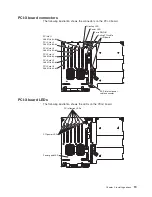
Page 31: ...4 266 MHz 64 bit PCI X slot 3 266 MHz 64 bit PCI X slot 2 266 MHz 64 bit PCI slot 1 266 MHz 64 bit Attention LED Power LED SAS internal power cable connector ServeRAID 8i I O board Active PCI cable PC...

Page 32: ...ation shows the connectors on the SAS backplane Front of SAS backplane Back of SAS backplane SAS hard disk drive connectors SAS signal cable 2 SAS signal cable 1 SAS power 2 20 IBM xSeries 460 Type 88...

Page 33: ...steps that involve installing or removing adapter cables v Blue on a component indicates touch points where you can grip the component to remove it from or install it in the server open or close a la...

Page 34: ...r forearms Button long sleeved shirts before working inside the server do not wear cuff links while you are working inside the server v Do not allow your necktie or scarf to hang inside the server v R...

Page 35: ...e server and all attached peripheral devices Disconnect all power cords then disconnect all external signal cables from the server 3 Slide the server out of the rack until the slide rails lock into pl...

Page 36: ...ion you must either install a second power supply or use 220 V ac input v If you install or remove a power supply observe the following precautions Statement 8 CAUTION Never remove the cover on a powe...

Page 37: ...g inside the server with the power on 2 Remove the server cover See Removing the cover and bezel on page 23 3 If you are adding a power supply to an empty power supply bay remove the cover from the ac...

Page 38: ...3 V 32 bit or 64 bit PCI and PCI X adapters v The server scans devices and PCI X slots to assign system resources in the following order integrated Ethernet controller integrated SAS controller and t...

Page 39: ...ted surface on the outside of the server then grasp the adapter by the top edge or upper corners of the adapter and remove it from the package 5 Remove the ServeRAID 8i adapter from the package using...

Page 40: ...off the server and peripheral devices and disconnect the power cords and all external cables 3 Remove the server cover see Removing the cover and bezel on page 23 and determine which PCI X expansion s...

Page 41: ...an adapter avoid touching the components and gold edge connectors on the adapter Make sure that the adapter is correctly seated in the connector Incorrectly seated adapters might cause damage to the I...

Page 42: ...drives when you are installing the server in a rack configuration install the server in the rack before installing the hard disk drives v You do not have to turn off the server to install hot swap dr...

Page 43: ...laced If the green hard disk drive activity LED is flashing the drive is being accessed 2 If the server will be configured for RAID operation using a ServeRAID controller you must configure the disk a...

Page 44: ...to save new configuration information to the BIOS when installing or removing DIMMs The only exception is if you replace a DIMM that was marked as Disabled in the Memory Settings menu In this case you...

Page 45: ...there is a problem and guide you to the defective DIMM When this occurs first identify the defective DIMM then remove and replace the DIMM The following illustration shows the LEDs on the memory card...

Page 46: ...f memory scrubbing determines that a DIMM is damaged beyond use read and write operations are redirected to the remaining good DIMMs Memory scrubbing then reports the damaged DIMM and light path diagn...

Page 47: ...structures inside the server a Grasp the memory card by the retention levers and turn the memory card so that the connector aligns with the connector on the microprocessor board b Insert the memory ca...

Page 48: ...b Insert the memory card into the memory card connector c Press the memory card into the connector and close the retention levers If you have other options to install or remove do so now otherwise go...

Page 49: ...onnectors facing up Attention To avoid breaking the DIMM retaining clips or damaging the DIMM connectors open and close the clips gently 5 Open the retaining clip on each end of the DIMM connector 6 T...

Page 50: ...he retention levers If you have other options to install or remove do so now otherwise go to Completing the installation on page 47 Hot swapping DIMMs To hot swap DIMMs complete the following steps 1...

Page 51: ...tention To avoid breaking the DIMM retaining clips or damaging the DIMM connectors open and close the clips gently 5 Open the retaining clip on each end of the DIMM connector and remove the DIMM or DI...

Page 52: ...g the installation on page 47 Hot adding DIMMs To hot add DIMMs and memory cards complete the following steps 1 Read the safety information that begins on page v and Installation guidelines on page 21...

Page 53: ...by aligning the edges of the DIMM with the slots at the ends of the DIMM connector 8 Firmly press one end of the DIMM into the connector then press the other end into the connector The retaining clip...

Page 54: ...upports up to four Intel Xeon microprocessors If you are installing two or more microprocessors they must be the same cache size and type and the same clock speed v With more than one microprocessor t...

Page 55: ...processor in the server Install the microprocessors in the order shown in the following illustration If you install the microprocessors in the wrong order the server will not start 1 2 3 4 To install...

Page 56: ...ops then push in on the microprocessor tray retention latches on each side of the tray and pull the tray out of the server Attention The microprocessor tray is heavy Pull the tray partially out of the...

Page 57: ...and store it for future use 6 Remove the protective cover tape or label from the surface of the microprocessor socket if any is present 7 Lift the microprocessor release lever to the fully open positi...

Page 58: ...heat sink retaining clip to the fully open position approximately 135 angle 12 Remove the heat sink from its package and remove the cover from the bottom of the heat sink 13 Remove the release liner...

Page 59: ...See the Rack Installation Instructions that come with the server for complete rack installation and removal instructions Attention v Install the server only in a rack cabinet with perforated doors v D...

Page 60: ...o interconnect the SMP Expansion Ports of two or more servers v 2 3 m XpandOnDemand Scalability cable kit comes with one 2 3 m 7 6 foot SMP Expansion cable v 2 9 m XpandOnDemand Scalability cable kit...

Page 61: ...igurations that consist of two four or eight servers for up to 32 way operation A node is a server that is interconnected with other servers or nodes through the SMP Expansion Ports to share system re...

Page 62: ...hat is connected to port 1 on node 1 then connect the opposite end of the cable to port 1 of node 2 Next route the cable through the node 2 cable management arm b Locate the SMP Expansion cable that i...

Page 63: ...ion b Connect one end of an SMP Expansion cable to port 2 on node 1 then route the cable through the node 1 cable management arm Use a 2 3 m 7 6 foot SMP Expansion cable for this connection c Connect...

Page 64: ...is connected to port 1 on node 1 then connect the opposite end of the cable to port 1 of node 4 Next route the cable through the node 4 cable management arm b Locate the SMP Expansion cable that is co...

Page 65: ...able 2 9 m SMP Expansion cable 2 9 m SMP Expansion cable 2 9 m SMP Expansion cable 3 Connect the SMP Expansion cables to node 1 a Connect one end of an SMP Expansion cable to port 1 on node 1 then rou...

Page 66: ...node 3 then route the cable through the node 3 cable management arm Use a 2 3 m 7 6 foot SMP Expansion cable for this connection 6 Connect the SMP Expansion cables to node 4 a Locate the SMP Expansio...

Page 67: ...rm c Connect one end of an SMP Expansion cable to port 3 on node 7 then route the cable through the node 7 cable management arm Use a 2 3 m 7 6 foot SMP Expansion cable for this connection 10 Connect...

Page 68: ...56 IBM xSeries 460 Type 8872 and xSeries MXE 460 Type 8874 User s Guide...

Page 69: ...p sequence that is set in the Configuration Setup Utility program and temporarily assign a device to be first in the startup sequence v Gigabit Ethernet controller configuration process For informatio...

Page 70: ...ity menu is available 3 Select settings to view or change Configuration Setup Utility menu choices The following choices are on the Configuration Setup Utility main menu Depending on the version of th...

Page 71: ...24 hour format hour minute second This choice is on the full Configuration Setup Utility menu only v System Security Select this choice to set passwords See Passwords on page 62 for more information a...

Page 72: ...emory configuration the server automatically disables the failing pair of memory connectors and continues operating with reduced memory After the problem is corrected you must manually enable the memo...

Page 73: ...of the error messages is displayed otherwise the log contains only numeric error codes Run the diagnostic program to get more information about error codes that occur See the Problem Determination an...

Page 74: ...a power on password is set when you turn on the server the system startup will not be completed until you type the power on password You can use any combination of up to seven characters A Z a z and 0...

Page 75: ...ministrator password and then forget it there is no way to change override or remove it You must replace the I O board Using the ServerGuide Setup and Installation CD The ServerGuide Setup and Install...

Page 76: ...are levels of a ServeRAID adapter and determines whether a later level is available from the CD v Detects installed hardware options and provides updated device drivers for most adapters and devices v...

Page 77: ...nd restart the server At this point the installation program for the operating system takes control to complete the installation Installing your operating system without ServerGuide If you have alread...

Page 78: ...specifying the startup order of devices through the PXE boot agent utility program Starting the PXE boot agent utility program To start the PXE boot agent utility program complete the following steps...

Page 79: ...ler lights LEDs to help you diagnose the problem and also records the error in the BMC system event log The baseboard management controller also provides the following remote server management capabil...

Page 80: ...Console Baud Rate 19200 v Remote Console Data Bits 8 v Remote Console Parity None v Remote Console Stop Bits 1 v Remote Console Text Emulation ANSI v Remote Console Keyboard Emulation ANSI v Remote C...

Page 81: ...ollowing line to the end of the Run gettys in standard runlevels section of the etc inittab file This enables hardware flow control and enables users to log in through the SOL console 7 2345 respawn s...

Page 82: ...ents prompt timeout 50 default linux boot dev hda map boot map install boot boot b message boot message linear image boot vmlinuz 2 4 9 e 12smp label linux initrd boot initrd 2 4 9 e 12smp img read on...

Page 83: ...the Linux operating system starts a LILO boot prompt is displayed instead of the graphical user interface Press Tab at this prompt to install all of the boot options that are listed To load the operat...

Page 84: ...e that you do not have to rerun grub after making changes to this file NOTICE You have a boot partition This means that all kernel and initrd paths are relative to boot eg root hd0 0 kernel vmlinuz ve...

Page 85: ...initrd initrd 2 4 9 e 12 img You must restart the Linux operating system after completing these procedures for the changes to take effect and to enable SOL SUSE SLES 8 0 configuration Note This proce...

Page 86: ...ack light gray default 0 timeout 8 title linux kernel hd0 1 boot vmlinuz root dev hda2 acpi oldboot vga 791 1 initrd hd0 1 boot initrd title floppy root chainloader 1 title failsafe kernal hd0 1 boot...

Page 87: ...mpt then press Enter to display the current boot options for the server b In the Boot Entries section locate the boot entry ID for the section with an OS friendly name of Windows Server 2003 Standard...

Page 88: ...0 partition 1 WINDOWS OS Load Options fastdetect redirect You must restart the Windows 2003 operating system after completing this procedure for the changes to take effect and to enable SOL Installing...

Page 89: ...system complete the following steps You must be logged in as a root user to perform these procedures 1 Go to http www ibm com pc support download the utility program and create the OSA BMC Management...

Page 90: ...and restart the server 2 From a command line prompt type bmc_cfg and press Enter 3 Follow the instructions on the screen Using the baseboard management controller firmware update utility program Use...

Page 91: ...st 623 to access the SOL network Type help at the smbridge prompt for more information Use the following commands in an SOL session connect Connect to the LAN Type connect ip ip_address u username p p...

Page 92: ...guration on the server you must run ServeRAID Manager in Startable CD mode as described in the instructions in this section If you install a different type of RAID adapter in the server use the config...

Page 93: ...t spare drive complete the following steps a Click the Spares tab b Select the physical drive that you want to designate as the hot spare drive and click the icon to add the drive 7 Click Next The Con...

Page 94: ...ues with the secondary nodes in numeric order of the logical node IDs Creating a scalable partition To create a scalable partition complete the following steps 1 Make sure that the service processor o...

Page 95: ...e in the following illustration is displayed a In the Scalable System Configuration field set the number of nodes that will be part of the scalable partition b In the Scalable Partition Number ID fiel...

Page 96: ...ol Scalable Partition page to manage the scalable partition Use the Control Partition page to replace a current scalable partition with a new scalable partition You can also start or stop a scalable p...

Page 97: ...Y OF ANY KIND EITHER EXPRESS OR IMPLIED INCLUDING BUT NOT LIMITED TO THE IMPLIED WARRANTIES OF NON INFRINGEMENT MERCHANTABILITY OR FITNESS FOR A PARTICULAR PURPOSE Some states do not allow disclaimer...

Page 98: ...the United States other countries or both UNIX is a registered trademark of The Open Group in the United States and other countries Java and all Java based trademarks and logos are trademarks of Sun M...

Page 99: ...f any standard hard disk drives and population of all hard disk drive bays with the largest currently supported drives available from IBM Maximum memory may require replacement of the standard memory...

Page 100: ...88 IBM xSeries 460 Type 8872 and xSeries MXE 460 Type 8874 User s Guide...

Page 101: ...anager 57 ServerGuide Setup and Installation CD 57 viewing 81 with ServerGuide 64 Configuration Setup Utility program 57 58 connector electrostatic discharge 9 Gigabit Ethernet 11 IXA RS485 11 keyboar...

Page 102: ...hard disk drive 30 installing continued hot swap hard disk drive 30 memory 36 memory modules 36 microprocessor 42 OSA SMBridge management utility program 76 power supply 23 installing ServeRAID 8i 26...

Page 103: ...n LED 9 password 62 publications 1 PXE Boot Agent Utility program 57 PXE Boot Agent Utility program continued using 66 R rack installing your server in 47 RAS features 6 release latch 9 reliability 6...

Page 104: ...ion Web Interface 81 utility baseboard management controller utility programs 78 Configuration Setup program using 58 OSA SMBridge management utility program 78 PXE boot agent utility program 66 SAS S...

Page 105: ......

Page 106: ...Part Number 31R1513 Printed in USA 1P P N 31R1513...

Reviews: