background image

Summary of Contents for XT 286

Page 1: ...Personal Computer Hardware Reference Library Guide to Operations 68x2523...

Page 2: ...ransit to prepay shipping charges to the warranty service location and to use the original shipping container or equivalent Contact an Authorized IBM Personal Computer Dealer or write toIBM Personal C...

Page 3: ...Personal Computer Hardware Reference Library Guide to Operations...

Page 4: ...periodically made to the information herein these changes will be incorporated in new editions ofthe publication IBM may make improvements and or changesin the product s and or the program s describe...

Page 5: ...Subpart J ofPart 15 ofFCC rules which are designed to provide reasonable protection against such interference in a residentialinstallation However there is no guarantee that interference will not occ...

Page 6: ...rgy and if notinstalled and used in accordance with the instruction manual may cause interference to radio communications It has been tested andfound to comply with the limitsfor a Class A computing d...

Page 7: ...ations cables is hazardous Connect and disconnect cables as shown when installing moving or opening the covers ofpersonal computers or attached devices To Connect To Disconnect Turn Everything OFF Dev...

Page 8: ...Notes VI n n...

Page 9: ...up at Your New Location 3 23 Section 4 Installing Your Options 4 1 Internal Options 4 3 Cover Removal 4 4 IBM Personal Computer AT Math Coprocessor 4 8 Memory Expansion AdapterInstallation 4 12 Memory...

Page 10: ...y 4 48 IBM Enhanced Color Display 4 50 IBM Personal Computer Display Stand 4 52 IBM Communications Cable 4 56 IBM Personal Computer AT Serial Adapter Cable 4 58 IBM 3 5 Inch External Diskette Drive 4...

Page 11: ...internal and external options that perform the functions you need An example of an internal option is the Color Graphics Monitor Adapter that allows a Color Display an external option to be attached t...

Page 12: ...Hardware Minimum hardware requirements are System unit with one diskette drive Keyboard Display n n n 1 2 Introduction...

Page 13: ...Software Software can be any of the following Disk operating system Game program Financial program Programming language such as BASIC Other programs of your choice o Introduction 1 3...

Page 14: ...erations will help you become familiar with the hardware n The Guide to Operations can be used as a reference manual You will probably use only a portion of the information it contains each time you o...

Page 15: ...ready to get started The following steps will help you determine which sections in the Guide to Operations to use The battery is installed backwardsin the battery compartment when shipped Install the...

Page 16: ...n installed in your system unit Note Internal options are parts installed inside the system unit such as the adapter your display is attached to n YES Continue with the next step NO Go to Internal Opt...

Page 17: ...3 Isyoursystem unitcabledandreadytouse n YES Go to Operating Your System on page 3 1 NO Continue with System Checklist page 2 4 Getting Started 2 3...

Page 18: ...tem Checklist IMPORTANT Before you connectthe power cord to your system unit be sure The system unit cover is on and the cover mounting screws are installed n Cover Mounting Screws n 2 4 Getting Start...

Page 19: ...d on the Setup Information foldout found in this manual VUV tllAlU CAA wVAu a 4 4 atlC a MMKMir NMCIf U g Setup Information Foldout The location of the system unit serial number is shown below n Syste...

Page 20: ...Cabling 1 Turn offthesystem unit 2 Turn offthepowerto allexternaloptions printer display and others a System Unit Power Switch n 2 6 Getting Started...

Page 21: ...y result if it is connected to anIBM Color Graphics Monitor Adapter Note If you do not have anIBM Monochrome Display orIBM Color Display refer to the instructions that come with the display to complet...

Page 22: ...cable to the appropriate adapter on your system unit Note Connect your printer to the IBM Monochrome Display and Printer Adapter if you have one Otherwise connect your printer to any parallel adapter...

Page 23: ...y set up refer to the instructions thatcome with it to complete its installation 8 Connectthe printerpowercordtothe printer then plug it into the electrical outlet CAUTION Connectto a properly grounde...

Page 24: ...designed for the user ssafety Itisto he used with a properly grounded receptacle to avoid possible electrical shock Connectthe power cord to the system unit then plug it into the electrical outlet n C...

Page 25: ...e If your external option has a detachable power cord connect it to the external option first and then plug it into the electrical outlet Monochrome Display Power Cord Color Display Power Cord CAUTION...

Page 26: ...f your internaloptions Internal options are parts installed inside the system unitsuch asthe adapter your display is attached to YES Go to Operating Your System on page 3 1 NO Continue with Setup Prog...

Page 27: ...ogram when you Install your system unitfor the first time Install certain options Wish to set date and time Wish to set the display mode Replace the battery O To setthe system options you mustknow whi...

Page 28: ...4 Insertthe Diagnosticsdisketteinto drive A Diskette Drive Handie in use Light 5 Turn your display controlsclockwise 6 Turnon allexternaloptions printer display and others 2 14 Getting Started...

Page 29: ...X can be any number YES Press F1 and follow the instructions on your screen Refer to the Setup Information foldout as you answer the Setup program questions This program allows you to teU your system...

Page 30: ...SELECT THE ACTION DESIRED 7 n YES Continue with the next step NO Remove the diskette and go to Testing Your System Section 5 n 11 Do you wanttosetthetime date display mode or run the Setup program YE...

Page 31: ...3 11 AboutDiskettes and Drive Compatibility 3 12 Write Protect 3 13 Loading Your Diskette Drive 3 14 Fixed Disk Drives 3 15 Displays 3 16 Battery Installation 3 17 Time and Date 3 19 Moving Your Syste...

Page 32: ...Notes r 3 2 Operatii Your System...

Page 33: ...and controls the operations of your system through a set ofinstructions called aprogram or software TheIBM Personal Computer XT Model 286 comes with an installed program language calledIBM BASIC A wi...

Page 34: ...Function Key Area Status Light Area 7 Typewriter Area IBM H y JpL i lllpj Control Key Numeric Area Keypad Area n Typewriter Area Most of the keys are typematic thatis they repeat as long as you hold...

Page 35: ...tion To shift to lowercase while Caps Lock is on press the Shift key Press the Caps Lock key again to release the uppercase mode for characters A through Z Caps Lack The Backspace key moves the cursor...

Page 36: ...er keys are pressed the characters shown on the upper portion of the keys appear O Shift The Alt key performs a variety of functions These are described in your operating system manual or application...

Page 37: ...n key is pressed a copy of the screen presentation is printed Print Screen Sys Rq The purpose of the ScrollLock key is defined in your operating system manualor application program manual Scroll Lock...

Page 38: ...ock mode the shift key must be held down to use the numeric keypad as cursor control keys The keypad is arranged like a calculator to save time when typing many numbers Pressing Num Lock again changes...

Page 39: ...as the cursor controls on the numeric kej ad These keys function as cursor controls only and are not affected by the Num Lock key Status Light Area The Num Lock light indicates the status of the mune...

Page 40: ...Height Adjustment You can adjust your keyboard to two different positionsfor typing coiMort To adjust turn yom keyboard over and set both keyboard legs into the desired position o O 3 10 Operating You...

Page 41: ...n yourIBM computer It stores approximately 1 2MB of data on a 5 1 4inch high capacity diskette The 5 1 4inch 360KB Diskette Drive is an option for your system It stores approximately 360KB of data on...

Page 42: ...ul operation of your IBM computer You can READ the following diskettes with a Doubie Sided Drive with a High Capacity Drive 1 s 1 f DoubleVided 0 c 1 SingleSided Double Sided a 0 0 You can WRITE on th...

Page 43: ...an be written recorded on the diskette To write protect a diskette cover the notch on the side of the diskette with a write protect tab If you wantto write record information on a diskette remove the...

Page 44: ...on it indicates the system unit is using the diskette drive n Drive A Diskette Drive Handle in use Light n To remove a diskette from the diskette drive rotate the diskette drive lever counterclockwis...

Page 45: ...operating system such as theIBM Disk Operating System DOS to store and retrieve datafrom your fixed disk When the system unitis using the fixed disk drive its in use hghtis on niiiimiiiiiii In use Li...

Page 46: ...s across the screen You can change the mode by using the Setup program on your Diagnostics diskette For more information refer to Setup Program in Section 2 TheIBM Monochrome display plugs into the re...

Page 47: ...tteries can be orderedfrom an IBM authorized dealer CAUTION The lithium battery presents a fire explosion or severe hum risk Do notrecharge remove the polarized connector disassemble heat above 100 C...

Page 48: ...3 Installthe battery asshown n 4 Closethe batterycompartmentdoorandinstall the screw n 3 18 Operatmg Your System...

Page 49: ...ing YourSystem To prevent a loss of data stored on a fixed disk drive back up aU the files before moving your system See your disk operating system manualfor backup instructions When you have complete...

Page 50: ...DIAGNOSTICS Version X XX C Copyright IBM Corp XXXX XXXX SELECT AN OPTION 0 SYSTEM CHECKOUT 1 FORMAT OISKEHE 2 COPY OISKEHE 3 PREPARE SYSTEM FOR MOVING 4 SETUP 9 END DIAGNOSTICS SELECT THE ACTION DESI...

Page 51: ...C Copyright IBM Corp XXXX XXXX SELECT AN OPTION 0 SYSTEM CHECKOUT 1 FORMAT DISKETTE 2 COPY OISKEHE 3 PREPARE SYSTEM FOR MOVING 4 SETUP 9 ENO DIAGNOSTICS SELECT THE ACTION OESIREO 3 ORIVE C IS PREPARE...

Page 52: ...rive lever clockwise Note If you do not have a shipping insert use a blank diskette Shipping insert 10 Unplug yoursystem unitpowercordfromthe electrical outlet Also unplug any external options n 11 Di...

Page 53: ...ter system came in use them to pack your units If you are using different cartons cushion your units well to avoid any damage Setup at Your New Location When your system arrives at the new location un...

Page 54: ...Notes o n n 3 24 Operating Your System...

Page 55: ...nhanced Graphics Adapter 4 29 Graphics Memory Expansion Card 4 31 Graphics Memory Module Bat 4 32 IBM Personal Computer GeneralPurpose Interface Bus Adapter 4 33 IBM Personal Computer Data Acquisition...

Page 56: ...Notes C o 4 2 Installing Your Options...

Page 57: ...u willfind these options Hsted on the Contents page of this section If you are installing one ofthese options use the instructions in this section If the option you are installing is notlisted on the...

Page 58: ...system manualfor backup instructions When you have completed backing up yourfUes continue with Step 1 O 1 Turn off your system unit System Unit Power Switch 2 Turn off allexternaloptions printer displ...

Page 59: ...Note the locations of all cables or cords and disconnectthemfrom the back of your system unit Monochrome Display Power Cord System Power Cord Keyboard Cable Other Cables Cover Removal 4 5...

Page 60: ...6 Removethecover mountingscrews Cover Mounting Screws o To remove the cover a SUde the cover to the front until it stops b Tilt the cover up to remove itfrom the base n n 4 6 Cover Removal...

Page 61: ...rmation Foldout Continue with the instructions for the option you are installing Notes a This section s table of contents gives page numbersfor options hsted in this manual b If your option is not hst...

Page 62: ...Cover Removal page 4 4 Warning IBM s Limited Warranty applies only to properly installed options The installation for this option should be performed by a technically skilled person IBM recommends tha...

Page 63: ...d in the expansion slots Note Some adapters have cables attached Carefully disconnect the cables noting connector locations 2 Assemblethesafety protector asshown below Insert slotQinto slot Insertslot...

Page 64: ...e safety protector should be on the top of the coprocessor n Notch Notch Warning The coprocessor is static sensitive Reduce static by touching the system frame with one hand while installing the copro...

Page 65: ...nto place i UJ I Notch Notch IMPORTANT Run the Setup program on your Diagnostics diskette after all your options are installed and verify that the installed devices list is correct O If you have other...

Page 66: ...Memory Expansion Adapter Installation Note If the cover is not already removed go to Cover Removal page 4 4 n o 4 12 Memory Adapter...

Page 67: ...the nextstep Note The 512KB 2MB Memory Expansion Adapter must be filled to its capacity of 2MB 2048KB before you install additional memory expansion adapters First Adapter Second Adapter 1 2 3 4 5 n T...

Page 68: ...2 3 Goto AdapterInstallation page4 39 You can installthe Memory Expansion Adapter in any available dual connector expansion slot n o 4 14 Memory Adapter...

Page 69: ...ationinstructions come with your kit 3 Install your memory module kitasdescribedin the kit installation instructions O 4 If you have otherinternaloptionsthatneedto be installed continue with the insta...

Page 70: ...Display Adapter InstaUation Color Graphics Monitor Adapter m IBM Monochrome Display and Printer Adapter 0 Note If the cover is not already removed go to Cover Removal page 4 4 O 4 16 Display Adapters...

Page 71: ...you install anIBM Monochrome Display and Printer Adapter its printer port becomes the primary printer port TheIBM Color Graphics Monitor Adapter must be installed in expansion slot 1 1 2 3 4 5 6 7 8 R...

Page 72: ...Locate the primary display switch on your system board The exactlocation of this switch may vary sUghtly Primary Display Switchx n 4 18 Display Adapters...

Page 73: ...lled in your system unit Note Use a ballpoint pen to set the primary display switch if necessary Monochrome Display Color Display t Primary Display Switch Front of System Unit I 3 4 Locate the Setup I...

Page 74: ...IBM Personal Computer AT Serial Parallel Adapter n Note If the cover is not already removed go to Cover Removal page 4 4 4 20 Serial ParaUel Adapter...

Page 75: ...ial adapter number 1 If this is your first serial adapter no action is required If this is your second serial adapter remove module J1 and install it as shown below Note To remove the module insert a...

Page 76: ...pter number 1 If this is your first Serial Parallel Adapter no action is required If this is your second Serial Parallel Adapter remove module J2 and install it as shown below Note To remove the modul...

Page 77: ...apter are used in your system unit the IBM Monochrome Display and Printer Adapter is always used by your system unit as LPTl printer number 1 Thefollowing combinationsshow how each parallel adapter is...

Page 78: ...n Monochrome Display and Printer Adapter with two Serial Parallel Adapters ADAPTERS INSTALLED LPT1 LPT2 LPT3 IBM Monochrome Display and Printer Adapter X 1st Serial Parallel Adapter X 2nd Serial Paral...

Page 79: ...IBM Binary Synchronous Communications BSC Adapter n Q 0 0 Note If the cover is not already removed go to Cover Removal page 4 4 Binary Synchronous Conununications BSC Adapter 4 25...

Page 80: ...1 and 3 selects the alternate mode Install the jumper according to your needs Connectors P1 and P2 must have jumpers as shown for correct operation of Jumper Position Jumper Position for Primary Mode...

Page 81: ...IBM Synchronous Data Link Control SDLC Conununications Adapter n Note If the cover is not already removed go to Cover Removal page 4 4 n Synchronoiis Data Link Control SDLC Adapter 4 27...

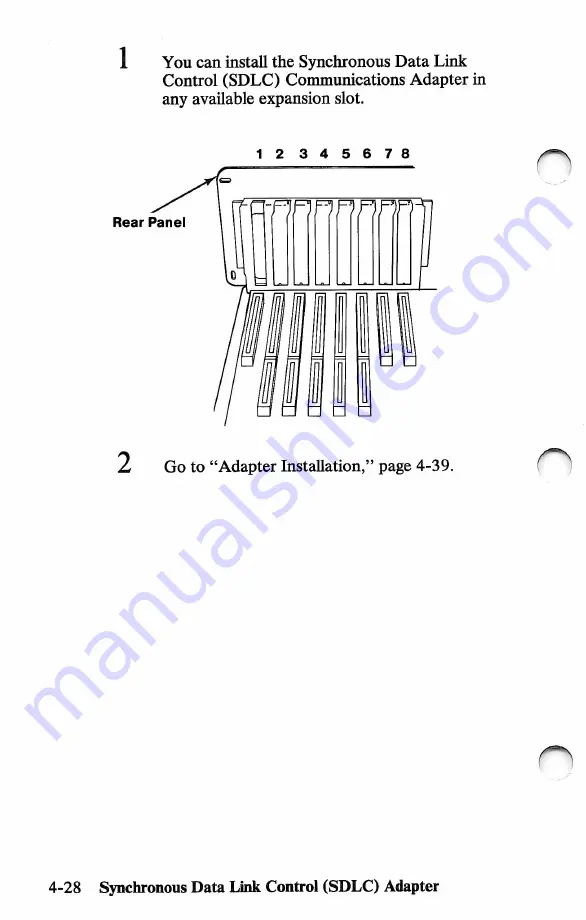
Page 82: ...tallthe Synchronous Data Link Control SDLC Conununications Adapter in any available expansion slot 1 2 3 4 5 6 7 8 Rear Panel C 2 Goto AdapterInstallation page4 39 4 28 Synchronous Data Link Control S...

Page 83: ...r Use the instruction package for the IBM Personal Computer AT to install your option 3 DiscardPackage 1 4 Comparethe version numberoftheDiagnostics diskette with the version number of the Diagnostics...

Page 84: ...7 Install your adapter asdescribedinthe IBM Personal Computer Enhanced Graphics Adapter Installation Instructions 8 If youhaveotherinternaloptionsthatneedto be installed continue with the installatio...

Page 85: ...tructions come with your card Use the instruction package for the IBM Personal Computer AT to install your option 3 Install your expansion card as described in the installation instructions 4 If you h...

Page 86: ...he instruction package for theIBM Personal Computer AT to install your option 3 Install yourmemory modulekitasdescribedin the kit installation instructions 4 If you haveotherinternaloptionsthatneedto...

Page 87: ...ctionscome with your adapter Use the instruction package for the IBM Personal Computer AT to install your option 3 DiscardPackage 1 4 Comparethe version numberoftheDiagnostics diskette with the versio...

Page 88: ...his page 7 Installyouradapter asdescribedinthe IBM Personal Computer GeneralPurpose Interface Bus GPIB Adapter Installation Instructions 8 Ifyouhaveotherinternaloptionsthatneedto be installed continue...

Page 89: ...our adapter Use the instruction package for the IBM Personal Computer AT to install your option 3 DiscardPackage 1 4 Comparethe versionnumberoftheDiagnostics diskette with the version number of the Di...

Page 90: ...r adapter as described in the IBM Personal Computer Data Acquisition and Control Adapter Installation Instructions 8 If youhave otherinternaloptionsthatneedtobe installed continue with the installatio...

Page 91: ...r adapter Use the instruction packagesfor the IBM Personal Computer AT to install your option 3 DiscardPackage 1 4 Comparethe versionnumberoftheDiagnostics diskette with the version number of the Diag...

Page 92: ...page 1 Installyour adapter asdescribedinthe IBMPC Network Adapter Installation Instructions _ 8 If youhaveotherinternaloptionsthatneedto be installed continue with the installation proceduresfor thos...

Page 93: ...proceduresin this manual 2 The table of contents gives page numbersfor options listed in this manual 3 If your option is notlisted in this manual read the installation instructions that came packaged...

Page 94: ...Remove the screwQand expansion slot cover Save the screw and discard the expansion slot cover Rear Panel o 4 40 Adapter InstaOation...

Page 95: ...pport brackets installed for aU expansion slots If a support bracket came with your option it is not needed 3 InstallthescrewQyouremovedinStep 1 4 Ifyouhave otherinternaloptionsthatneedto be installed...

Page 96: ...ou have Recorded the Setup information See the Setup Information foldout n M VIU f iA fc lint rtlit M H t luM lU IUUKMA lMjJi IA Setup Information Foldout Set the primary display switch See Display Ad...

Page 97: ...Install the cover mounting screws Cover Mounting Screws n If you have options to install that attach to the outside of your system unit continue with External Options page 4 44 If not go to CabUng pag...

Page 98: ...ection along with the installation instructions that come with your option Refer to this section s table of contentsfor specific page numbers Install external options in any order that is convenientfo...

Page 99: ...Power Cord Continue with the instructions for the option that you are installing Notes a This section s table of contents lists page numbersfor options hsted in this manual b If your option is not hs...

Page 100: ...be installed in your system If not refer to the option instructionsfor the display adapter Install the display adapter before continuing DANGER Seriousshock hazards exist within the covers of the IBM...

Page 101: ...splay serial number on the Setup Information foldout in this manual Use the Cabling Instructions to connecttheIBM Monochrome Display to your system unit If you have other external options that need to...

Page 102: ...installed in your system If not refer to the option instructionsfor the display adapter Install the display adapter before continuing O DANGER Serious shock hazards exist within the covers of the IBM...

Page 103: ...e 40 column mode allows 40large characters across the screen 80 colunm mode allows 80 smaller characters across the screen Note Some programs wih run only in the 80 column mode You can change the mode...

Page 104: ...led in your system If not refer to the option instructionsfor the display adapter Install the display adapter before continuing n DANGER Serious shock hazards exist within the covers of the IBM Enhanc...

Page 105: ...this page 6 DiscardthefirstpageofPackage4 7 Insertthe IBM Enhanced ColorDisplay Installation Instructions after this page 8 Install your display asdescribedinthe IBM Enhanced Color Display Installatio...

Page 106: ...IBM Personal Computer Display Stand D o 4 52 Display Stand...

Page 107: ...lace the display stand so the front track faces you Note You mayfind it easier to position your display on the stand with the display cables disconnected Track for Front Display Feet Display Stand 4 5...

Page 108: ...2 Liftand gently placethefrontfeetof your display in the track of the display stand IBK o o 4 54 Display Stand...

Page 109: ...play bypivotingthe stand up or down and by rotating it If you have any other external options that need to be installed continue with the installation proceduresfor those options If not go to CabUng p...

Page 110: ...ts The communications adapter to which you are connecting this cable should already be installed in your system If not refer to the option instructions for the communications adapter and install it be...

Page 111: ...nnector Screws Connect the other end of the cable to the modem or any other RS 232C data communications equipment Screws o 25 Pin Connector If you have other external options that need to be installed...

Page 112: ...tion Requirements The communications adapter to which you are connecting this cable should already be installed in your system If not refer to the option instructions for the communications adapter an...

Page 113: ...Screws Connectthe other end of the cable 25 pin end to the modem or any other RS 232C data communications equipment Screws n 25 Pin Connector If you have other external options that need to be instal...

Page 114: ...e cover is not already removed go to Cover Removal page 4 4 Locate the cable from the power supply to the fixed disk drive Carefully unplug the cable from the fixed disk drive From PowerSupply O Rear...

Page 115: ...Connector From Power Supply Power split Cable Rear of Machine n In Step 10 you willinstallthe ExternalDiskette Adapter in expansion slot 5 If a card isin this slot move it to another unused slotin you...

Page 116: ...the figure below and remove or carefully cut several bands of tape from the cable assembly to allow the signal cable cormector to reach the ExternalDiskette Adapter Note It may be necessary to remove...

Page 117: ...in the data cable External Diskette Adapter Color Stripe Signal Cable it 8 Rear Panel Using the flat cable supplied with this option connectthe Fixed Disk and Diskette Drive Adapter to the ExternalDis...

Page 118: ...ble to the power pins on the ExternalDiskette Adapter 10 Holdthe adaptercard bythetop firmlypressit into the expansion slotconnector and installthe j screw External Diskette Adapter Power split Cable...

Page 119: ...llation proceduresfor those options If not go to Cover Installation page 4 42 C 12 Insertthe externaldiskette drive connectorinto the connector on the External Diskette Adapter and tighten the screws...

Page 120: ...diskette press the eject button 14 If youhave otherexternaloptionsthatneedto be installed continue with the installation proceduresfor those options If not go to Cabling page 2 6 Note When installing...

Page 121: ...ou need A 5 25 inch scratch diskette formatted A blank 3 5 inch diskette Refer to the testing your system sections in your Guide to Operations and run the diagnostic tests Top View Bottom View Siiding...

Page 122: ...te if the system contains either one or two 1 2MB diskette drives Note If your system has asecond diskette drive B thatis not a 1 2MB diskette drive go to Notesto Experienced Users on page 4 72andfoll...

Page 123: ...type COPY B DRIVER SYS and press Enter J Type TYPE CONFIG SYS and press Enter Look for the following lines on your screen DEVICE EXDSKBIO DRV DEVICE DRIVER SYS D 2 T 80 S 9 H 2 C r t Ifthese lines alr...

Page 124: ...our drive into drive A 11 Ifyouareperformingtheinstallationona diskette go to Step 12 If you are performing the installation on a fixed disk go to Step 14 12 InsertyourDOSbackupor yourself starting ap...

Page 125: ...move the external drive to the opposite side or farther awayfrom the display unit The in use light on the diskette drive indicates when the system is using the drive Do not power off the system or re...

Page 126: ...rnal drive you may not assign a network device name as Eif you wantto access your external drive while using the network Notes to Experienced Users Wammg Do not write on a 360KB diskette in your 1 2MB...

Page 127: ...install the 3 5 Inch External Diskette Device Drivers The CONFIG SYS file must be appended or created if it does not exist with the following entries DEVICE EXDSKBIO DRV DEVICE DRrVER SYS D 2 T 80 S 9...

Page 128: ...Notes O n 4 74 3 5 Inch External Diskette Drive...

Page 129: ...System Tests on page 5 11 If you decide to return your system for service remember to bring the power cords and keys This manual has the information you need for moving your system in Section 3 Some o...

Page 130: ...escription of those messages Before you continue ensure that The software is designed for your system Your system meetsthe minimum requirements to use the software Your software works on another syste...

Page 131: ...Everything is turned on Contrast eind Brightness controls are adjusted properly If you have justinstalled an option ensure that The option is designed for your system The option was installed accordin...

Page 132: ...tte from the back of this manual Load the diskette into drive A n Turn on your system The memory size appears in the top left corner of the screen and increases until it matches the amountof memoryins...

Page 133: ...TEM CHECKOUT 1 FORMAT OISKEHE 2 COPY OISKEHE 3 PREPARE SYSTEM FOR MOVING 4 SETUP 9 END DIAGNOSTICS SELECT THE ACTION DESIRED 7 If your system did notrespond as described continue with Setup Messages o...

Page 134: ...am allows you to tell your system the date time and what type of options you have installed Press F1 and follow the instructions on your screen Refer to the Setup Information foldout as you answer the...

Page 135: ...system unit serviced 6XX Diskette Boot Record Error or Diskette Boot Failure X can be any number Action Make sure you are using the Diagnostics diskette and that it is loaded correctly Try to start th...

Page 136: ...the keyboard holding a key down If nothing is holding a key down try the following 1 Turn off the system unit 2 Unplug the keyboard from the system unit 3 Turn on the system unit If a 301 error remai...

Page 137: ...lure 1782 Disk Controller Failure 1790 DiskO Error 1791 Disk 1 Error 22XX Cluster Failure 30XX Network Failure except3015 and 3042 31XX Network Failure except3115 and 3142 ROM Error Parity Check 1 Par...

Page 138: ...oard work Have the keyboard and cable serviced Totally blank screen Continue with Display Problems on page 5 17 No cursor displayed Have the system unit serviced Only the cursor is displayed Have the...

Page 139: ...in with Step 6 on page 5 12 1 Turnoffthesystem unit 2 GettheDiagnostics diskettefromthe backof this manual 3 Load the disketteinto drive A 4 Turnonthesystem unit 5 If youreceivethefollowing message pr...

Page 140: ...tthe diskette try another diskette If the second diskette cannot be formatted either have the system unit serviced Select 1 FORMAT DISKETTE and follow the instructions on the screen to format a disket...

Page 141: ...nstalled devices If the list is correct press Y then Enter and continue with the next step Note If your printer is missingfrom the list press Y then Enter and continue with the next step When you have...

Page 142: ...creens that will appear is shown here so that you can compare it to the Character Set displayed on your system CHARACTER SET I 0 1 2 3 4 5 6 7 a 9 5 ABCDEFGHI JKLMNOPQRSTUVWXYZ C abcde fghi j k l mnop...

Page 143: ...PTION 0 SYSTEM CHECKOUT 1 FORMAT DISKEHE 2 COPY OISKEHE 3 PREPARE SYSTEM FOR MOVING 4 SETUP 9 END DIAGNOSTICS ENTER THE ACTION DESIRED 7 YES If you noted an error message or stiU suspect a problem con...

Page 144: ...432 error message Continue with Printer Problems on page 5 21 Any printer error or problems Continue with Printer Problems on page 5 21 Tests stop and you cannot continue Have the system unit service...

Page 145: ...ave their own tests Check the instructions thatcame with your displayfor any self tests that may have been included IBM Monochrome Display If you are having problems with a monochrome display and rece...

Page 146: ...Turn offthe display 5 Disconnectthe displaysignalcablefromthe system 6 Turnonthe display Is the screen white YES Have the system unit serviced NO Have the display serviced 7 While watchingthescreen tu...

Page 147: ...g or missing colors Have the display serviced If the symptom is notlisted continue with the next step Operate the controls hsted below Brightness Contrast Vertical Hold Vertical Size If any of the con...

Page 148: ...Too Short Too Wide Too Small 0 Too Narrow Tilted Changes Size When Brightness Control Turned Out of Focus Characters Shifted Left or Right or Up and Down Off the Display Area YES Have the display serv...

Page 149: ...rinter is Turned on Ready Online Printers may have their own tests Refer to the manual that came with yoxir printer and run the printer tests If the printer tests work have the system unit serviced If...

Page 150: ...Notes o n 5 22 Testing August1986...

Page 151: ...Appendix A Keyboard Templates n Introduction A 3 French A 5 German A 7 Italian A 9 Spanish A 11 U K English A 13 U S English A 15 O n Templates A 1...

Page 152: ...Notes O o A 2 Templates...

Page 153: ...S English are for the 102 key keyboard If they are used with a U S English 101 key keyboard not all characters will be available The shaded areas on the keyboard templates are keys that are not avail...

Page 154: ...Notes A 4 Templates...

Page 155: ...alfor the owner s use If the owner transfers this manual any copies made must be destroyed or transferred with the manual O 0 s m 71 W 71 w 71 s 1 1 1 1 1 s a a a In I a a a a o J a a 3 a Q p a m m Q...

Page 156: ...b b a O 175 224 225 226 227 228 229 230 231 232 233 L r 8 o e Q a 0 CO lO D O CNJ CNi CM CM O T This chart may he reproduced hy the owner of the manual for the owner s usje If the owner transfers thi...

Page 157: ...he owner of the manualfor the owner s use If the owner transfers this manual any copies made must be destroyed or transferred with the manual l i D E O ca E m B 0 B 0 ITl 3 3 1 1 1 i 1 0 5 U a Q a U O...

Page 158: ...oco T C i C J C J C J CNJOI C J CM a S C Z 01 Oi CO a 10 CO h U 10 0 0 CO CO 8 4 o o y CO lO CO N I a O CO lO CD h CO CM CM CM CM CM CM L r 3 e U Hf lO D O This chart may he reproduced hy the owner of...

Page 159: ...eproduced by the owner of the manual for the owner s use If the owner transfers this manual any copies made must be destroyed or transferred with the manual 1 1 1 i Q u Li Qjt a Q o sj U Q 0 LU LU 3 0...

Page 160: ...M b I 0 r oicj CMOJ CMOj ej c co i CVJ CM CVJ CMCVI CMCJCVI CVI L r S IS 0 0 O 0 O Q CO Tf 10 O N CO o r 3 O This chart may he reproduced hy the owner of the manualfor the owner s use If the owner tr...

Page 161: ...y the owner of the manual for the owner s use If the owner transfers this manual any copies made must be destroyed or transferred with the manual 1 1 1 i 1 1 Li 3 Q Q Q U 1 3 o 1 3 3 3 3 3 3 3 3 O 3 3...

Page 162: ...h h h CM CMCMCMCMCM i CM CM CMCMCMCM CJ H d 1 81 Oi _ I Q 0 8 L r 8 lii This chart may he reproduced hy the owner of the manualfor the owner s use If the owner transfers this manual any copies made m...

Page 163: ...owner of the manual for the owner s use If the owner transfers this manual any copies made must be destroyed or transferred with the manual m 3 E3 O Q Z3 Q Q 1 m m A B 3 3 3 3 3 3 1 t a 3 B Q 3 3 3 3...

Page 164: ...CM 1 L r oa C_ CMCO t0 iO Oh 000 0 r h h r cMCMCM cmcmcmco t CMCMCM CMCMCMCM cj S lU 8 4J o CM CO 10 CO r 3 ic Z ni oi This chart may be reproduced by the owner of the manualfor the owner s use If the...

Page 165: ...plate may be reproduced by the owner of the manual for the owner s use If the owner transfers this manual any copies made must be destroyed or transferred with the manual 1 1 1 1 1 1 u Li U Q Q Li a u...

Page 166: ...vi cviwcj eo r i t i i T CMCNJ CM C 4 OJ CM C J 3 ic Z cei oi c UJ 8 C 0 CMCOrf lO Oh eOO 0 CMCO lo m lo O a 4 This chart may he reproduced hy the owner of the manual for the owner s use If the owner...

Page 167: ...urpose symbolic instruction code 2 A programming language that uses common English words BSC binary synchronous communications A uniform procedure using a standardized set of control characters and co...

Page 168: ...pose Diagnostics diskette Diskette with programs designed to detect and isolate failing parts of the system diskette A thin flexible magnetic disk and a semirigid protective jacket in which the disk i...

Page 169: ...es rules and associated documentation 2 Contrast with software internal option See option internal K 1024 bytes KB 1024bytes keylock A device that deactivates the keyboard and locks the cover on for s...

Page 170: ...peration oftwo or more devices or to the concurrent performance of two or more activities In this book serial and parallel refers to devices as opposed to sequential and consecutive which refer to pro...

Page 171: ...al programs on the Diagnostics diskette that allows a user to set the date time and options single sided diskette See diskette single sided software 1 Computer programs procedures and rules concerned...

Page 172: ...keyboard and a display system unit Main part of the computer configuration typematic Keyboard key that repeats its function whenheld pressed n v V Volts write To make a permanent or transient recordi...

Page 173: ...lation 4 39 alt key 3 6 binary synchronous communications adapter 4 25 0 B cable communications 4 56 serial adapter 4 58 cabling yom system unit 2 6 caps lock key 3 5 3 9 hght 3 9 checklist system 2 4...

Page 174: ...16 enhanced color 4 50 mode 2 13 3 16 4 49 monochrome 3 16 4 46 operating 3 16 problems 5 1 display mode 2 13 3 16 4 49 display signal cable 2 7 display switch 4 18 DOS A 3 double sided drive 3 11 dri...

Page 175: ...K 0 lights diskette drive in use 3 11 3 14 fixed disk in use 3 15 status 3 9 loading the diskette 3 14 LPTl 4 23 4 24 LPT2 4 23 4 24 LPT3 4 23 4 24 M keyboard control key area 3 4 3 9 function key are...

Page 176: ...3 7 power switch 2 6 preparing to move your system 3 19 primary display switch print screen key 3 7 printer cabling 2 8 problems 5 1 problems 5 1 4 18 safety v scrolllock key 3 7 serial adapter cable...

Page 177: ...1 time and date 2 13 3 19 t5 ematic 3 4 W 101 key keyboard 3 4 A 3 102 key keyboard 3 4 A 3 161 error 2 13 5 1 162error 2 13 5 1 163 error 2 13 5 1 164 error 2 13 5 1 3 5 inch external diskette drive...

Page 178: ...Notes o n n 6 Index...

Page 179: ...o n V...

Page 180: ...International Business Machines Corporation P O Box 1328 W Boca Raton Florida 33429 1328 f o n 68X2523 Printed in the United States of America...

Reviews: