Seating and Safety Restraints
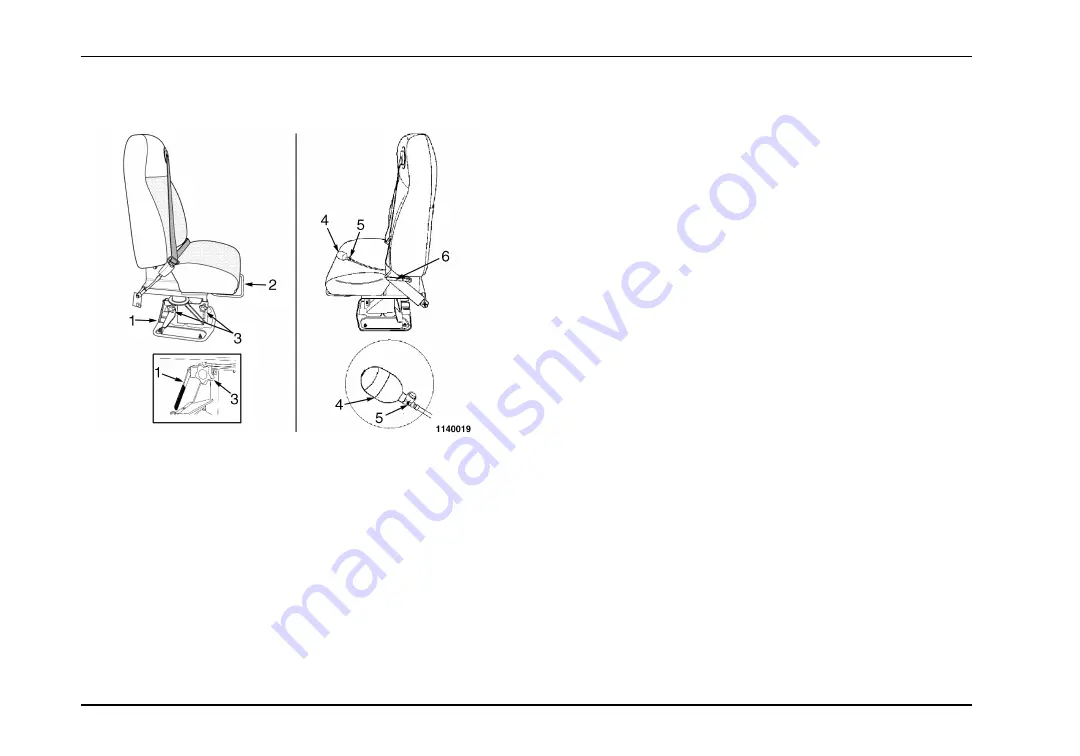
Seat Height Adjustment
1.
Seat Height Lever
2.
Forward / Aft Adjustment Bar
3.
Seat Height Adjustment Lock Knob
4.
Lumbar Support Squeeze Bulb
5.
Release Valve
6.
Seatback Adjustment Lever
There are three possible seat heights available: Top, Middle, and
Low. At the top position three adjustment holes are visible, and
at the low position none of the holes are visible.
NOTE: All seat height adjustments must be made WHILE
NOT SITTING IN THE SEAT.
Adjust the seat height as follows:
1.
Loosen the Seat Height Adjustment Lock Knob just
enough to allow seat height adjustment.
2.
While standing to the side of the seat, lift and hold the
Seat Height Lever while raising or lowering the seat
to the desired height, then release the lever.
While
adjusting the seat height, the Seat Height Lever may
remain in the up position. The location and orientation
of the Height Adjustment Lever may vary.
3.
When at the desired position, move the seat slightly up
or down until the Seat Height Lever snaps to its height
engaged (down) position.
4.
After the desired seat position is satisfied, tighten the
Seat Height Adjustment Lock Knob.
Forward / Aft Adjustment
Lift and hold the Forward / Aft adjustment Bar to move the
seat forward or backward, and release the lever at the desired
position.
Seatback Adjustment
The seatback adjustment lever is located on the left of the seat.
Lift and hold the seatback lever while moving the seatback
forward, or rearward, and release the lever at the desired
position.
80
Summary of Contents for BE Series
Page 4: ......
Page 11: ...Table of Contents Section 14 Index Index 215 vii ...
Page 12: ...Table of Contents viii ...
Page 52: ...Instrumentation Declination Zone Map 40 ...
Page 67: ...Driver Controls 55 ...
Page 68: ...Driver Controls 56 ...
Page 71: ...Driver Controls 59 ...
Page 144: ...Operation 132 ...
Page 151: ...Roadside Emergencies Body Fuse Circuit Breaker Panel 139 ...


