background image

1

STANDARD FEATURES

The system’s standard features include:
• 4-button remote transmitter
• Extended range receiver w/built-in LED sta-

tus indicator & valet switch

• Flashing parking lights
• Auto cold Start feature
• Stop & go feature
• Programmable engine run-time
• Hood & brake pedal safety inputs

OPTIONAL FEATURES

This system has optional features that may
require additional parts and/or labor. Please
contact your dealer for more details.
• Remote keyless entry (door lock/unlock)
• Remote trunk/hatch release
Note: Some features may not be appropriate
for certain vehicles. 

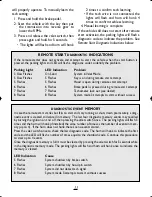
REMOTE TRANSMITTER  BUTTONS

SYSTEM OPERATION

DOOR LOCKING* 

To lock the doors press button 1:

• The parking lights flash once.
• The horn honks once.* 
• The doors lock.*
• The LED begins flashing after 5 seconds.

*

Optional Feature

LOCK BUTTON WINDOW ROLL UP*

This feature rolls up the windows and closes
the sunroof on some late model vehicles.
To activate the Window Roll Up feature: 

1. Press and release button 1 to lock the

doors.

2. Press and hold button 1 again until the

windows and sunroof are closed.
• The LED flashes once. 
• The parking lights flash once.
• The doors lock.*

The optional Window Roll Up feature acti-
vates long as button 1 is held.  This feature
rolls up the windows and closes the sunroof
on some late model vehicles.  

*

Optional Feature

DOOR UNLOCKING* 

To unlock the doors press button 2. 

• The parking lights flash twice.
• The horn honks twice.* 

Transmitter Icons

Button 1

Button 2

Button 3

Button 4

IMPORTANT SAFETY NOTICE

Do not use the remote start function when parked in an enclosed area or without sufficient ventilation, as carbon
monoxide build up may occur, resulting in serious injury or death.  It is the operator’s responsibility to use the
remote start function in a safe manner, so make sure to place the system into valet mode if the vehicle is being
serviced or if it is being used by an unfamiliar driver.

RS160 REMOTE START SYSTEM

FOR  USE WITH AUTOMATIC TRANSMISSION VEHICLES  ONLY!

RS160manualRev3:BW2450.qxd  1/7/2010  2:24 PM  Page 1

Summary of Contents for RS160

Page 1: ...odel vehicles To activate the Window Roll Up feature 1 Press and release button 1 to lock the doors 2 Press and hold button 1 again until the windows and sunroof are closed The LED flashes once The parking lights flash once The doors lock The optional Window Roll Up feature acti vates long as button 1 is held This feature rolls up the windows and closes the sunroof on some late model vehicles Opti...

Page 2: ...k and the trunk release or other option will open AUXILIARY 2 OUTPUT To activate the auxiliary 2 output press but ton 2 for three seconds The doors will unlock and the auxiliary 2 function will acti vate If button 2 is held the output will remain on for up to 5 seconds to close power sliding doors etc CAR LOCATOR FEATURE If the system s trunk release output is not being used button 3 may be progra...

Page 3: ...ature 1 Make sure the engine is running 2 Press button 4 3 Turn ignition off and remove key The doors will unlock The parking lights will turn on The engine will remain running To resume driver control 1 Turn on the ignition 2 Press the brake pedal The remote start disengages TURBOTIMER MODE The turbo timer feature can run the engine at idle for an additional 2 minutes after the ignition is turned...

Page 4: ...y features using a single transmitter To program Two Car operation get all transmitters ready up to 4 and fol low the steps below 1 Program car 1 s original two transmit ters as shown in steps 1 and 2 for Adding Transmitters 2 Program car 2 s first transmitter into car 1 by pressing Button 3 The siren chirps once 3 Program car 2 s second transmitter into car 1 by pressing Button 3 The siren chirps...

Page 5: ...ond accessory output See Program mable Features REDWIRE Main power inputA Using the supplied in line fuse holder connect to the vehicle s battery or alternate power source with a minimum 30 Amp supply REDWIRE Main power input B Using the supplied in line fuse holder connect to the vehicle s battery or alternate power source with a minimum 30 Amp supply WHITEWIRE Second ignition output Connect to t...

Page 6: ...lly the wire opposite the common wire on the coil or fuel injector BLUE WIRE Glow plug light input Most diesel vehicles will have a glow plug wire located in the instrument cluster For these vehicles test the wire to confirm proper operation and connect to it Nega tive glow plug wire systems will show 12V when the glow plug wait to start light is on then show ground when the light turns off Positi...

Page 7: ...operly To reset all functions to their default settings 1 Within 3 seconds turn the ignition on off on off and leave on 2 Press the valet switch The parking lights will turn on The horn will honk once optional 3 Press and hold the valet switch until the parking lights flash and the horn honks optional 3 times to confirm reset 4 Turn ignition off NOTE The Default Reset does not reset the Second Ign...

Page 8: ...1 Tach Settings There are two programming PROGRAMMABLE FEATURES default settings in bold Feature Setting 1 Setting 2 Setting 3 Menu 1 1 Ignition L UL On On On Off Off Off 2 Horn Output Silent L UL Normal 3 Door L UL Pulses L UL x 2 L x 2 UL L UL 4 Door Pulse Timing 25 second 3 seconds 75 second 5 Aux 1 Program Accessory Starter Auxiliary 6 Aux 2 Program Dome Light Passenger UL Auxiliary 2 Menu 2 1...

Page 9: ...till slightly over or under crank the starter To correct an over crank condition use setting 2 to increase the tach setting by 10 Test the system and if necessary adjust using feature 2 again and repeat until proper operation is achieved 3 Under Crank Adjustment To correct an under crank condition use setting 3 to decrease the tach setting by 10 Test the system and if necessary adjust using featur...

Page 10: ...mperatures The Tachless Start feature detects the engine s run status using specially designed software that interprets certain characteris tics of the engine without connection to the vehicle s tach wire This feature allows faster installation but may not be work as well with all vehicles or in extreme temperatures ENGINE LEARNING Auto Learn Mode After completing installation follow these steps t...

Page 11: ... Brake pedal is pressed during remote start attempt 7 Flashes 7 Flashes Tachometer lock out see dealer 8 Flashes 8 Flashes System made 3 attempts to start without success DIAGNOSTIC EVENT MEMORY In case the remote start cranks but fails to start and stay running or shuts down prematurely a diag nostic event is created and stored in memory The last four diagnostic memory events may recalled by turn...

Page 12: ...nue to hold theValet switch The parking lights will turn off The horn will honk 5 times optional 4 Release theValet switch 5 Press Button 1 on the transmitter The parking lights will flash and horn will honk optional 6 Repeat step 5 for each additional trans mitter up to four total transmitters 7 Turn off the ignition NOTE If a transmitter is lost or stolen make sure to code all 4 transmitter memo...

Page 13: ...13 NEGATIVE TRIGGER POSITIVE TRIGGER DOOR LOCK WIRING DIAGRAMS ADDING ACTUATORS REVERSE POLARITY POSITIVE TRIGGER NEGATIVE TRIGGER RELAY WIRING DIAGRAMS ...

Page 14: ...14 NOTES ...

Page 15: ...arranty is nontransfer able and is void if the product has been damaged by accident or unreasonable use neglect improper service or other causes not arising out of defects in mate rials or construction This warranty is limited to defective parts and or replacement parts only and excludes any incidental and consequen tial damages connected therewith Some states do not allow the exclusion or lim ita...

Page 16: ...16 WIRING DIAGRAM 2009 64 652 rev2 01 10 IC Dynamics 18250 Harwood Avenue Unit 1 P O Box 1699 Homewood IL 60430 708 922 0500 800 624 0500 ...

Reviews: