background image


Speed Dome Camera Instruction Manual 

14/47


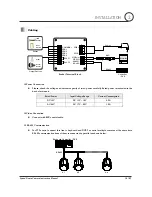
Cabling


RS-485

BNC

PWR+

PWR-

VIDEO(+)

VIDEO(-)

RS-485+

RS-485-

RELAY1


SEN1
SEN2
SEN3
SEN4

Braket Terminal Block

Moinitor

Controller

/ DVR

Power

Light

Alarm
Buzzer

Sensor

Output Devices

IrDA
Sensor

Door
Switch

RELAY2


‰

 Power Connection 

z


Please, check the voltage and current capacity of rated power carefully. Rated power is indicated in the 
back of main unit. 

Rated Power 

Input Voltage Range 

Current Consumption 

DC 12V 

DC 11V ~ 18V 

2.5 A 

AC 24V 

AC 17V ~ 29V 

1.5 A 


‰

 Video Connection 

z


Connect with BNC coaxial cable. 


‰

 RS-485 Communication 

z


For PTZ control, connect this line to keyboard and DVR. To control multiple cameras at the same time, 
RS-485 communication lines of them is connected in parallel as shown below. 


Keyboard Controller / DVR

RS-485

+

-

#1

+

-

#2

+

-

#n

+

-


INSTALLATION

Summary of Contents for ICR2200

Page 1: ...INSTRUCTION MANUAL Ver 1 1 Outdoor High Speed Dome Camera ...

Page 2: ...of un insulated dangerous voltage within the product s enclosure that may be of sufficient magnitude to constitute a risk of electric shock to persons This exclamation point symbol is intended to alert the user to the presence of important operating and maintenance servicing instructions in the literature accompanying the appliance ...

Page 3: ...d only from the type of power source indicated on the marking label Precautions Operating z Before using make sure power supply and others are properly connected z While operating if any abnormal condition or malfunction is observed stop using the camera immediately and then contact your local dealer Handling z Do not disassemble or tamper with parts inside the camera z Do not drop or subject the ...

Page 4: ...tion 16 Preset and Pattern Function Pre Check 16 Start OSD Menu 17 Reserved Preset 17 Preset 18 Swing 18 Pattern 19 Group 20 Other Motion Functions 21 OSD Display of Main Screen 22 4 How to use OSD Menu General Rules of Menu Operation 23 Main Menu 23 Display Menu for Main Screen 24 Privacy Zone Mask Setup 25 Camera Module Setup 26 Motion Setup 34 Preset Setup 36 Swing Setup 39 Pattern Setup 40 Gro...

Page 5: ...a to a desired position with zoom proportional pan tilt movement Preset Pattern Swing Group Privacy Mask and More z MAX 127 Presets are assignable and characteristics of each preset can be set up independently such as White Balance Auto Exposure Label Digital Outputs and so on z Max 8 set of Swing action can be stored This enables to move camera repetitively between two preset positions with desig...

Page 6: ...relay contact is AC 250V 3A or DC 28V 3A z If an external sensor is activated camera can be set to move to the corresponding Preset position Meanwhile the output relay can be matched to some specific Preset positions to do counteractions such as turning on the light or sound the alarm Reserved Presets for Special Purpose z Most camera characteristics can be set up easily and directly with reserved...

Page 7: ...ction Manual 7 47 Product Accessories Product Accessories z Main Body z Main Body Sun Shield z Dome Cover z Wall mount bracket z Ceiling Mount Bracket z Screws Options z Pole Mount Adapter z Cornor Mount Adapter INTRODUCTION 1 ...

Page 8: ...ps the camera from dropping during installation and maintenance After install the Bracket please hang the spring to the drop prevention hook of main body as shown in picture for further tasks z Lockup Screw After assembling main body to bracket screw main body to bracket to protect them from separation by vibration and so on z Fuse If the fuse is burnt to protect your came from over current damage...

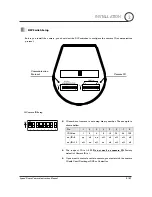
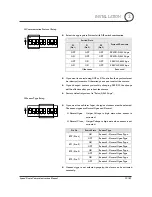
Page 9: ...otocol Camera ID Camera ID Setup 1 2 3 4 5 6 ON ON 7 8 z ID number of camera is set using binary number The example is shown bellow Pin 1 2 3 4 5 6 7 8 ID Value 1 2 4 8 16 32 64 128 ex ID 5 on off on off off off off off ex ID 10 off on off on off off off off z The range of ID is 1 255 Do not use 0 as camera ID Factory default of Camera ID is 1 z If you want to control a certain camera you must mat...

Page 10: ...IP S W the change will be effective after you reboot the camera z Factory default of protocol is Pelco D 2400 bps z If you want to use Alarm Input the types of sensor must be selected The sensor types are Normal Open and Normal Normal Open Output Voltage is high state when sensor is activated Normal Close Output Voltage is high state when sensor is not activated Pin No Switch State Sensor Type ON ...

Page 11: ...a from unexpected drop and connect Main Body Cable to Main Body Connector in Wall Mount Bracket Line up the mold lines and assemble main body to Wall Mount Bracket Turn main body on its axis in CW Clockwise direction and after assembling them screw main body to Wall Mount Bracket to protect them from separation by vibration or others In case of using pipe use the hole located on lower side of Wall...

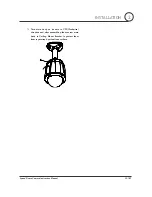
Page 12: ... ceiling panel and attach the Ceiling mount bracket on it Wire cables to terminal blocks on the PCB in Ceiling Mount Bracket Hook up Drop Prevention Spring on main body to prevent camera from unexpected drop and connect Main Body Cable to Main Body Connector in Ceiling Mount Bracket Line up the mold lines and assemble main body to Ceiling Mount Bracket INSTALLATION 2 ...
Page 13: ...ra Instruction Manual 13 47 Turn main body on its axis in CW Clockwise direction and after assembling them screw main body to Ceiling Mount Bracket to protect them from separation by vibration or others INSTALLATION 2 ...

Page 14: ...ge and current capacity of rated power carefully Rated power is indicated in the back of main unit Rated Power Input Voltage Range Current Consumption DC 12V DC 11V 18V 2 5 A AC 24V AC 17V 29V 1 5 A Video Connection z Connect with BNC coaxial cable RS 485 Communication z For PTZ control connect this line to keyboard and DVR To control multiple cameras at the same time RS 485 communication lines of...

Page 15: ...or Normal Close in Dip switch in main body of camera must be set properly Signal Description IN COM Connect cable of electric power source for Sensors to this port as shown in the circuit above IN1 IN2 IN3 In4 Connect output of sensors for each port as shown in the circuit above z Relay Output OUT 1 AC or DC OUT 2 AC or DC Internal LOAD LOAD Maximum allowable electrical load of relay is shown bell...

Page 16: ...ra can not be controlled properly The operation of this manual is based on the standard Pelco Controller Preset and Pattern Function Pre Check z Check how to operate preset and pattern function with controller or DVR in advance to operate camera function fully when using controller or DVR z Refer to the following table when using standard Pelco protocol controller Go Preset Input Preset Number and...

Page 17: ...FF Go Preset 171 Sets Camera BLC Mode to ON Go Preset 172 Sets Camera Flickerless Mode to OFF Go Preset 173 Sets Camera Flickerless Mode to ON Go Preset 174 Sets Camera Focus Mode to AUTO Go Preset 175 Sets Camera Focus Mode to Manual Go Preset 176 Sets Camera Focus Mode to SEMI AUTO Go Preset 177 Sets Day Night Mode to AUTO Go Preset 178 Sets Day Night Mode to NIGHT Go Preset 179 Sets Day Night M...

Page 18: ...When swing function runs camera moves from the preset assigned as the 1st point to the preset assigned as the 2nd point in CW Clockwise direction Then camera moves from the preset assigned as the 2nd point to the preset assigned as the 1st point in CCW Counterclockwise direction In case that the preset assigned as the 1st point is same as the preset assigned as the 2nd point camera turns on its ax...

Page 19: ...ods Method 1 Set Pattern Pattern NO Pattern editing screen is displayed as bellow EDIT PATTERN 1 NEAR SAVE FAR DELETE 0 0 x1 N Movement by Joystick and preset movement can be memorized in a pattern The rest memory size is displayed in progress bar To save the recording press NEAR key and to cancel press FAR key Method 2 OSD Using OSD Menu See the section How to use OSD Menu z Run Pattern Method 1 ...

Page 20: ... or swing Preset speed can be set up and the repeat number of Pattern Swing can be set up in Group setup Dwell time between actions can be set up also Preset 1 Pattern 1 Swing 1 Dwell Time Max 20 Entities z Set Group Use OSD Menu to create a Group z Run Group Method 1 Run Pattern Group NO 20 Method 2 Go Preset Group NO 150 ex Run Group 7 Run Pattern 27 ex Run Group 7 Go Preset 157 z Delete Group U...

Page 21: ...Privacy Masks can be created on the arbitrary position to hide objects such as windows shops or private house With Spherical Coordinates system powerful Privacy Zone Mask function is possible The availability for Privacy Zone Function should be different by models z GLOBAL LOCAL Image Setup WB White Balance and AE Auto Exposure can be set up independently for each preset There are 2 modes Global m...

Page 22: ...ored PRESET When camera reach to Preset PATTERN When Pattern is in action SWG PRESET When Swing is in action z Action Title UNDEFINED When undefined function is called to run z Preset Label The Label stored for specific Preset z Alarm Information This information shows current state of Alarm I O The character O of first line stands for Output and I of second line means Input If an I O point is ON ...

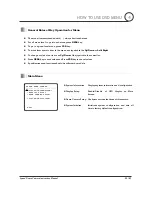
Page 23: ...joystick in the controller z Press NEAR key to save values and Press FAR key to cancel values z Specifications and functions should be different by models Main Menu SPEED DOME CAMERA SYSTEM INFORMATION DISPLAY SETUP DOME CAMERA SETUP SYSTEM INITIALIZE EXIT z System Information Displays system information and configuration z Display Setup Enable Disable of OSD display on Main Screen z Dome Camera S...

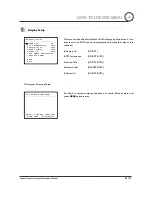
Page 24: ...ION MOVE TO TARGET POSITION NEAR SAVE FAR CANCEL This menu defines Enable Disable of OSD display on Main Screen If an item is set to be AUTO the item is displayed only when the value of it is changed z Camera ID ON OFF z PTZ Information ON OFF AUTO z Action Title ON OFF AUTO z Preset Label ON OFF AUTO z Alarm I O ON OFF AUTO Set North to assign compass direction as criteria Move camera and press N...

Page 25: ...HEIGHT NEAR SAVE FAR CANCEL Select area in image to mask z Mask No 1 8 Select Mask number If the selected mask has already data camera moves as it was set Otherwise UNDEFINED will be displayed under Mask NO z Display ON OFF Sets if camera makes mask shows or not on images z Clear Mask CANCEL OK Deletes data in the selected mask NO Move camera to area to mask Then the menu to adjust mask size will ...

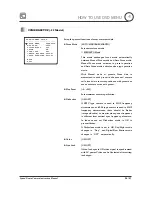
Page 26: ...preset in advance and camera calls focus data in correspondence with presets as soon as camera arrives at a preset z Max Zoom 2 220 Sets maximum zoom magnification z Flickerless ON OFF If NTSC type camera is used in 50HZ frequency circumstance or if PAL type camera is used in 60HZ frequency circumstance there should be flicker image vibration on monitor since power frequency is different from vert...

Page 27: ...anual 27 47 White Balance Setup WB SETUP GLOBAL WB MODE AUTO RED ADJUST BLUE ADJUST BACK EXIT z WB Mode AUTO MANUAL In Manual mode Red and Blue level can be set up manually z Red Adjust 0 255 z Blue Adjust 0 255 HOW TO USE OSD MENU 4 ...

Page 28: ... 1 1800 sec 27 1 10000 sec z Backlight ON OFF Sets Backlight Compensation z Day Night AUTO DAY NIGHT z Slow Shutter OFF 2 128 Field Sets Digital Slow Shutter The number of piled field can be setup It is only available when Day Night mode is Day z AE Mode AUTO SHUTTER IRIS MANUAL Sets AE Auto Exposure mode Only if Day Night mode is set to Day and Slow Shutter mode is set to OFF AE can be set z IRIS...

Page 29: ...preset in advance and camera calls focus data in correspondence with presets as soon as camera arrives at a preset z Max Zoom 2 300 Sets maximum zoom magnification z Flickerless ON OFF If NTSC type camera is used in 50HZ frequency circumstance or if PAL type camera is used in 60HZ frequency circumstance there should be flicker image vibration on monitor since power frequency is different from vert...

Page 30: ...following table z Day Night AUTO DAY NIGHT z Slow Shutter OFF 2 128 Field Sets Digital Slow Shutter The number of piled field can be setup z AE Mode AUTO SHUTTER IRIS MANUAL Sets AE Auto Exposure mode Only if Day Night mode is set to Day or Night and Slow Shutter mode is set to OFF AE can be set z IRIS Level 0 255 If AE mode is set to IRIS mode or Manual mode this can be set up z GAIN Level 0 255 ...

Page 31: ... z Criteria Area Down of Image z BLC Level 1 D2 z Criteria Area Down of Image z BLC Level 2 R1 z Criteria Area Right of Image z BLC Level 1 R2 z Criteria Area Right of Image z BLC Level 2 Note Shutter Speed Table Value Shutter Value Shutter Value Shutter Value Shutter 0 1 60 sec 7 1 400 sec 14 1 1000 sec 21 1 2000 sec 1 1 125 sec 8 1 450 sec 15 1 1100 sec 22 1 2500 sec 2 1 150 sec 9 1 500 sec 16 1...

Page 32: ...s data in correspondence with presets as soon as camera arrives at a preset z Digital Zoom ON OFF Sets digital zoom function to ON OFF If this is set to OFF optical zoom function runs but zoom function stops at the end of optical zoom magnification z Flickerless ON OFF If NTSC type camera is used in 50HZ frequency circumstance or if PAL type camera is used in 60HZ frequency circumstance there shou...

Page 33: ...ight ON OFF Sets Backlight Compensation z Day Night AUTO DAY NIGHT z AE Mode AUTO SHUTTER IRIS BRIGHT MANUAL Sets AE Auto Exposure mode If Flickerless mode is set to ON AE mode should be fixed to Shutter Speed mode z IRIS Level CLOSE F1 6 F28 If AE mode is set to IRIS mode or Manual mode this can be set up z GAIN Level 3dB 28dB This can be set up when AE mode is set to Manual mode z Shutter Speed ...

Page 34: ...ax Speed 1 sec 360 sec Sets maximum jog speed Jog speed is inversely proportional to zoom magnification As zoom magnification goes up pan tilt speed goes down z Jog Direction INVERSE NORMAL If you set this to Inverse the view in the screen is moving same direction with jog tilting If Normal is selected the view in the screen is moving reversely z Freeze in Preset ON OFF At start point of preset mo...

Page 35: ...d during assigned Wait Time z Park Enable ON OFF z Wait Time 1 minute 4 hour The time is displayed with hh mm ss format and you can change this by 1 min unit z Park Action HOME PRESET PATTERN SWING GROUP HOME Camera moves to home position if there is no PTZ command during assigned Wait Time Match the Alarm sensor input to one of Preset positions If an external sensor is activated camera will move ...

Page 36: ...lay Out Define Relay output If an Output point is ON state it will show a number corresponding to each point Otherwise will be displayed z CAM Adjust GLOBAL LOCAL WB White Balance and AE Auto Exposure can be set up independently for each preset There are 2 modes Global mode Local mode The Global mode means that WB or AE can be set up totally and simultaneously for all presets in ZOOM CAMERA SETUP ...

Page 37: ...erse rectangular is cursor As soon as finishing selecting alphabet cursor moves to the next digit Using Left Right Up Down of joystick move to an appropriate character from the Character set To choose that character press the NEAR key If you want to use blank choose Space character If you want to delete a character before use back space character If you complete the Label editing move cursor to OK...

Page 38: ...Speed Dome Camera Instruction Manual 38 47 Relay Out Setup RELAY OUT PRESET 1 RELAY OUT 1 OFF RELAY OUT 2 OFF BACK EXIT z Relay Out ON OFF Sets Relay Outputs for assigned preset 4 HOW TO USE OSD MENU ...

Page 39: ...unction runs camera moves from the preset assigned as the 1st point to the preset assigned as the 2nd point in CW Clockwise direction Then camera moves from the preset assigned as the 2nd point to the preset assigned as the 1st point in CCW Counterclockwise direction In case that the preset assigned as the 1st point is same as the preset assigned as the 2nd point camera turns on its axis by 360 in...

Page 40: ...Clear Pattern CANCEL OK Deletes data in current pattern z Edit Pattern Starts editing pattern By using Joystick move to start position with appropriate zoom To start pattern recording press NEAR key To exit this menu press FAR key Move camera with joystick of controller or run preset function to memorize the path mostly curve path in a selected pattern The total memory size and the rest memory siz...

Page 41: ...ined UNDEFINED will be displayed under selected Group number z Clear Group CANCEL OK Deletes data in current Group z Edit Group Starts editing Group Press Near key in NO list to start Group setup Note that MAX 20 Functions are allowed in a Group Move cursor up down and press Near key to set up Set up Action Dwell time and Option Note that selected item is displayed in reverse Move cursor Left Righ...

Page 42: ... GROUP 1 NO ACTION DWELL OPT 1 PRESET 1 00 03 360 2 NONE 3 NONE 4 NONE 5 NONE BACK NEAR EDIT ACT CANCEL FAR EDIT END Set up items such as Action Dwell and OPT After finishing setting up a Action press Near key to one upper level menu Step Move cursor Up Down to select Action number and repeat Step Step to edit selected Group After finishing setting up all Actions press FAR key to exit Then cursor ...

Page 43: ...UTO Motion Lock OFF Slow Shutter OFF Power Up Action ON AE Mode AUTO Auto Flip ON Brightness 50 Jog Max Speed 120 sec Jog Direction INVERSE z User Defined Data Freeze in Preset OFF Preset 1 128 Undefined Park Action OFF Swing 1 8 Undefined Alarm Action OFF Pattern 1 4 Undefined Group 1 8 Undefined Note Applicable Model 22 Model 30 Model 26 Model z Clear All Data Deletes all configuration data such...

Page 44: ...5 Preset 360 sec Manual 0 05 360 sec proportional to zoom Pan Tilt Speed Swing 1 180 sec Preset 127 Preset Label Camera Image Setting Pattern 4 Pattern 1200 commands about 5 minute Pattern Swing 8 Swing Group 8 Group 20 action entities per Group Pan Tilt Other Functions Auto Flip Auto Parking Power Up Action etc Communication RS 485 Protocol Pelco D Pelco P selectable Alarm I O 4 Input 2 Output OS...

Page 45: ...Tilt 95 Preset 360 sec Manual 0 05 360 sec proportional to zoom Pan Tilt Speed Swing 1 180 sec Preset 127 Preset Label Camera Image Setting Pattern 4 Pattern 1200 commands about 5 minute Pattern Swing 8 Swing Group 8 Group 20 action entities per Group Pan Tilt Other Functions Auto Flip Auto Parking Power Up Action etc Communication RS 485 Protocol Pelco D Pelco P selectable Alarm I O 4 Input 2 Out...

Page 46: ...ec proportional to zoom Pan Tilt Speed Swing 1 180 sec Preset 127 Preset Label Camera Image Setting Pattern 4 Pattern 1200 commands about 5 minute Pattern Swing 8 Swing Group 8 Group 20 action entities per Group Pan Tilt Other Functions Auto Flip Auto Parking Power Up Action etc Communication RS 485 Protocol Pelco D Pelco P selectable Alarm I O 4 Input 2 Output Privacy Mask Zone 8 Zone OSD Menu PT...

Page 47: ...ension z Main Body z Ceiling Mount Bracket 162 5 73 149 206 z Main Body Sun Shield 163 7 73 149 227 2 50 80 110 158 2 74 1 81 5 1 1 2 NPT 130 8 3 1 2 0 1 2 0 z Wall Mount Bracket 158 120 136 10 4 111 2 356 191 213 7 3 4 NPT Unit mm 5 SPECIFICATIONS ...

Reviews: