background image

  iCanView270 User’s Guide 


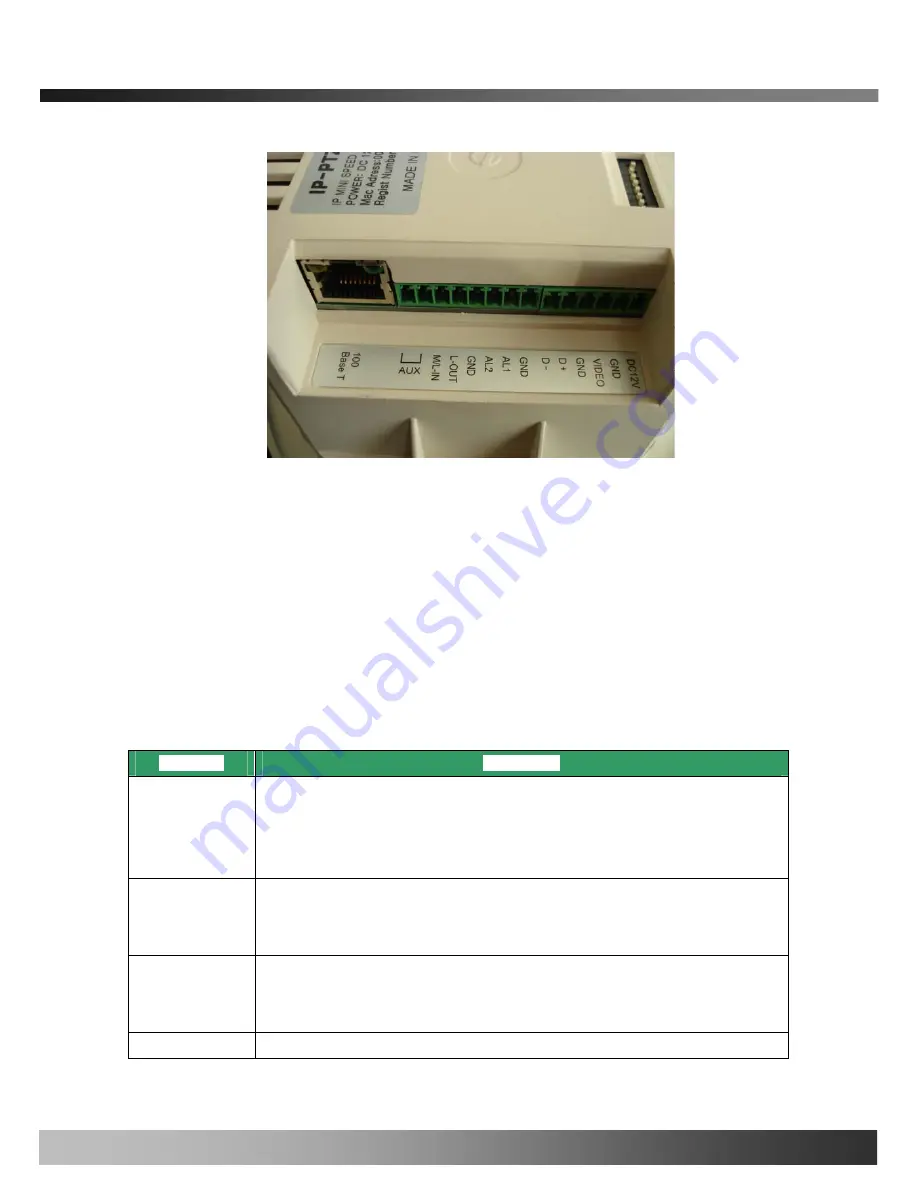
-Connector 

100 Base T : RJ-45 connector for connecting LAN (100 Base-T) 

The power can also be applied through the RJ-45 connector using proprietary PoE injector or PoE 

adaptor supplied by iCanTek. 

When the power is applied through the RJ-45 connect, do not apply power using DC12V pins.


-Terminal Block 

Refer to the following table for pin configuration


Pin Name 

Description 

AUX 

1 Relay output


. Use the two pins to connect the alarm annunciating device such as sirens, 

flashing light, etc., to network camera. 

Please refer to the section 6.1 for more detailed description.   

M/L-IN 

. Connect external Microphone or audio to network camera. 


Input audio/voice is compressed in network camera for synchronized 

transmission with video to client PC through IP network 

L-OUT 

. Connect a speaker with amplifier. LINE OUT 

. Audio/voice from client at remote site can be output through the line out terminal 

in 

bi-directional audio mode 

of iNVR or NVR-Pro. 

AL1, AL2 

2 Alarm inputs 

Fig.2-1 detailed view of iCanView270


Rev.2.0 (Nov.2007) 

12 


Summary of Contents for iCanView270

Page 1: ...iCanView270 User s Guide Rev1 0 Aug 2007 ...

Page 2: ...ticular installation If this equipment does cause harmful interference to radio or television reception which can be determined by turning the equipment off and on the user is encouraged to try to correct the interference by one or more of the following measures z Reorient or relocate the receiving antenna z Increase the separation between the equipment and receiver z Connect the equipment into an...

Page 3: ...ld be installed by trained personnel Always stop using when the product emits smoke or abnormal heat Never install the product in area exposed to oil or gas Never install the product on a ceiling that cannot hold its weight Never expose the product to direct sunlight or severe ray Never touch the front glass of the product Never drop hit strongly nor vibrate the product Never use the product in ex...

Page 4: ...iCanView270 User s Guide Revision History Date Rev No Description 2007 08 10 1 0 Creation of the document Rev 2 0 Nov 2007 4 ...

Page 5: ...DSL Cable Modem 19 4 IP Installer 21 4 1 Main window of IP Installer 21 5 Configuring iCanView270 in Administrative Mode 22 5 1 Log On 22 5 2 Basic Setup 24 5 3 Network Configuration 26 5 4 User Admin Time Setup 29 5 5 Sensor Capture Setup 32 5 6 Alarm Device Setup 34 5 7 Motion Region Setup 36 5 8 PTZ Setup 38 5 9 Encryption Set up 40 5 10 Upgrade Reset 42 5 11 Status Report 44 6 Tips for Using i...

Page 6: ...a solution for system integration solutions iCanView270 is offered with standard Ethernet interface 1 2 Features of iCanView270 y Vandal proof mini speed dome 10X optical zoom 10X digital zoom y 1 channel synchronized real time Video Audio streaming MPEG 4 video ADPCM audio y Bi directional audio communication Real time audio communication between iCanView270 and Client PC y The viewer assisted re...

Page 7: ...ion detection zone Motion detection can initiate video recording which is sent to the user through FTP and or E mail y Resolution NTSC 720x480 352x240 176x144 PAL SECAM 720x576 352x288 176x144 y Remote administration control Entire operational parameter set up Software upgrade Rev 2 0 Nov 2007 7 ...

Page 8: ...ronment to the internal modules IP66 Rated Hot Keys This camera supports various hot key functions for ease of control by other controllers or DVRs Various Surveillance Functions Auto Scan continuously repeats movement between two preset positions with various speed and dwell time 8 Group Tour Up to 8 Programmable Group tours are supported Each group can be configured to have up to 60 preset posit...

Page 9: ...turing facilities parking lots banks government facilities military etc y Real time Internet broadcasting y Remote monitoring hospitals kindergartens traffic public areas etc y Teleconference Bi directional audio conference y Remote Learning y Weather and environmental observation Rev 2 0 Nov 2007 9 ...

Page 10: ...er MPEG 4 Speed Dome Network Camera PC software to allocate IP parameters to iCanView270 PC software to view and record the A V streaming data transmitted from iCanView270 3 PLC adaptor 1 Wall Mount Bracket 2 PoE injector or Adaptor 1 Camera main body 2 CD Manual S W 3 Screw Ø 4x16 screw 5EA Ø4x16 screw 5EA 4 Manual 5 Terminal Block 5Pin 2EA iCanView270 Optional Items Rev 2 0 Nov 2007 10 ...

Page 11: ...ended CPU Pentium IV 1 8G above Main Memory 512MB above Operating system Windows 2000 or later Web browser Internet Explorer 6 0 above Resolution 1280 X 1024 Network 100 Base T Ethernet Operating Systems supported Windows 2000 Professional Windows XP Professional Windows XP Home Edition 2 4 Physical description 2 4 1 Bottom View and Name 1 Surface Mount Adaptor 2 Cap Screw PT3 4 2EA 3 Dip Switch 4...

Page 12: ...e the two pins to connect the alarm annunciating device such as sirens flashing light etc to network camera Please refer to the section 6 1 for more detailed description M L IN Connect external Microphone or audio to network camera Input audio voice is compressed in network camera for synchronized transmission with video to client PC through IP network L OUT Connect a speaker with amplifier LINE O...

Page 13: ...osite video output from the camera DC12V Connect 12 Volt DC adaptor to this terminal for supplying power to the network camera Power adapter which is compliant to the specification for iCanView270 should be used Misuse of power supply can cause damage to iCanView270 ICANTEK assumes no responsibility for misuse of the power supply The power can also be applied through the RJ 45 connector using prop...

Page 14: ... Programmable group tours each one consisting of up to 60 preset steps with different steps Auto scan Programmable Auto scan Pattern 8 Programmable Patterns total 480 seconds Privacy Zone 4 privacy zones Sector 8 Sectors identifiable with 16 character label Password Protection Yes Alarm Input 2 alarms OFF NC NO selectable Alarm Actions Activate preset Group scanning or output on alarm input Aux Ou...

Page 15: ...n Luminance S N Ratio More than 50dB Video Output VBS 1 0Vp p 75Ohm BLC ON OFF NTSC ON OFF 1 100 Flickerless PAL ON OFF 1 120 White balance AWB ATW INDOOR OUTDOOR 2 6 Quick Installation Guide Brief information for rapid installation is provided in this section For more detailed information you are recommended to refer to pertinent documentations provided with the product or refer to iCanTek s home...

Page 16: ...nView270 is delivered You are asked to configure the system for your environment in administration mode Detailed information of using administration mode can be found in 5 Configuring iCanView270 in Administrative Mode Among the parameters the parameters in the following table should be set up with proper values Detailed information for the parameters in Administrator Mode is found in 5 Configurin...

Page 17: ...CanView270 Connectors Function Signal description Number Mic LINE In Audio Voice in Connect microphone or output from audio devices 1 Line Out Audio out for speaker Audio from remote site is available from this connector in bi directional audio mode Connect speaker with amplifier 1 Connecting Alarm Sensor IR sensor Motion Sensor Smoke Detector 1 Alarm Aux Connecting Alarm annunciating device Siren...

Page 18: ... if you can receive video data when connecting to iCanView270 using the viewer program 4 When one or more IP video products are connected through a IP sharing device i e router to a larger network i e the internet in order to access each unit from outside the local area network each device must have a unique RTSP Real Time Stream Protocol and HTTP port number You must also conFig your IP sharing d...

Page 19: ... and i NVR S W on PC 3 Using IP Installer S W set up some parameters for communication through IP network Please refer to the IP installer and i NVR user s guide 4 Connect iCanView270 with ADSL Cable Modem as Fig 3 2 5 Run i NVR program and check if you can receive video data when connecting to iCanView270 Fig 3 2 Connecting iCanView270 to ADSL Cable Modem When fixed IP address is assigned to the ...

Page 20: ...gement server provides a convenient way of connecting to your network camera under dynamic IP environment Please refer to the Application note regarding Management Server in the CD When connecting iCanView270 to xDSL or Cable modem usually regular LAN cable is required But since some modems have crossover connections please contact your service provider for detailed information Rev 2 0 Nov 2007 20...

Page 21: ...information of Installing and running IP installer can be found in IP installer user s guide 4 1 Main window of IP Installer Fig 4 1 IP Installer All the basic network parameters needed for the initial connection to IP video products can be assigned by IP Installer Once the basic parameters are assigned and the initial connection is successfully made you can connect to the administration page for ...

Page 22: ...address window of the Internet Explorer as followings http iCanView270 IP address admin htm Example http 172 16 64 133 admin htm If you changed the HTTP port from default value you can login by typing in http iCanView270 IP address HTTP port admin htm Example http 172 16 64 133 8080 admin htm 2 Log on from i NVR Select video channel in the viewing window of i NVR Selected video channel will be hig...

Page 23: ... On Screen Factory default User Name and Password are set as root and dw2001 respectively Click on OK button to enter into the Basic Setup page of Administrative Mode If you have changed the username and password of the Administrator you must log on with the changed username and password Rev 2 0 Nov 2007 23 ...

Page 24: ...utton Sub Field Button Description Language Select a language of your choice System Name Logical name of the iCanView270 It is same as the one set up by IP installer You can reassign the system name Screen Capture in Web Viewer Assign the name of the folder to store captured image in web viewer Rev 2 0 Nov 2007 24 ...

Page 25: ...ate Assign bandwidth for transmitting video data Audio rate Assign bandwidth for transmitting audio data Audio data is not transmitted if you select NA Check After you finish set up of video and audio for all the channels click on this box to obtain the possible maximum number of users Possible Max Users and remaining network bandwidth Remained remaining when possible maximum users are connected P...

Page 26: ... s Guide 5 3 Network Configuration Setup the network parameters appropriately in accordance with your network environment Many of the parameters in this page are same as those set up by IP Installer Rev 2 0 Nov 2007 26 ...

Page 27: ...le modem connection select this mode Refer to IP installer user s guide for Host name and domain for Cable Modem IP Assign Type Clone MAC Refer to IP installer user s guide for Clone MAC Each port should have a number below 65 535 RTSP The RTSP port is used for transmitting real time audio video data from the network camera Default is 554 Port Change HTTP HTTP port is used for the connection to th...

Page 28: ...ds with proper parameters FTP Server Setup Setup IP address Username Password and Directory of FTP server to send data in case of alarm Default FTP port number is 21 You can register the network camera to the Management Server DDNS Server for name service to your network camera Management Server Log on to server Check this box to enable log on to the management server By log on to the management s...

Page 29: ...Setup You can change the ID and password of users and also assign different attributes for each user Fig 5 5 User Administrator Time Setup Field Button Sub Field Button Description User Administrator Admin ID Default ID is root Rev 2 0 Nov 2007 29 ...

Page 30: ...nView270 check Audio in the check box Administration User List You can list user ids and their attributes here z format user id A BA P A Audio B Bi directional audio P PTZ attribute You can delete specific user by clicking the DELETE button YES SAVE If you want to restrict viewing access to the iCanView270 check at the box left to Yes and click on Save Users need to input ID and password to connec...

Page 31: ...70 you can assign time server by filling in Specific Time Server field Synchronize With this Computer Time Synchronize the time with the time of the PC Time Setup Set Manually Set the time manually Fill in the fields with desired formats SAVE Save the set up parameters If you lost Administrator s ID and password the only means of recovery is to reset the settings to factory default but then you lo...

Page 32: ...ew270 For the sensor setup use the OSD menu available from virtual system controller Refer to iNVR user s guide Sensor Setup Name Not applicable for iCanView270 Video Capture Condition It sets the condition of video transmission via FTP or E mail The iCanView270 supports 2 types of conditions which are mutually independent 1 Sensor initiated when at least one of the sensor detects alarm condition ...

Page 33: ...sent to the Recv E mail address Refer to Section 5 3 Captured video data for E mail consists of intra frames only in consideration of the limited storage space for E mail account FTP data contains entire video frames Captured Video Transmission By FTP Check to send captured video by FTP FTP is sent to the FTP Server Refer to Section 5 3 If the FTP server is not properly assigned in Network Configu...

Page 34: ...hite background indicates the status of the relay by On Off ON On the alarm output close the relay contact Alarm Device Test OFF Off the alarm output Open the relay contact Sound Test Setup the condition of activating alarm device Select sensor or motion detection as the condition Name Logical name of the alarm device can be input into the box at the left Sensor Check at the box at the left of to ...

Page 35: ...iCanView270 User s Guide detection Duration Set the duration of Alarm annunciation 10 sec 30 sec 1 min 2 min 5 min 10 min 30 min 1 hour SAVE Save the setup parameters Rev 2 0 Nov 2007 35 ...

Page 36: ...iCanView270 User s Guide 5 7 Motion Region Setup Set the motion detection regions Up to 3 regions can be defined Fig 5 9 Motion Region Setup Rev 2 0 Nov 2007 36 ...

Page 37: ...ND and click on a box overlaid on the video 3 The defined motion detection zone will be indicated with corresponding colors Legend of the color red region 1 green region 2 blue region3 START Enable selection of rectangular zone start END Enable selection of rectangular zone end SELECT Click on this button and click on desired rectangle to add or delete the rectangular region to the motion detectio...

Page 38: ...iption Channel Selection Not applicable PTZ Model Selection Choose the PTZ model Choose default model for proper operation Delete Button Press this button to delete the setup of PTZ PTZ Device ID Your PTZ device needs an ID input ID in this field Click on SAVE to save the ID Rev 2 0 Nov 2007 38 ...

Page 39: ...ou can check the various operation of the PTZ devices Left Right UP DOWN AUTO FOCUS ZIN ZOUT PTZ Position Setup Not applicable for iCanView270 Detailed set up can be achieved by PTZ controller or virtual controller of the viewer Rev 2 0 Nov 2007 39 ...

Page 40: ...ncryption for the video and audio data For enabling the encryption check at the box at the left of the Enable data encryption then check at the proper check boxes at the left of Video and Audio After the selection click on SAVE button beneath the Video and Audio check boxes Field Button Sub Field Button Description Enable Data Encryption Check at this box to apply data encryption If it is unchecke...

Page 41: ... key value generated by the network camera DOWNLOAD Download Key value to your PC The key values can be downloaded and stored as a file to your PC for reference when you make connection When encryption is enabled the PC client program will ask for particular key value out of the 20 available key values Key Value INSTALL Upload key value to the network camera The key value stored on your PC can be ...

Page 42: ...er to 6 4 How To Upgrade Your iCanView270 System Field Button Sub Field Button Description Upgrade the system manually System S W Upgrade Upgrade the system software installed in the network camera via the network System software needed for the upgrade can be downloaded from iCanTek s home page Refer to 6 4 How To Upgrade Your iCanView270 System Manual Upgrade Bootloader Upgrade the bootloader ins...

Page 43: ...adio button Except Network Configuration you can preserve the parameters for the network Checking on All will return all the parameters to factory default state Once iCanView270 is re initialized as factory default state it should be set up again using IP Installer System Reset Perform remote reset by clicking the CONFIRM button All previous connections will be disconnected upon reset iCanView270 ...

Page 44: ...ide 5 11 Status Report It shows you system records since the system started Fig 5 13 Status Report You can check the problems as well as the versions and event status of the whole system and each module Rev 2 0 Nov 2007 44 ...

Page 45: ...tor for Sensor Input to iCanView270 Connect the two wires of the sensors The sensor type can be set in i NVR 1 Please run i NVR connect iCanView270 and click on the Virtual System Controller button and then you will get Virtual System Controller screen 2 Select the menu button on Virtual System Controller then OSD menus are displayed on the corresponding video display screen of the iNVR Using the ...

Page 46: ...tor for Relay Output from iCanView270 A Relay output is provided for connecting alarm devices or for remote on off devices such as light control Relay circuits are normal open and circuits are closed upon alarm output or remote on The relay is capable of switching AC DC 30V 1A electrical signal You can connect up relay to AUX 1 and AUX 2 at the bottom panel of iCanView270 Fig 6 3 shows the relay o...

Page 47: ...nsor Alarm Device 3 1 Connection of Sensor Fig 6 4 Sensor Device Sensor Power Supply NO NCType Sensor1 Sensor1 12V GND Sensor Device Sensor Power Supply Open CollectorType Photo Coupler Fig 6 4 Connection of Sensor to iCanView270 3 2 Connection of Relay Fig 6 5 Rev 2 0 Nov 2007 47 ...

Page 48: ...r iCanView270 is successfully installed iCanView270 in viewing mode neither channel name nor video is display and eventually timeout message is shown up Check the power and network connection of iCanView270 To check if the network is properly operating open the browser and try to connect to any server Example http www yahoo com Or open the MS DOS Prompt and type the following ping www yahoo com Th...

Page 49: ...sed by performance limitation of the PC Do not run too many programs while running viewer program The other reason could be missing data while transmission from iCanView270 Mosaic phenomenon Mosaic phenomenon occurs when not enough network bandwidth is available considering the resolution and frame rate of the video Example is 704x480 video with low Max Bandwidth Users are recommended to adjust re...

Page 50: ...ng internet explorer type in IP address or host address in the address input field of the internet explorer Fig 6 6 Web Viewer z Control Panel of Web Viewer Enable bidirectional audio When bidirectional audio is enabled voice from your PC is delivered to iCanView270 Capture and store the still image on your desk top screen Rev 2 0 Nov 2007 50 ...

Page 51: ... the button Shows the status of the sensor Blue color means that the sensor is in normal state while red color indicates alarm situation Number on the button indicates the number of sensor Move the center of the camera in up down left right directions Z Z Zoom in Z Zoom out Z F Move the focus to further position A F Auto focus F Move the focus to nearer position 6 4 How to upgrade iCanView270 firm...

Page 52: ...n is ief 4 When you ve found the file click Open This will select the file and close the Choose file dialogue window 5 Click the INSTALL button An alert message box will pop up Click OK button then it will start uploading the file This may take some time 6 Upgrade completion message will appear after the system upgrade has been completed 7 Reboot iCanView270 by performing System Reset 8 After rebo...

Page 53: ... the surface mount adaptor with 4pcs of screws on the place where you want to install FIG 4 2 When you use pipe please note the standard size of pipe FIG 5 3 You can re assemble the domes A 2 Set the DIP switches as in the following picture Ensure to set switch 1 to ON position while leaving the others to OFF position Rev 2 0 Nov 2007 53 ...

Page 54: ... the RS 485 communication channel to be 2400 bps 8 bit 1 stop bit no parity Wall Mounting using Wall Mount Bracket The wall should be strong enough to hold 4 times of the weight of the camera 5 3 KG This means that the wall should withstand weight of 21 2 KGs in the minimum Rev 2 0 Nov 2007 54 ...

Page 55: ...ll a corner mount adaptor on the corner of wall E 2 Use wall or gooseneck mount bracket to finish installation F Pole Mounting F 1 Install a pole mount adaptor on the pole F 2 Use wall or gooseneck mount bracket to finish installation Rev 2 0 Nov 2007 55 ...

Page 56: ...iCanView270 User s Guide Rev 2 0 Nov 2007 56 ...

Reviews: