background image


12

 
3-3 LED indicator 
 
In normal operating status, the LED light will be flashing in green; if there is no network, it 
shows a steady green. When there is an incoming call, LED light will be flashing rapidly. 
When the battery is low, LED light will be flashing in red. If the battery is required to be 
charged, it shows a steady red light. 
 
If SIM card is not inserted or installed properly, LED light will be flashing in blue. 


Chapter 4: Operation 

How to Setup Security Phone: 
 
Important Note Before You Start to Setup:   
There are two types of methods for setting up your Security Phone (to pre-program the Speed 
Dials, Text Messages and SOS dials.)    Please note that you may choose EITHER method 
that would work best for you. 
 
Setup Method I     
Place the SIM card in a regular mobile phone to setup 
 
1. Initiating the SIM card in Security Phone: 
Place the SIM card into the Security Phone and turn it on.    The Security Phone will format 
the SIM card memory and make it ready for setup.  When the initiation is finished, the 
Security Phone LED lights will flash in seven colors for about 3 seconds as the confirmation.   
You would need to know the password to proceed with each setting (the manufacturer 
password is preset as 0000).    
 
2. Use a regular mobile phone to setup: 
Next, remove the SIM card from Security Phone and place it into a regular mobile phone that 
has a display.    Follow the manufacturer’s password: 0000 to complete each setup.    See the 
setup reference table below for instructions to setup phone numbers and text messages.     
 
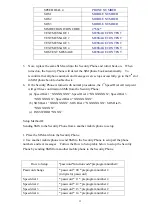
3. When finished entering all telephone numbers, escape from the Phone Book.    When 
finished entering all pre-setup text messages, escape from the Text Message Box. 

CHANGE PASSWORD   

0000 

SPEED DIAL 1 

PHONE NUMBER 

SPEED DIAL 2 

PHONE NUMBER 

SPEED DIAL 3 

PHONE NUMBER 

Summary of Contents for S 3300

Page 1: ...S Series Security Mobile Phone Model S 3300 User Manual...

Page 2: ...irbag of motor vehicle Do not attempt to disassemble the phone Any maintenance or repair should only be performed by authorized service personnel 4 FCC Regulations zThis mobile phone complies with par...

Page 3: ...t on a circuit different from that to which the receiver is connected Consult the dealer or an experienced radio TV technician for help Changes or modifications not expressly approved by the party res...

Page 4: ...Avoid high temperature 9 1 3 6 4 Privacy 9 1 3 6 5 SIM card password 9 Chapter 2 Function introduction 10 2 1 General 9 2 2 Text Message 9 2 3 Speed Dial keypads 9 2 4 Authorization 9 2 5 Setting conf...

Page 5: ...6 Speaker Volume 19 4 8 Switching to vibrate ring mode 20 4 9 Change Ring Volume 20 4 10 Setup confirmation 20 4 11 One way communication 21 4 12 Password 22 4 12 1 Change password 22 4 12 2 Forget pa...

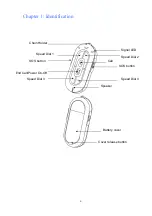
Page 6: ...6 Chapter 1 Identification SOS button Call End Call Power On Off Signal LED Chain Holder Speed Dial 1 Speed Dial 2 Speed Dial 3 Speed Dial 4 Speaker SOS button Battery cover Cover release button...

Page 7: ...ERIES Security Phone accessories It is suggested that use only S SERIES accessories for S SERIES Security Phone z Safety neck chain z Power charger z Li ion battery z Optional belt clip z Optional car...

Page 8: ...nge of setting in order to protect personal privacy and security 1 3 4 1 Original password Original password is 0000 Please change the password immediately after purchase Remember your new password si...

Page 9: ...e power cable and battery Step two Remove water from the phone and clean it with soft cloth Step three Dry the phone with fan and contact S SERIES customer service center immediately on phone number D...

Page 10: ...as a speed dial keypad for emergency case For example when a child is sick in school he she can use SOS Button sending pre programmed message to inform receivers It is suggested that the first receive...

Page 11: ...e to ensure the safety of S SERIES Security Phone When battery is installed LED light will be flashing and the phone is turned on This is to test whether the battery is correctly installed Please do n...

Page 12: ...Initiating the SIM card in Security Phone Place the SIM card into the Security Phone and turn it on The Security Phone will format the SIM card memory and make it ready for setup When the initiation i...

Page 13: ...ation SMS from the Security Phone a Speed Dial 1 XXXXXXXX Speed Dial 2 XXXXXXXX Speed Dial 3 XXXXXXXX Speed Dial 4 XXXXXXXX b SOS Dial 1 XXXXXXXX SOS Dial 2 XXXXXXXX SOS Dial 3 XXXXXXXX c PASSWORD XXX...

Page 14: ...r to receive a confirmation SMS for each setup afterwards Setup SOS receivers 1 Step one Access to write message function in mobile phone with display enter password 21 number Original password is 000...

Page 15: ...to write message function in mobile phone with display enter password 11 number Original password is 0000 Step two For example if your password is 0000 and the dial out number is 0930123456 Enter 000...

Page 16: ...rmation message will send to the pre programmed first receiver in a few seconds How to use Press third speed dial keypad then press dial out key to make calls Setup speed dial keypad 4 Step one Access...

Page 17: ...t Set up SMS 2 Step one Access to write message function in mobile phone with display enter password T2 number Original password is 0000 Step two For example if your password is 0000 and the SMS is Mu...

Page 18: ...one Access to write message function in mobile phone with display enter password T5 number Original password is 0000 Step two For example if your password is 0000 and the SMS is Mum I am sick Then yo...

Page 19: ...one with display enter password 21 number Original password is 0000 Step two For example if your password is 0000 and the first receiver number is 0915111111 Then you enter 0000 21 0915111111 Step thr...

Page 20: ...mple if your password is 0000 and the first receiver number is 0915111111 Then you enter 0000 23 0917111111 Step three Send the message to S SERIES Security Phone When the LED light is on setup is com...

Page 21: ...for selection Step three When you reach the desired ring type press receiving keypad 4 9 Change Ring Volume Step one press SOS Button on both sides Step two press speed dial key 3 to increase volume o...

Page 22: ...6999999 then you enter 0000 40 0916999999 Step three Send the message to S SERIES Security Phone When the LED light is on setup is completed Step four S SERIES Security Phone will auto call back to th...

Page 23: ...eiver 5 2 Charge the battery when power off Step one All light indicators are off at this moment Step two As shown in the diagram insert the charger to the re charge hole of the S SERIES Security Phon...

Page 24: ...rough this manual before using S SERIES Security Phone Suggestions S SERIES Security Phone is designed for children age of three or above Keep the phone in clean area Do not expose the phone to liquid...

Page 25: ...m handheld mobile phones SAR is the body radio frequent energy absorption measurement when using mobile phone SAR is the tested highest quality value in lab and the mobile phone is designed to connect...

Page 26: ...tempting any cleaning Do not use AC charger outdoor or in a wet environment Do not modify the power cable or plug Contact a qualified electrician if the plug does not fit to the power outlet Emergency...

Page 27: ...cess of 140 Turn off the phone before discharge the battery Use the battery as described in this manual Do not place battery in the mouth If the battery is damaged electrolyte may leak and cause perso...

Reviews: