background image


IVR  Quick  Start  Guide

 V1.0  P.8 


  ⑪                                                        ⑩                                    ⑨          ⑧  ⑦


  ②  ③              ④


⑥ 


  LOCK 

On / Off Key Lock in live mode. 

  USB 2.0 

USB port 


IR Sensor


Input sensor for the remote control


④ 

LED

 Display 

    (From left to right)


HDD

Hard disk drive 

Power

Power is on


LAN

Network connected 

LOGIN

User login 

REC

Recording


PLAY

DVR play video


  REW     

In PLAYBACK mode, press to play rewind 

4x, 8x, 16x, 32x 

  PLAY / PAUSE 

In PLAYBACK mode,

 p

ause / resume playback


  STOP 

In PLAYBACK mode,

 stop

 playback


  FF 

In PLAYBACK mode, press to play forwards

 4x, 8x, 16x, 32x 

  SEARCH 

In LIVE mode, press to display time search menu.


⑦ 

Arrow keys 

In  SETUP  mode, 

move  the  cursor up  / down,  reduce / increase 

the value of key.


  SEL 

In SETUP mode, press to enter sub-menu


  Number  0~

9、

10+


Select the full screen channel in live mode. 

Select the full screen channel in playback. 

  STATUS 

In live mode, enter the System Information menu 

  BACKUP 

In LIVE mode, press to display the BACKUP menu.


  MUTE 

In LIVE mode, enable/ disable live audio


  ZOOM 

In LIVE mode, enlarge the display of a channel.


  PIP 

In LIVE mode, display with picture in picture format.


⑩ 

FREEZE 

In LIVE mode, display can be FREEZE.


Summary of Contents for 24CH IVR

Page 1: ...IVR Quick Start Guide V1 0 P 1 24CH IVR Quick Start Guide 1 Packing P 1 2 Hard Disk Installation P 3 3 DVD RW Installation P 4 4 Front Panel Controls P 8 5 Rear Panel Connectors P 10...

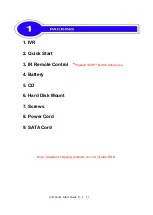
Page 2: ...Start Guide V1 0 P 2 1 IVR 2 Quick Start 3 IR Remote Control Pressed DVR1 Button before use 4 Battery 5 CD 6 Hard Disk Mount 7 Screws 8 Power Cord 9 SATA Cord Note Standard shipping products do not in...

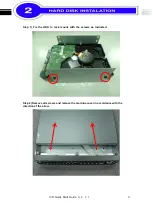
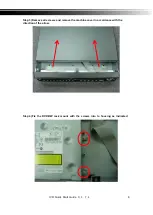
Page 3: ...IVR Quick Start Guide V1 0 P 3 3 Step 1 Fix the HDD to rack mount with the screws as indicated Step 2 Remove all screws and remove the machine cover in accordance with the direction of the arrow...

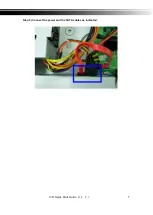
Page 4: ...HDD plate and screw it as indicated Step 4 Connect the power and the SATA cables as indicated Note After installation please initialize Hard Disk before starting to record For more detailed informati...

Page 5: ...ide V1 0 P 5 5 DVD RW Installation Standard shipping products do not include HDD and DVD RW Step 1 Remove the riser of DVR RW Step 2 Fix the DVD RW to rack mount with the screws as indicated Remove th...

Page 6: ...uick Start Guide V1 0 P 6 6 Step 3 Remove all screws and remove the machine cover in accordance with the direction of the arrow Step 4 Fix the DVD RW rack mount with the screws into to housing as indi...

Page 7: ...IVR Quick Start Guide V1 0 P 7 7 Step 5 Connect the power and the SATA cables as indicated...

Page 8: ...ACK mode press to play forwards 4x 8x 16x 32x SEARCH In LIVE mode press to display time search menu Arrow keys In SETUP mode move the cursor up down reduce increase the value of key SEL In SETUP mode...

Page 9: ...IVR Quick Start Guide V1 0 P 9 9 PTZ Display PTZ Menu ESC In SETUP mode Exit Return to previous setup menu MENU In LIVE mode press to display menu DVD Writer Optional DVD RW backup device Option...

Page 10: ...240V 4 AUDIO OUT RCA output port for audio signal 5 AUDIO IN RCA input port for audio signal 6 WAN Connect Router or Internet 7 VGA VGA Port 8 HDMI HDMI Port 9 USB 3 0 USB 3 0 Port 10 USB USB 2 0 Por...

Reviews: