ICX420GAP Manual
8
2 Installing the ICX420GAP Series AP
ICX420GAP Series can be installed indoor using one of two methods:
Wall hanging installation
T-keel installation
Wall Installation
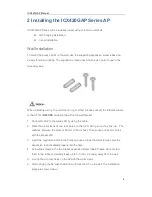
To mount the Access Point on the wall, use the supporting expansion screw tubes and
screws for wall mounting. The expansion screw tubes and screws can be found in the
accessory bag.
When installing using the wall mounting method, please connect the Ethernet cable
to the AP first
BEFORE
mounting the AP on the wall bracket.
1. Connect the AP to the wired LAN by using the cable
2. Mark the all positions of two rear holes on the AP making sure they line up. The
distance between the holes is 65 mm (2.55 inches). Then punch out the two holes
with the impact drill;
3. Insert the expansion bolt into the holes and use a rubber hammer to make sure the
expansion tube is seated properly into the hole.
4. Screw the screws in the two plastic expansion screw tubes. Please do not screw
them in the tubes completely, leave up to 3-5 mm (.2 inches) away from the wall;
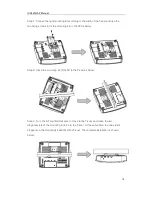
5. Line up the two rear holes on the AP with the wall screws.
6. After hanging the AP, push the AP down to lock the AP on the wall. The installation
steps are shown below:


