background image

11

OPERATOR MANUAL

 /  / -OB/

MACHINE COMPONENTS


20.
21.
22.
23.
24.
25.
26.
27.
28.
29.
30.
31.
32.
33.
34.
35.
36.
37.

OLD DESIGN

Control panel (see Panel components)
Emergency Stop Button (Drive Models) 
Main controller breaker
On-board battery charger / Window
Solution Tank Level / Drain Hose
Heavy Down Pressure Lever
Scrub Head Lift Pedal
Bumper Rollers
Squeegee Assembly
Squeegee Vacuum Hose
Filter Assembly
Ball Valve
Cargo Mesh Bag
Squeegee Lift Lever
Power cord, on-board Battery charger
Recovery Tank Drain Hose
Recovery Tank
Recovery Tank Cover

21.
22.
23.
24.
25.
26.
27.
28.
29.
30.
31.
32.
33.
34.
35.
36.
37.
38.

NEW DESIGN

Control panel (see Panel components)
Main controller breaker
Emergency Stop Button (Drive Models)
On-board battery charger / Window
Solution Tank Level / Drain Hose
Heavy Down Pressure Lever
Scrub Head Lift Pedal
Bumper Rollers
Squeegee Assembly
Squeegee Vacuum Hose
Filter Assembly
Ball Valve
Cargo Mesh Bag
Squeegee Lift Lever
Power cord, on-board Battery charger
Recovery Tank Drain Hose
Recovery Tank
Recovery Tank Cover

Summary of Contents for 20NBL+-OB

Page 1: ...i20NBL i20NBL OB i20NBTL i24BTL Auto Scrubber Operator Manual ...

Page 2: ......

Page 3: ...0 Fax 0769 81863000 Specifications and parts are subject to change without notice PROTECT THE ENVIRONMENT Please dispose of packaging materials old machine components such as bat teries hazardous fluids including antifreeze and oil in an environmentally safe way according to local waste disposal regulations Always remember to recycle ...

Page 4: ...ase fill out return your warranty card Please fill out at time of installation for future reference Model No ____________________________________________________ Serial No ____________________________________________________ Machine Options _______________________________________________ Sales Rep ___________________________________________________ Sales Rep Phone No ______________________________...

Page 5: ...d Driver or Brush Mounting the Squeegee Assembly Filling the Solution Tank MACHINE OPERATION Pre Operation Checks Operating the Machine WHILE OPERATING MACHINE Circuit Breaker Hour Meter TANK DRAINING Draining the recovery Tank Draining the solution Tank PREVENTATIVE MAINTENANCE Daily Maintenance Monthly Maintenance Machine Storage FAULT CODE SOLUTION BASIC TROUBLESHOOTING TECHNICAL SPECIFICATION ...

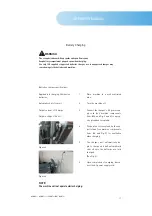
Page 6: ...around Do not operate on inclines that exceed 5 3 Before leaving or servicing machine Stop on level surface Turn off machine When servicing machine Read operators manual thoroughly prior to operating or servicing this machine Use manufacturer supplied or approved replacement parts Secure machine with wheel blocks prior to jacking the machine up Use approved jack or hoist to safely ele vate the mac...

Page 7: ...on Hazard Keep sparks and open flames away Keep battery compartment open when charging WARNING Flammable materials can cause an explosion or fire Do not use flammable materials in tanks WARNING Flammable materials or reactive metals can cause explosion or fire Do not pick up ...

Page 8: ...8 OPERATOR MANUAL i20NBL i20NBTL i20NBTL OB i24BTL 1 2 3 4 5 6 7 8 9 10 11 12 15 16 17 18 19 14 13 Old Design New Design ...

Page 9: ...h Caster 3 15 Inch Caster 2 Inch Squeegee Blade Adjustment i Synergy decal ICE Logo Hose Fill Port Squeegee Storage Bracket 1 2 3 4 5 6 7 8 9 10 11 12 13 14 15 16 17 18 19 20 NEW DESIGN Control Handle Control Handle Start Bail i SynergyTM ID card scanning area Recovery Tank Support Stand Vacuum Motor 24VDC Lithium ion Batteries Cleaner Group Option Bucket Fill Port Clean Out Port Solution Tank LED...

Page 10: ...10 OPERATOR MANUAL i20NBL i20NBTL i20NBTL OB i24BTL 20 21 22 23 24 25 26 27 28 31 32 33 34 35 29 30 36 37 Old Design New Design ...

Page 11: ... Valve Cargo Mesh Bag Squeegee Lift Lever Power cord on board Battery charger Recovery Tank Drain Hose Recovery Tank Recovery Tank Cover 21 22 23 24 25 26 27 28 29 30 31 32 33 34 35 36 37 38 NEW DESIGN Control panel see Panel components Main controller breaker Emergency Stop Button Drive Models On board battery charger Window Solution Tank Level Drain Hose Heavy Down Pressure Lever Scrub Head Lift...

Page 12: ...en Solution flow indicator Solution flow control button Solution flow control button Fault message display area Vacuum motor indicator 1 2 3 4 5 6 7 8 9 Vacuum motor switch Fault code Timer Speed control button Speed indicator Speed control button NOTE Decall i20NBTL is similar of i24BTL 10 11 12 13 14 15 2 3 1 5 6 7 9 10 8 11 12 4 2 3 1 10 13 15 9 12 11 7 5 6 8 14 4 ...

Page 13: ...BTL OB i24BTL Panel Components New Design i20NBL Calendar time Battery meter Solution flow control button Setting Vacuum motor switch Fault indicator 1 2 3 4 5 6 Power saving Custom Pattern Heavy load Timer Regulating detergent 7 8 9 10 11 ...

Page 14: ...nel Components New Design i20NBTL i24BTL Calendar time Battery meter Solution flow control button Setting Vacuum motor switch Fault indicator 1 2 3 4 5 6 Power saving Speed control button Heavy load Custom Pattern Timer Regulating detergent 7 8 9 10 11 12 ...

Page 15: ...n about machines usage and even specific timings Besides i SynergyTM also collects data on lithium ion battery vacuum motor brush deck motor drive wheel motor and other electrical components at least once every minute when the machine is in use and even during battery charging i SynergyTM will send notifications instantly to the ICE server in case of any malfunction ICE maintenance personnel will ...

Page 16: ...hine uses Lithium ion batteries the batteries are already in the machine upon delivery however you will need to connect the Lithium ion batteries to the machine Installing Batteries for i Synergy machines only Open recovery tank to gain access to bat tery compartment Place the battery brace at the rear of the batteries 1 2 WARNING Fire or Explosion Hazard Keep sparks and open flames away Keep batt...

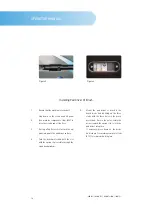
Page 17: ... current of 15 Amps Output voltage of 24 Volt 1 2 3 4 5 6 Place machine in a well ventilated area Turn the machine off Connect the charger s AC power sup ply cord see machine components item 34 and Fig 3 and 4 to a prop erly grounded receptable Prop up the recovery tank by the sup port stand see machine components item 4 and Fig 5 for ventilation when charging The charger will automatically be gin...

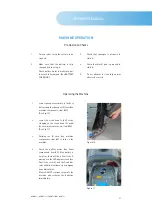
Page 18: ...ad to the pad driver surface Turn the brush motor hub until the slot with the spring clip is visible through the scrub head window 1 2 3 4 Mount the pad driver or brush to the brush motor hub by lining up the three studs with the three holes in the brush motor hub Once in the holes rotate the driver toward the spring clip to lock the pad driver into place If necessary press down on the motor hub l...

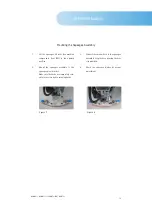
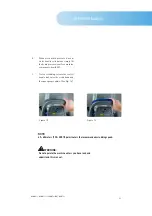
Page 19: ...item 33 to the upward position Mount the squeegee assembly to the squeegee pivot bracket Make sure the knobs are completely seat ed into the slots before securing knobs 1 2 Connect the vacuum hose to the squeegee assembly Loop the hose by using the hose clip provided Check the squeegee blades for proper adjustment 3 4 Figure 7 Figure 8 ...

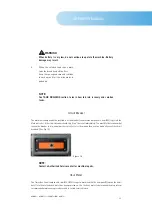
Page 20: ...k is empty Fill the solution tank to the 60L level on the solution tank sight gauge When using the bucket fill port stop filling when the level reaches the bottom edge of the fill port WARNING Do not put any flammable materials into solution tank This can cause an explosion or a fire Only use recommended cleaning chemicals Contact your janitorial supply distributor for recommendations on proper ch...

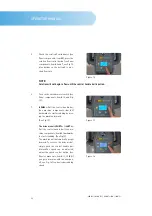
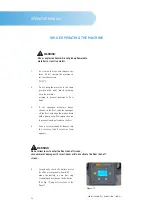
Page 21: ...y stepping on the scrub head lift pedal see machine components item 26 See Fig 11 Swiping the ID card see machine components item 3 to turn on the machine Check the battery meter see Panel components item 2 if the battery is very low there will be a Fault code message on the LED display screen see Fault code section and the Fault indi cator will blink contiunously accompany an audible alarm Please...

Page 22: ...13 i20NBL Pull the control handle bail see machine components item 2 backwards to start scrubbing by mov ing the machine forward See Fig 15 The drive model i20NBTL i24BTL Pull the control handle bail see ma chine components item 2 backwards to start scrubbing See Fig 15 The machine will automatically propel forward To reverse the drive model simply push the control handle bail forward The speed ca...

Page 23: ...re brush pressure is need ed for heavily soiled areas simply lift the down pressurelever see machine components item 25 To stop scrubbing release the control handle bail raise the scrub head and the squeegee assembly See Fig 16 8 9 WARNING Do not operate the machine unless you have read and understand this manual Figure 16 Figure 15 ...

Page 24: ...oor and wipe the blades down with a damp cloth Pre sweep the area to prevent leaving streaks on the floor Pour a recommended defoamer into the recovery tank if excessive foam appears WARNING Fire or explosion hazard Do not pick up flammable materials or reactive metals WARNING Do not allow foam to enter the float shut off screen vacuum motor damage will result Foam will not activate the float shut...

Page 25: ...ettable circuit breaker see machine components item 22 to protect the Main controller If the circuit breaker should trip it can t be reset immediately You must first determine what caused the breaker to trip and allow the controller to cool down and then you can manually reset the circuit breakers See Fig 18 The Timer see Panel components item 12 10 if you got a machine with the new panel records ...

Page 26: ...when the solution tank has been refilled foam or water may enter the float shutoff screen and cause damager to the vacuum motor Open the recovery tank cover and rin se out the tank Use a rag to remove any excess dirt Clean the float shut off screen and de bris tray located in the recovery tank With the squeegee and scrub head in their up position transport machine to approved area for draining tan...

Page 27: ...r of the filter assembly see machine components item 30 to drain the solution tank check the filter screen and clean it up if necessary See Fig 19 Rinse the solution tank with clean wa ter after every use This will help pre vent chemical build up and clogging of the solution lines After rinsing out the tank securely re connect the tank level hose to the hose fitting replace the filter assembly cov...

Page 28: ... disconnected WARNING Repairs are to be completed by Authorized service centers only Any repairs completed by unauthorized persons will not be covered by the warrenty Remove the float shut off assembly and rinse it out with clean water Clean machine with an approved cleaner and a damp towel Recharge the batteries Check the condition of the squeegee blade wiping edge rotate blade if worn 4 5 6 7 Mo...

Page 29: ...head and checking for wear or damage to four isolators in the front and four in the rear of the Orbital head The locations of the isolators are shown in figure For Orbital head you should have checked the eight isolators located in the Orbital head every 300 hours If storing in an area which may reach freezing temperatures be sure to drain all fluids from the machine pri or to storage Any damage c...

Page 30: ...ee Panel components item 6 Fault message display on the LED screen and the Fault indicator see Panel components item 6 will flash continuously accompany an audible alarm occasionally Once fault occuring please DO NOT continue operate the machine unless the fault are elim inated Turn off the machine then to solve the fault the fault code message will be eliminated when machine restart If the fault ...

Page 31: ...trol handle bail or lower the brush deck Turn off the machine and re start after a moment Drain recovery tank Charge the battery Charge Battery NOW Turn off the machine and re start after a moment Check the brush motor wiring Check the vacuum motor wiring Check the wiring contactors Check the wiring contactors Check the propel motor wiring x x x x x x x x x x x x x x x x x x x x x x x Brush deck i...

Page 32: ...l Unit Check Detergent Pump Check Detergent Pump Replace Panel or Re place controller unit Check lead wire and connector Check lead wire and connector Check lead wire and connector Check lead wire and connector Check propel motor wiring Proximity switch fault Operation mistake Emergency stop button activated Bad Control Unit Bad Control Unit Detergent Pump Short Circuit Detergent Pump Short Circui...

Page 33: ...24BTL FAULT CODE FAULT MESSAGE FAULT CAUSE SOLUTION Model i20NBL i20BTL i24BTL Brush Motor Short Circuit Vac Mtr Short Circuit Check the brush motor wiring Check the brush motor wiring x x x x Brush motor short circuit Vac Mtr Short Circuit F67 F69 ...

Page 34: ...Lower scrub head Faulty scrub head up down switch Contact ICE service center Faulty control handle bail switch Contact ICE service center Faulty brush motor or wiring Contact ICE service center Worn Motor carbon brushes Contact ICE service center Vacuum motor will not operate Faulty vacuum motor or wiring Contact ICE service center Worn Motor carbon brushes Contact ICE service center Little or no ...

Page 35: ... squeegee blade height Loose vacuum hose connections Secure hose connections Clogged vacuum hose Remove clogged debris Damaged vacuum hose Replace vacuum hose Recovery tank cover not in place Properly position cover Damaged recovery tank cover seal Replace seal Faulty vacuum motor Contact ICE service center Low battery charge Recharge batteries Short run time Low battery charge Fully recharge batt...

Page 36: ... Gal 60 L SQUEEGEE WIDTH 30 in 762 mm CLEANING PATH WIDTH 20 in 500 mm Disk 24 in 600 mm PRODUCTIVITY RATE 19 275ft2 1 800m2 h 23 680ft2 2 200m2 h 28 000ft2 2 600m2 h DRIVE SYSTEM Brush Assisted Transaxle 0 27hp 0 2KW TRAVEL SPEED MAXIMUM N A 246ft min 75 min MINIMUM AISLE TURN 63 in 1 600 mm PAD BRUSH PRESSURE 65lbs 30kg min 100lbs 45kg max SOLUTION FLOW RATE 0 0 37Gal min 0 1 400ml min BRUSH MOT...

Page 37: ...37 OPERATOR MANUAL i20NBL i20NBTL i20NBTL OB i24BTL MODEL i20NBL Brush Assist i20NBTL W Drive i24BTL Dual Disk VOLTAGE DC 24V DECIBEL RATE AT OPERATORS EAR INDOORS 68dB A 68dB A GRADE LEVEL MAX 5 3 ...

Page 38: ...0NBL BEARING BALL 6004 8 WHEEL WHEEL 8 INCH i20NBTL i24BTL PROTECTIVE WHEEL SQUEEGEE BLADE FRONT LINATEX SQUEEGEE BLADE REAR LINATEX 20 BRUSH i20NBL NBTL 20 BRUSH i20NBL NBTL OPTIONAL 12 BRUSH i24BTL 19 PAD HOLDER i20NBL NBTL 19 PAD HOLDER i20NBL NBTL OPTIONAL 11 PAD HOLDER i24BTL 11 PAD HOLDER i24BTL OPTIONAL ISOLATORS M10 25 i20NBTL OB ISOLATORS M10 25 i20NBTL OB WEAR AND TEAR PARTS LIST DIA NO ...

Page 39: ...39 OPERATOR MANUAL i20NBL i20NBTL i20NBTL OB i24BTL ...

Page 40: ...40 CE APPROVAL i20NBL i20NBTL i20NBTL OB i24BTL ...

Page 41: ...41 CE APPROVAL i20NBL i20NBTL i20NBTL OB i24BTL ...

Page 42: ...020 31 0 800 9099 info emea icerobo com cc icerobo com ICE Robotics USA 101 E Roosevelt Zeeland MI 49464 833 ICE ROBO info us icerobo com ICE Robotics China 2F Building 5 1151 Lianxi Road Pudong Shanghai China 86 138 1611 1119 marketing icecompanies com Smarter Cleaning Brighter Future ...

Reviews: